E
N
U
 Buy printed version
of the bibles
Buy high res images
Search the site
![[All You Need To Know About Car Tyres (Tires) And Wheels.]](tyre_bible_files/thewheelandtyrebible.gif)
DISCLAIMER:I
am in no way affiliated with any branch of the motor industry. I am
just a pro-car, pro-motorbike petrolhead :-) The information on these
pages is the result of a lot of information-gathering and research.
This website was originally established in 1994 to answer a lot of FAQs
from posters on the old transport-related usenet groups. By reading
these pages, you agree to indemnify, defend and hold harmless me
(Christopher J Longhurst), any sponsors and/or site providers against
any and all claims, damages, costs or other expenses that arise
directly or indirectly from you fiddling with your car or motorbike as
a result of what you read here. In short : the advice here is worth as
much as you are paying for it.
One more thing : the Google ads are
only at the top of the page here - I need to pay for my site space and
bandwidth somehow. The rest of the page is ad-free for your reading
pleasure.
 |  |  |  |
Are you confused by your car's tyres? (or tires if you're American). Don't know your rolling radius from your radial? Then take a good long look through this page where I hope to be able to shift some of the mystery from it all for you. At the very least, you'll be able to sound like you know what you're talking about the next time you go to get some new tyres.
It's confusing isn't it? All numbers, letters, symbols, mysterious codes. Actually, most of that information is surplus to what you need to know. So here's the important stuff:
![[your tyre]](tyre_bible_files/your_tyre.gif) |
Key | Description |
|---|---|---|
| A | Manufacturers or brand name, and commercial name or identity. | |
| B and J | Tyre size, construction and speed rating designations. Tubeless designates a tyre which requires no inner tube. See tyre sizes and speed ratings below. | |
| C | Denotes type of tyre construction. | |
| D | M&S denotes a tyre designed for mud and snow. Reinforced marking only where applicable. | |
| E | Load and pressure marking requirement (not applicable in the UK). These go from a load index of 50 (190kg) up to an index of 169 (5800kg). | |
| F | ECE (not EEC) type approval mark and number. | |
| G | North American Dept of Transport compliance symbols and identification numbers. | |
| H | Country of manufacture. |
Also on the sidewall, you might find the following info embossed in the rubber.
The temperature rating - an indicator of how well the tire withstands
heat buildup. "A" is the highest rating; "C" is the lowest.
The traction rating - an indicator of how well the tire is capable of
stopping on wet pavement. "A" is the highest rating; "C" is the lowest.
The tread-wear rating - a comparative rating for the useful life of the
tire's tread. A tire with a tread-wear rating of 200, for example,
could be expected to last twice as long as one with a rating of 100.
Tread-wear grades typically range between 60 and 600 in 20-point
increments. It is important to consider that this is a relative
indicator, and the actual life of a tire's tread will be affected by
quality of road surfaces, type of driving, correct tire inflation,
proper wheel alignment and other variable factors. In other words,
don't think that a tread-wear rating of 100 means a 30,000 mile tyre.
Encoded in the US DOT information (G on the diagram above) is a
two-letter code that identifies where the tyre was manufactured in
detail. In other words, what factory and in some cases, what city it
was manufactured in. It's the first two letters after the 'DOT' - in
this case "FA" denoting Yokohama.
This two-letter identifier is worth knowing in case you see a tyre
recall on the evening news where they tell you a certain factory is
recalling tyres. Armed with the two-letter identifier list, you can
figure out if you are affected. It's a nauseatingly long list, and I've
not put it on this page. But if you click here it will popup a separate window with just those codes in it.
As part of the DOT code (G above), there is a tyre manufacture date
stamped on the sidewall. Take a look at yours - there will be a three-
or four-digit code. This code denotes when the tyre was manufactured,
and as a rule-of-thumb, you should never
use tyres more than 6 years old. The rubber in tyres degrades over
time, irrespective of whether the tyre is being used or not. When you
get a tyre change, if you can, see if the tyre place will allow you to
inspect the new tyres first. It's not uncommon for these shops to have
stuff in stock which is more than 6 years old. The tyre might look
brand new, but it will delaminate or have some other failure within
weeks of being put on a vehicle.
Reading the code. The code is pretty simple. The three-digit code was for tyres manufactured before 2000. So for example 1 7 8 means it was manufactured in the 17th week of 8th year of the decade. There was no way of determining which decade, so in fact, 1 7 8 could mean the 17th week of 1988....Good tip : if the tyre has a 3-digit code, don't buy it!!
After 2000, the code was switched to a 4-digit code. Same rules apply, so for example 3 0 0 3 means the tyre was manufactured in the 30th week of 2003.
The calculation built in to this page is up-to-date based on today's
date. If the DOT age code on your tyres is older than this code, change
your tyres.
Interesting note : in June 2005, Ford and GM admitted that tyres older than 6 years posed a hazard and from their 2006 model year onwards, started printing warnings to this effect in their drivers handbooks for all their vehicles.
When I moved to America, I noticed a lot of tyre shops offering tyres
with x,000 mile guarantees. For example, Big-O offer a 60,000 mile
guarantee on one of their tyres. It amazed me that anyone would be
foolish enough to put a guarantee on a consumable product given that
the life of the tyre is entirely dependent on the suspension geometry
of the car it is being used on, the style of driving, the types of
road, and the weather. Yet Big-O offer an unconditional* guarantee that
this tyre will not puncture or lose its tread within 60,000 miles.
There's the catch though. The '*' after the word "unconditional" takes
you elsewhere on their information flyer, to the conditions attached to
the unconditional guarantee. If you want to claim on that guarantee,
typically you'll have to prove the tyres were inflated to the correct
pressure all the time, prove they were rotated every 3000 miles, prove
the suspension geometry of your car has always been 100%, prove you
never drove over 80mph, prove you never left them parked in the baking
hot sun or freezing cold ice, and prove you never drove on the
freeways. Given that you can't prove any of this, the guarantee is,
therefore, worthless.
Don't be taken in by this - it's a sales ploy and nothing more. Nobody
- not even the manufacturers - can guarantee that their tyre won't
de-laminate or catch a puncture the moment you leave the tyre shop.
Okay, so you look at your car and discover that it is shod with a nice, but worn set of 185-65HR13's. Any tyre mechanic will tell you that he can replace them, and he will. You'll cough up and drive away safe in the knowledge that he's just put some more rubber on each corner of the car that has the same shamanic symbols on it as those he took off. So what does it all mean?
| 185 | 65 | H | R | 13 |
|---|---|---|---|---|
| This is the width in mm of the tyre from sidewall to sidewall when it's unstressed and you're looking at it head on (or top-down). This is known as the section width. | This is the ratio of the height of the tyre sidewall, (section height), expressed as a percentage of the width. It is known as the aspect ratio. In this case, 65% of 185mm is 120.25mm - the section height. | This is the speed rating of the tyre. | This tells you that the tyre is a radial construction. Check out tyre construction if you want to know what that means. | This is the diameter in inches of the rim of the wheel that the tyre has been designed to fit on. Don't ask me why tyre sizes mix imperial and metric measurements. They just do. Okay? |
More recently, there has been a move (especially in Europe) to adjust tyre designations to conform to DIN (Deutsche Industrie Normal). This means a slight change in the way the information is presented to the following:
| 185 | 65 | R | 13 | 91 | V |
|---|---|---|---|---|---|
| Section width | Aspect ratio | Radial | Rim diameter | load rating | speed rating. |
What ho. Fabulous morning for a ride in the Bentley. Problem is your
1955 Bentley is running on 7.6x15 tyres. What, you ask, is 7.6x15? Well
it's for older vehicles with imperial measurements and crossply tyres.
Both measurements are in inches - in this case a 7.6inch tyre designed
to fit a 15inch wheel. There is one piece of information missing though
- aspect ratio. Aspect ratios only began to be reduced at the end of
the 1960s to improve cornering. Previously no aspect ratio was given on
radial or crossply tyres. For crossply tyres, the initial number is
both the tread width and the sidewall height. So in my example, 7.6x15
denotes a tyre 7.6 inches across with a sidewall height which is also
7.6 inches. After conversion to the newer notation, this is the
equivalent to a 195/100R15. If you're plugging numbers into the tyre
size calculator lower down this page, I've included an aspect ratio
value of 100 for imperial calculations.
Here is a javascript calculator to turn your imperial tyre size into a metric tyre size:
Remember above that I said aspect ratios only started to come into play in the 1960s? Unlike the 100% aspect ratio for crossply tyres, for radial tyres, it's slightly different - here an aspect ratio of 80% is be assumed. So for example, if you come across on older tyre with 185R16 stamped on it, this describes a tyre with a tread width of 185mm and a sidewall height which is assumed to be 80% of that; 148mm. If you're plugging vintage radial numbers into the tyre size calculator lower down this page, I've included an aspect ratio value of 80 for these calculations.
Fab! You've bought a BMW 525TD. Tyres look a bit shoddy so you go to
replace them. What the....? TD230/55ZR390? What the hell does that
mean? Well my friend, you've bought a car with metric tyres. Not that
there's any real difference, but certain manufacturers experiment with
different things. For a while, (mid 1990s) the 525TD came with arguably
experimental 390x180 alloy wheels. These buggers required huge and
non-conformal tyres. I'll break down that classification into chunks
you can understand with your new-found knowledge:
TD - ignore that. 230 = cross section 230mm. 55 = 55% sidewall height.
Z=very high speed rating. R390=390mm diameter wheels. These are the
equivalent of about a 15.5" wheel. There's a nice standard size for
you. And you, my friend, have bought in to the long-raging debate about
those tyres. They are an odd size, 180x390. Very few manufacturers make
them now and if you've been shopping around for them, you'll have had
the odd heart-stopper at the high price. The advice from the BMWcar magazine forum
is to change the wheels to standard sized 16" so there's more choice of
tyres. 215-55R16 for example. The technical reason for the 390s
apparently is that they should run flat in the event of a puncture but
that started a whole debate on their forum and serious doubts were
expressed. You've been warned...
If you're European, you'll know that there's one country bound to throw a spanner in the works of just about anything. To assist BMW in the confusion of buyers everywhere, the French, or more specifically Michelin have decided to go one step further out of line with their Pax tyre system. See the section later on to do with run-flat tyres to find out how they've decided to mark their wheels and tyres.
 On
older Land Rovers, you'll often find tyres with a size like 750x16.
This is another weird notation which defies logic. In this case, the
750 refers to a decimalised notation of an inch measurement. 750 = 7.50
inches, referring to the "normal inflated width" of the tyre - i.e. the
external maximum width of the inflated, unladen tyre. (This is
helpfully also not necessarily the width of the tread itself). The 16
still means 16 inch rims. Weird eh? The next question if you came to
this page looking for info on Land Rover tyres will be "What size tyre
is that the equivalent of in modern notation?". Simple. It has no
aspect ratio and the original tyres would likely be cross-ply, so from
what you've learned a couple of paragraphs above, assume 100% aspect
ratio. Convert 7.5inches to be 190mm. That gives you a 190/100 R16
tyre. (You could use the calculator in the section on Classic / vintage / imperial crossply tyre sizes above to get the same result.)
On
older Land Rovers, you'll often find tyres with a size like 750x16.
This is another weird notation which defies logic. In this case, the
750 refers to a decimalised notation of an inch measurement. 750 = 7.50
inches, referring to the "normal inflated width" of the tyre - i.e. the
external maximum width of the inflated, unladen tyre. (This is
helpfully also not necessarily the width of the tread itself). The 16
still means 16 inch rims. Weird eh? The next question if you came to
this page looking for info on Land Rover tyres will be "What size tyre
is that the equivalent of in modern notation?". Simple. It has no
aspect ratio and the original tyres would likely be cross-ply, so from
what you've learned a couple of paragraphs above, assume 100% aspect
ratio. Convert 7.5inches to be 190mm. That gives you a 190/100 R16
tyre. (You could use the calculator in the section on Classic / vintage / imperial crossply tyre sizes above to get the same result.)
Generally speaking, the Land Rover folks reckon a 265/65R16 is a good
replacement, although the tread is slightly wider and might give some
fouling problems on full lock. It's also 5% smaller in rolling radius
so your speed will over-read by about 4mph at 70mph.
If you're really into this stuff, you ought to read Tom Sheppard's Off Roader Driving
(ISBN 0953232425). It's a Land Rover publication first published in
1993 as "The Land Rover Experience". It's been steadily revised and you
can now get the current edition from Amazon. I've even helpfully
provided you with this link so you can go straight to it....
All tyres are rated with a speed letter. This indicates the maximum speed that the tyre can sustain for a ten minute endurance without coming to pieces and destroying itself, your car, the car next to you and anyone else within a suitable radius at the time.
| Speed Symbol | Max Car Speed Capability | Speed Symbol | Max Car Speed Capability | ||
|---|---|---|---|---|---|
| Km/h | MPH | Km/h | MPH | ||
| L | 120 | 75 | S | 180 | 113 |
| M | 130 | 81 | T | 190 | 118 |
| N | 140 | 87 | U | 200 | 125 |
| P | 150 | 95 | H | 210 | 130 |
| Q | 160 | 100 | V | 240 | 150 |
| R | 170 | 105 | W | 270 | 168 |
| Z | 240+ | 150+ | |||
'H' rated tyres are becoming the most commonplace and widely used tyres, replacing 'S' and 'T' ratings. Percentage-wise, the current split is something like this: S/T=67%, H=23%, V=8%. Certain performance cars come with 'V' or 'Z' rated tyres as standard. This is good because it matches the performance capability of the car, but bad because you need to re-mortgage your house to buy a new set of tyres.
The UTQG - Uniform Tyre Quality Grade - test is required of all dry-weather tyres ("snow" tyres are exempt) before they may be sold in the United States. This is a rather simple-minded test that produces three index numbers : Tread life, Traction and Temperature.
There are some exceptions: Yokohama A008's are temperature rated "C" yet are sold as "H" speed rated tyres. These UTQC tests should be used only as a rough guide for stopping. If you drive in the snow, seriously consider a pair of (if not four "Snow Tyres" Like life, this tyre test is entirely subjective.
The load index on a tyre is a numerical code associated with the
maximum load the tyre can carry. These are generally valid for speed
under 210km/h (130mph). Once you get above these speeds, the
load-carrying capacity of tyres decreases and you're in highly
technical territory the likes of which I'm not going into on this page.
The table below gives you most of the Load Index (LI) values you're
likely to come across. For the sake of simplicity, if you know your car
weighs 2 tons - 2000kg - then assume an even weight on each wheel. 4
wheels at 2000kg = 500kg per wheel. This is a load rating of 84. The
engineer in you should add 10% or more for safety's sake. For this
example, I'd probably add 20% for a weight capacity of 600kg - a load
rating of 90. Generally speaking, the average car tyre is going to have
a much higher load rating than you'd ever need. It's better to have
something that will fail at speeds and stress levels you physically
can't achieve, than have something that will fail if you nudge over
60mph with a six pack in the trunk.
|
|
|
|
|
|
|
|
|
|
|
Simply put, if you bought a car in the last 20 years or so, you should be riding on radial tyres. If you're not, then it's a small miracle you're still alive to be reading this. Radial tyres wear much better and have a far greater rigidity for when cars are cornering and the tyres are deforming.


| Cross-ply components | Radial components |
|---|---|
| The tread consists of specially compounded/vulcanised rubber which can have unique characteristics ranging from wear resistance, cut resistance, heat resistance, low rolling resistance, or any combination of these. The purpose of the tread is to transmit the forces between the rest of the tyre and the ground. | |
| The sidewall is a protective rubber coating on the outer sides of the tyre. It is designed to resist cutting, scuffing, weather checking, and cracking. | |
| The chafer protects the bead and body from chafing (wear from rubbing) where the tyre is in contact with the rim. | The chafer of a radial tire acts as a reinforcement. It increases the overall stiffness of the bead area, which in turn restricts deflection and deformation and increases the durability of the bead area. It also assists the bead in transforming the torque forces from the rim to the radial ply. |
| The liner is an integral part of all tubeless pneumatic tires. It covers the inside of the tire from bead to bead and prevents the air from escaping through the tire. | |
| The bead of a cross-ply tyre consists of bundles of bronze coated high tensile strength steel wire strands which are insulated with rubber. A cross-ply tyre designed for off-road use typically has two or three bundles. A radial on-road tyre normally only has one. The bead is considered the foundation of the tire. It anchors the bead on the rim. | |
| The cord body is also known as the tyre carcass. It consists of layers of nylon plies. The cord body confines the pressure, which supports the tyre load and absorbs shocks encountered during driving. Each cord in each ply is completely surrounded by resilient rubber. These cords run diagonally to the direction of motion and transmit the forces from the tread down to the bead. | The body ply of a radial tire is made up of a single layer of steel cord wire. The wire runs from bead to bead laterally to the direction of motion (hence the term "radial plies"). The body ply is a primary component restricting the pressure which ultimately carries the load. The body ply also transmits the forces (torque, torsion, etc.) from the belts to the bead and eventually to the rim. |
| The breakers are also know as belts. They provide protection for the cord body from cutting. They also increase tread stability which resists cutting. Breakers can be made of nylon, aralon, or steel wire. | The belts are layers of steel cord wires located between the tread and the body ply. Off-road tyres can have up to five belts. Road tyres typically have one or two. The steel wire of the belts run diagonally to the direction of motion. The belts increase the rigidity of the tread which increases the cut resistance of the tire. They also transmit the torque forces to the radial ply and restrict tire growth which prevents cutting, cut growth and cracking. |
This little table gives you some idea of the advantages and disadvantages of the two types of tyre construction. You can see the primary reasons why radial tyres are almost used on almost all the world's passenger vehicles now, including their resistance to tearing and cutting in the tread, as well as the better overall performance and fuel economy.
| Cross-ply | Radial | |
|---|---|---|
| Vehicle Steadiness |  |  |
| Cut Resistance - Tread | | |
| Cut Resistance - Sidewall | | |
| Repairability | | |
| Self Cleaning | | |
| Traction | | |
| Heat Resistance | | |
| Wear Resistance | | |
| Flotation | | |
| Fuel Economy | | |
You thought tread was the shape of the rubber blocks around the outside
of your tyre didn't you? Well it is, but it's also so much more. The
proper choice of tread design for a specific application can mean the
difference between a comfortable, quiet ride, and a piss poor excuse
for a tyre that leaves you feeling exhausted whenever you get out of
your car.
A proper tread design improves traction, improves handling and
increases Durability. It also has a direct effect on ride comfort,
noise level and fuel efficiency. Believe it or not, each part of the
tread of your tyre has a different name, and a different function and
effect on the overall tyre. Your tyres might not have all these
features, but here's a rundown of what they look like, what they're
called and why the tyre manufacturers spend millions each year fiddling
with all this stuff.

Sipes
are the small, slit-like grooves in the tread blocks that allow the
blocks to flex. This added flexibility increases traction by creating
an additional biting edge. Sipes are especially helpful on ice, light
snow and loose dirt.
Grooves create voids for better water
channeling on wet road surfaces (like the Aquachannel tyres below).
Grooves are the most efficient way of channeling water from in front of
the tyres to behind it. By designing grooves circumferentially, water
has less distance to be channeled.
Blocks are the segments that make up the majority of a tyre's tread. Their primary function is to provide traction.
Ribs are the straight-lined row of blocks that create a circumferential contact "band."
Dimples are the indentations in the tread, normally towards the outer edge of the tyre. They improve cooling.
Shoulders
provide continuous contact with the road while maneuvering. The
shoulders wrap slightly over the inner and outer sidewall of a tyre.
The Void Ratio
is the amount of open space in the tread. A low void ratio means a tyre
has more rubber is in contact with the road. A high void ratio
increases the ability to drain water. Sports, dry-weather and high
performance tyres have a low void ratio for grip and traction.
Wet-weather and snow tyres have high void ratios.
There are hundreds if not thousands of tyre tread patterns available. The actual pattern itself is a mix of functionality and aesthetics. Companies like Yokohama specialise in high performance tyres with good-looking tread patterns. Believe it or not, the look of the pattern is very important. People want to be safe with their new tyres, but there's a vanity element to them too. For example, in the following comparison, which would you prefer to have on your car?

The thought process you're going through whilst looking at those two
tyres is an example of the sort of thing the tyre manufacturers are
interested in. Sometimes they have focus groups and public
show-and-tells for new designs to gauge public reaction. For example,
given the choice, I'd prefer the tread pattern on the right. The
challenge for the manufacturers is to make functionally safe tyres
without making them look like a random assortment of rubber that's just
been glued to a wheel in a random fashion.
In amongst all this, there are three basic types of tread pattern that the manufacturers can choose to go with:
Symmetrical: consistent across the tyre's face. Both halves of the treadface are the same design.
Asymmetrical:
the tread pattern changes across the face of the tyre. These designs
normally incorporates larger tread blocks on the outer portion for
increased stability during cornering. The smaller inner blocks and
greater use of grooves help to disperse water and heat. Asymmetrical
tyres tend to also be unidirectional tyres.
Unidirectional:
designed to rotate in only one direction, these tyres enhance
straight-line acceleration by reducing rolling resistance. They also
provide shorter stopping distance. Unidirectional tyres must be
dedicated to a specific side of the vehicle, so the information on the
sidewall will always include a rotational direction arrow. Make sure
the tyres rotate in this direction or you'll get into all sorts of
trouble.

![[aquatread]](tyre_bible_files/aquatread.gif) In the last few years, there has been a gradually increasing trend for
manufacturers to design and build so-called aquachannel tyres. Brand
names you might recognise are Goodyear Aquatread and Continental Aquacontact.
These differ noticeably from the normal type of tyre you would expect
to see on a car in that the have a central groove running around the
tread pattern. This, combined with the new tread patterns themselves
lead the manufacturers to startling water-removal figures. According to
Goodyear, their versions of these tyres can expel up to two gallons of
water a second from under the tyre when travelling at motorway speeds.
My personal experience of these tyres is that they work. Very well in
fact - they grip like superglue in the wet. The downside is that they
are generally made of a very soft compound rubber which leads to
greatly reduced tyre life. You've got to weigh it up - if you spend
most of the year driving around in the wet, then they're possibly worth
the extra expense. If you drive around over 50% of the time in the dry,
then you should think carefully about these tyres because it's a lot of
money to spend for tyres which will need replacing every 10,000 miles
in the dry.
In the last few years, there has been a gradually increasing trend for
manufacturers to design and build so-called aquachannel tyres. Brand
names you might recognise are Goodyear Aquatread and Continental Aquacontact.
These differ noticeably from the normal type of tyre you would expect
to see on a car in that the have a central groove running around the
tread pattern. This, combined with the new tread patterns themselves
lead the manufacturers to startling water-removal figures. According to
Goodyear, their versions of these tyres can expel up to two gallons of
water a second from under the tyre when travelling at motorway speeds.
My personal experience of these tyres is that they work. Very well in
fact - they grip like superglue in the wet. The downside is that they
are generally made of a very soft compound rubber which leads to
greatly reduced tyre life. You've got to weigh it up - if you spend
most of the year driving around in the wet, then they're possibly worth
the extra expense. If you drive around over 50% of the time in the dry,
then you should think carefully about these tyres because it's a lot of
money to spend for tyres which will need replacing every 10,000 miles
in the dry.
![[twintyre2]](tyre_bible_files/twintyre2.jpg)
![[twintyre1]](tyre_bible_files/twintyre1.gif) This
is an idea from the USA based on the twin tyres used in Western
Australia on their police vehicles. It's long been the practice for
closed-wheel racing cars, such as Nascar vehicles, to use two inner
tubes inside each tyre, allowing for different pressures inside the
same tyre. They also allow for proper run-flat puncture capability.
Well, it seems that TwinTires
have put the same principle into effect for those of us with road-going
cars. Their system uses specially designed wheel rims to go with their
own unique type of tyres. Each wheel rim is actually molded as two
half-width rims joined together. The TwinTires tyres then fit these
double rims. Effectively, you're getting two independent tyres per
wheel, each with their own inner tube or tubeless pressure. The most
obvious advantage of this system is that it is an almost failsafe
puncture proof tyre. As most punctures are caused by single objects
entering the tyre at a single point, with this system, only one tyre
will deflate, leaving the other untouched so that your vehicle is still
controllable. TwinTires themselves actually claim a reduction in
braking distance too. Typically from 150ft down to 120ft when braking
from a fixed 70mph. The other advantage is that the system is
effectively an evolution of the Aquatread type single tyres that can be
bought over the counter. In the dry, you have more or less the same
contact area as a normal tyre. In the wet, most of the water is
channeled into the gap between the two tyres leaving (supposedly) a
much more efficient wet contact patch. Time will tell whether this
system is just a passing fad or if it will take off as a viable
alternative to the standard wheel/tyre combos that we all use. Typical
tyre sizes are 125/85-R16 and 125/90-R16 (Yokohama and Avon).
This
is an idea from the USA based on the twin tyres used in Western
Australia on their police vehicles. It's long been the practice for
closed-wheel racing cars, such as Nascar vehicles, to use two inner
tubes inside each tyre, allowing for different pressures inside the
same tyre. They also allow for proper run-flat puncture capability.
Well, it seems that TwinTires
have put the same principle into effect for those of us with road-going
cars. Their system uses specially designed wheel rims to go with their
own unique type of tyres. Each wheel rim is actually molded as two
half-width rims joined together. The TwinTires tyres then fit these
double rims. Effectively, you're getting two independent tyres per
wheel, each with their own inner tube or tubeless pressure. The most
obvious advantage of this system is that it is an almost failsafe
puncture proof tyre. As most punctures are caused by single objects
entering the tyre at a single point, with this system, only one tyre
will deflate, leaving the other untouched so that your vehicle is still
controllable. TwinTires themselves actually claim a reduction in
braking distance too. Typically from 150ft down to 120ft when braking
from a fixed 70mph. The other advantage is that the system is
effectively an evolution of the Aquatread type single tyres that can be
bought over the counter. In the dry, you have more or less the same
contact area as a normal tyre. In the wet, most of the water is
channeled into the gap between the two tyres leaving (supposedly) a
much more efficient wet contact patch. Time will tell whether this
system is just a passing fad or if it will take off as a viable
alternative to the standard wheel/tyre combos that we all use. Typical
tyre sizes are 125/85-R16 and 125/90-R16 (Yokohama and Avon).
For an independent opinion on TwinTyre systems from someone who's been using them since the year dot, have a read of his e-mail to me which has a lot of information in it.
Yikes! Tyres for the accident-prone. As it's name implies, it's a tyre
designed to run when flat. ie. when you've driven over a cunningly
placed plank full of nails, you can blow out the tyre and still drive
for miles without needing to repair or re-inflate it. I should just put
one thing straight here - this doesn't mean you can drive on forever
with a deflated tyre. It means you won't careen out of control across
the motorway and nail some innocent wildlife when you blowout a tyre.
It's more of a safety thing - it's designed to allow you to continue
driving to a point where you can safely get the tyre changed (or
fixed). The way it works is to have a reinforced sidewall on the tyre.
When a normal tyre deflates, the sidewalls squash outwards and are
sliced off by the wheel rims, wrecking the whole show. With run-flat
tyres, the reinforced sidewall maintains some height in the tyre
allowing you to drive on. A pressure sensor is strapped ![[runflat]](tyre_bible_files/runflat.gif) to the inside of the wheel rim and is activated by centrifugal forces
once the speed of the vehicle is above 5mph. It then samples the
pressure once a minute for 4 minutes, and then the temperature once
every 5 minutes. The information from all 4 wheels is relayed by radio
to a dash-mounted readout for the driver's information. Of course, in
normal use, this also means that the driver knows what all 4 tyre
pressures are for everyday use. It means they're far less likely to get
up one day and find one tyre with such low pressure that it's not
possible to drive to a garage to re-inflate it. With run-flat tyres,
that also becomes a bit of a moot point.
to the inside of the wheel rim and is activated by centrifugal forces
once the speed of the vehicle is above 5mph. It then samples the
pressure once a minute for 4 minutes, and then the temperature once
every 5 minutes. The information from all 4 wheels is relayed by radio
to a dash-mounted readout for the driver's information. Of course, in
normal use, this also means that the driver knows what all 4 tyre
pressures are for everyday use. It means they're far less likely to get
up one day and find one tyre with such low pressure that it's not
possible to drive to a garage to re-inflate it. With run-flat tyres,
that also becomes a bit of a moot point.
Both Goodyear (Run-flat Radials) and Michelin (Zero Pressure System) have introduced run-flat tyres to their ranges this year. The Michelin tyre technology cutaway explains it all much better than I can. Check it out here.
![[pax system]](tyre_bible_files/paxsystem.gif) Not content with their Zero Pressure System, Michelin developed the PAX system
too in late 2000 which is a variation on a theme. Rather than
super-supportive sidewalls, the PAX system relies on a wheel-rim and
tyre combination to provide a derivative run-flat capability. As well
as the usual air-filled tyre, there is now a reinforced polymer support
ring inside. This solid ring clips the air-filled tyre by it's bead to
the wheel rim which is the first bonus - it prevents the air-filled
tyre from coming off the rim. The second bonus, of course, is that if
you get a puncture, the air-filled tyre deflates, and the support ring
takes the strain. Michelin say this system is good for over 100 miles
at 80km/h (50mph)!
Not content with their Zero Pressure System, Michelin developed the PAX system
too in late 2000 which is a variation on a theme. Rather than
super-supportive sidewalls, the PAX system relies on a wheel-rim and
tyre combination to provide a derivative run-flat capability. As well
as the usual air-filled tyre, there is now a reinforced polymer support
ring inside. This solid ring clips the air-filled tyre by it's bead to
the wheel rim which is the first bonus - it prevents the air-filled
tyre from coming off the rim. The second bonus, of course, is that if
you get a puncture, the air-filled tyre deflates, and the support ring
takes the strain. Michelin say this system is good for over 100 miles
at 80km/h (50mph)!
Remember up the top of this page where I was talking about tyre sizes and mentioned that Michelin had come up with a new 'standard' ? Imagine you're used to seeing tyre sizes written like this : 205/65 R15. If you've read my page this far, you ought to know what that means. But for the PAX system, that same tyres size now becomes : 205-650 R440 A. Decoding this, the 205 is the same as it always was - tyre width in mm. The 650 now means 650mm in overall diameter, rather than a sidewall height of 65% of 205mm. The 440 is the metric equivalent of a 15inch wheel rim - and metric is no bad thing - and finally the 'A' means "This is a PAX system wheel or tyre".
What about the criminals?
My
immediate thought when I heard about run-flat tyres was "so now
criminals can outfit their cars with these, and not be prone to the
police stinger devices used to slow down getaway cars." I e-mailed all
the major tyre companies for their response on this matter, and so far
have only had one reply - from Michelin. Here's what they have to say
on the matter:
![]()
"Michelin's
aim is to propose products allowing people to drive in enhanced
conditions of security. From this point of view, run-flat tyres and PAX
System represent great progress in the history of the automotive
industry. Indeed, these two developments allow drivers to go on driving
even after a puncture, if, for instance, they do not feel safe to stop
on the hard shoulder of a highway to repair their tyre, or they are in
a hazardous area. Michelin is of course aware that such inventions,
like any other innovations can be used in a distorted way : cheques for
example are meant to facilitate transactions, however the signature on
a cheque can be falsified and money can go into the wrong hands ; run
flat tyres are designed to provide better security to a driver, but
could be used for other purposes by somebody having other intentions.
Michelin is very sorry that it is unable to control any abuses made of
its tyres by individuals intent on breaking the law."
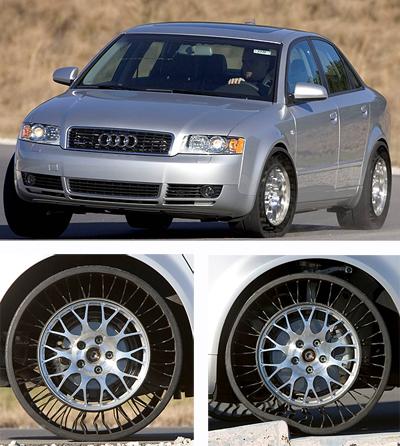
![[michelintweel]](tyre_bible_files/michelintweel.jpg) In 2005, Michelin unveiled their "Tweel" concept - a word made up of the combination of Tyre and Wheel.
After decades of riding around on air-filled tyres, Michelin would like
to convince us that there is a better way. They're working on a totally
air-less tyre. Airless = puncture proof. The Tweel is the creation of
Michelin's American technology centre - no doubt working with the sound
of the Ford Explorer / Bridgestone Firestone lawsuit still ringing in
their ears.
In 2005, Michelin unveiled their "Tweel" concept - a word made up of the combination of Tyre and Wheel.
After decades of riding around on air-filled tyres, Michelin would like
to convince us that there is a better way. They're working on a totally
air-less tyre. Airless = puncture proof. The Tweel is the creation of
Michelin's American technology centre - no doubt working with the sound
of the Ford Explorer / Bridgestone Firestone lawsuit still ringing in
their ears.
The Tweel is a combined single-piece tyre and wheel
combination, hence the name, though it actually begins as an assembly
of four pieces bonded together: the hub, a polyurethane spoke section,
a "shear band" surrounding the spokes, and the tread band - the rubber
layer that wraps around the circumference and touches the road. The
Tweel's hub functions just like your everyday wheel right now - a rigid
attachment point to the axle. The polyurethane spokes are flexible to
help absorb road impacts. These act sort of like the sidewall in a
current tyre. But turn a tweel side-on and you can see right through
it. The shear band surrounding the spokes effectively takes the place
of the air pressure, distributing the load. Finally, the tread is
similar in appearance to a conventional tyre. The
image on the right is my own rendering based on the teeny tiny images I
found from the Michelin press release. It gives you some idea what the
new Tweel could look like.
One of the basic shortcomings of a
tyre filled with air is that the inflation pressure is distributed
equally around the tire, both up and down (vertically) as well as
side-to side (laterally). That property keeps the tire round, but it
also means that raising the pressure to improve cornering - increasing
lateral stiffness - also adds up-down stiffness, making the ride
harsher. With the Tweel's injection-molded spokes, those
characteristics are no longer linked. Only the spokes toward the bottom
of the tyre at any point in its rotation are determining the grip /
ride quality. Those spokes rotating around the top of the tyre are free
to flex to full extension without affecting the grip or ride quality.
The Tweel offers a number of benefits beyond the obvious attraction of
being impervious to nails in the road. The tread will last two to three
times as long as today's radial tires, Michelin says, and when it does
wear thin it can be retreaded. For manufacturers, the Tweel offers an
opportunity to reduce the number of parts, eliminating most of the 23
components of a typical new tire as well as the costly air-pressure
monitors now required on all new vehicles in the United States. (See TPMS below).
Another benefit? No spare wheels. That leaves more room for boot/trunk space, and reduces the carried weight in the vehicle.
Reporters who took the change to drive an Audi A4 sedan equipped with
Tweels early in 2005 complained of harsh vibration and an overly noisy
ride. Michelin are well aware of these shortfalls - mostly due to
vibration in the spoke system. (They admit they're in
extremely-alpha-test mode.) Another problem is that the wheels transmit
a lot more force and vibration into the cabin than regular tyres. A
plus point though is cornering ability. Because of the rigidity of the
spokes and the lack of a flexing sidewall, cornering grip, response and
feel is excellent.
There are other negatives: the flexibility, at this early stage,
contributes to greater friction, though it is within 5% of that
generated by a conventional radial tyre. And so far, the Tweel is no
lighter than the tyre and wheel it replaces. Almost everything else
about the Tweel is undetermined at this early stage of development,
including serious matters like cost and frivolous questions like the
possibilities of chrome-plating. Either way, it's a promising look into
the future.
Tweels are being tested out on the iBot - Dean Kamen's (the Segway
inventor) new prototype wheelchair, and by the military. The military
are interested because the Tweel is incredibly resistant to damage,
even caused by explosions. Michelin hope to bring this technology to
everyday road car use, construction equipment, and potentially even
aircraft tyres.
 When you're looking for new tyres, you'll often see some coloured dots
on the tyre sidewall, and bands of colour in the tread. These are all
here for a reason, but it's more for the tyre fitter than for your
benefit.
When you're looking for new tyres, you'll often see some coloured dots
on the tyre sidewall, and bands of colour in the tread. These are all
here for a reason, but it's more for the tyre fitter than for your
benefit.
The dots on the sidewall typically denote unformity and weight. It's
impossible to manufacture a tyre which is perfectly balanced and
perfectly manufactured in the belts. As a result, all tyres have a
point on the tread which is lighter than the rest of the tyre - a thin
spot if you like. It's fractional - you'd never notice it unless you
used tyre manufacturing equipment to find it, but its there. When the
tyre is manufactured, this point is found and a coloured dot is put on
the sidewall of the tyre corresponding to the light spot. Typically
this is a yellow dot (although some manufacturers use different colours
just to confuse us) and is known as the weight mark.
Typically the yellow dot should end up aligned to the valve stem on
your wheel and tyre combo. This is because you can help minimize the
amount of weight needed to balance the tyre and wheel combo by mounting
the tire so that its light point is matched up with the wheel's heavy
balance point. Every wheel has a valve stem which cannot be moved so
that is considered to be the heavy balance point for the wheel.
As
well as not being able to manufacture perfectly weighted tyres, it's
also nearly impossible to make a tyre which is perfectly circular. By
perfectly circular, I mean down to some nauseating number of decimal
places. Again, you'd be hard pushed to actually be able to tell that a
tyre wasn't round without specialist equipment. Every tyre has a high
and a low spot, the difference of which is called radial runout. Using
sophisticated computer analysis, tyre manufacturers spin each tyre and
look for the 'wobble' in the tyre at certain RPMs. It's all about
harmonic frequency (you know - the frequency at which something
vibrates, like the Tacoma Narrows bridge collapse). Where the first
harmonic curve from the tyre wobble hits its high point, that's where
the tyre's high spot is. Manufacturers typically mark this point with a
red dot on the tyre sidewall, although again, some tyres have no marks,
and others use different colours. This is called the uniformity mark.
Correspondingly, most wheel rims are also not 100% circular, and will
have a notch or a dimple stamped into the wheel rim somewhere
indicating their low point. It makes sense then, that the high point of
the tyre should be matched with the low point of the wheel rim to
balance out the radial runout.
Generally speaking, if you get a tyre with both a red and a yellow dot on it, it should be mounted according to the red dot - ie. the uniformity mark should line up with the dimple on the wheel rim, and the yellow mark should be ignored.
Often when you buy tyres, there will be a coloured band or stripe
running around the tyre inside the tread. These can be any colour and
can be placed laterally almost anyhwere across the tread. Some are on
the tread blocks whilst others are on the tyre carcass. For ages I
thought this was a uniformity check - a painted mark used to check the
"roundness" of the tyre. But I had a tyre dealer contact me with a far
more feasible answer. The same tyre is often made with slightly tweaked
specifications for different vehicles. To easily identify these same
labelled tyres when they are warehoused or in storage, different
markings and stripes are used. Sometimes stripes are added for huge
bulk orders to various manufactures. Eg All the red outside stripes are
for Toyota next week. This gives anyone in the warehouse a very quick
visual check of the different types of tyres without needing to pull
them all down and read the sidewall on each one.
As well as the colour, the actual position of the lines is something to
take note of too. They're a measure of something called runout.
Depending on how the belts are laid on the tyre during manufacturing,
they can cause the tire to "run out" - to not track perfectly straight,
but pull to the left or right. The closer to the centre of the tyre
that these lines are, the less runout the tyre has and the straighter
it will track when mounted on your car. So for example, if you were
looking at your car from the front and you saw the coloured striped
running around the right side of both your front tyres, the car would
likely have a tendency to pull to that side. The best thing is to have
the coloured stripes on opposite sides of the tyres for opposite sides
of the car, so that the runout on each side will counteract the other
and help maintain a good straight running. This is something that not
many tyre fitting places know about or take any notice of. The obvious
solution to having the stripes both on one side is to flip one of the
tyres around, but that will only work if they're not unidirectional
tyres. If they are unidirectional (and thus must be mounted to rotate a
specific way) then you should try to find another tyre from the same
batch with the stripe on the opposite side.

Okay. If you want to change the wheels on your car, you need to take some things into consideration.
| 4 stud (bolt) PCD | 5 stud (bolt) PCD |
|---|---|
![[4stud]](tyre_bible_files/4stud_pcd.gif) |
![[4stud]](tyre_bible_files/5stud_pcd.gif) |
| No offset | Inset wheel | Outset wheel |
|---|---|---|
![[none]](tyre_bible_files/no_offset.gif) |
![[inset]](tyre_bible_files/inset_wheel.gif) |
![[outset]](tyre_bible_files/outset_wheel.gif) |
![[arealwheel]](tyre_bible_files/arealwheel.jpg) They say a picture is equivalent to a thousand words, so study this one
carefully. It's one of the wheels off my own car. Enlarged so you can
read it is the wheel information described above. You'll notice it
reads "6J x 14 H2 ET45". The "6J x 14" part of that is the size of the
wheel rim - in this case it has a depth of 6 inches and a diameter of
14 inches (see the section directly below here on wheel sizes for a
more in-depth explanation). The "J" symbolises the shape of the tyre
bead profile. (More on that later)
They say a picture is equivalent to a thousand words, so study this one
carefully. It's one of the wheels off my own car. Enlarged so you can
read it is the wheel information described above. You'll notice it
reads "6J x 14 H2 ET45". The "6J x 14" part of that is the size of the
wheel rim - in this case it has a depth of 6 inches and a diameter of
14 inches (see the section directly below here on wheel sizes for a
more in-depth explanation). The "J" symbolises the shape of the tyre
bead profile. (More on that later)Okay. This is a biggie so take a break, get a hot cup of Java, relax and then when you think you're ready to handle the complexities of tyre matching, carry on. This diagram should help you to figure out what's going on.
![[xsection]](tyre_bible_files/xsection.gif)
Wheel sizes are expressed as WWWxDDD sizes. For example 7x14. A 7x14 wheel is has a rim width of 7 inches, and a rim diameter of 14 inches. The width is usually below the width of the tyre for a good match. So a 185mm tyre would usually be matched to a wheel which is 6 inches wide. (185mm is more like 7 inches, but that's across the entire tyre width, not the bead area where the tyre fits the rim.)
The important thing that you need to keep in consideration is rolling radius. This is so devastatingly important that I'll mention it in bold again:rolling radius!.
This is the distance in mm from the centre of the wheel to the edge of
the tread when it's unladen. If this changes because you've mismatched
your new wheels and tyres, then your speedo will lose accuracy and the
fuel consumption might go up. The latter reason is because the
manufacturer built the engine/gearbox combo for a specific rolling
radius. Mess with this and the whole thing could start to fall down
around you.
It's worth pointing out that the actual radius the
manufacturers use for speedo calculation is the 'dynamic' or the
'laden' radius of the wheel at the recommended inflation pressure and
'normal' loading. Obviously though, this value is entirely dependent on
the unladen rolling radius.
![[beadprofile]](tyre_bible_files/beadprofile.gif) No, my keyboard letters weren't stuck down when I typed this. The
letter that typically sits between the rim width and diameter figures
stamped on the wheel, and indicates the physical shape of the wheel
where the tyre bead meets it. In the cross-section on the left you can
see the area highlighted in red.
No, my keyboard letters weren't stuck down when I typed this. The
letter that typically sits between the rim width and diameter figures
stamped on the wheel, and indicates the physical shape of the wheel
where the tyre bead meets it. In the cross-section on the left you can
see the area highlighted in red.
Like so many topics, the answer as to which letter represents which
profile is a long and complicated one. Common wisdom has it that the
letter represents the shape. ie. "J" means the bead profile is the
shape of the letter "J". Not so, although "J" is the most common
profile identifier. 4x4 vehicles often have "JJ" wheels. Jaguar
vehicles (especially older ones) have "K" profile wheels. Some of the
very old VW Beetles had "P" and "B" profile wheels.
Anyway the reason it is an "awkward topic to find definitive data on"
is very apparent if you've ever looked at Standards Manual of the
European Tyre and Rim Technical Organisation. It is extremely
hard to follow! There are pages and pages (64 in total) on wheel
contours and bead profiles alone, including dimensions for every type
of wheel you can think of (and many you can't) with at least a dozen
tabled dimensions for each. Casually looking through the manual is
enough to send you to sleep. Looking at it with some concentration is
enough to make your brain run out of your ears. To try to boil it all
down for you, it seems that they divide up the rim into different
sections and have various codes to describe the geometry of each area.
For example, the "J" code makes up the "Rim Contour" and specifies rim
contour dimensions in a single category of rims called "Code 10 to 26
on 5deg. Drop-Centre Rims". To give you some idea of just how complex /
anal this process is, I've recreated one such diagram with Photoshop
below to try to put you off the scent.

From the tables present in this manual, the difference in dimensions
between "J" and "B" rims is mainly due to the shape of the rim flange.
This is the part in the above diagram defined by the R radius and B and
Pmin parameters. Hence my somewhat simpler description : tyre bead profiles.
Note
that in my example, the difference between "J" and "B" rims is small
but not negligible. This area of rim-to-tire interface is very
critical. Very small changes in a tyre's bead profile make large
differences in mounting pressures and rim slip.
"A" and "D" contour
designations come under the category of "Cycles, Motorcycles, and
Scooters" but also show up in the "Industrial Vehicles and Lift Trucks"
category. Naturally, the contours have completely different geometry
for the same designation in two different categories.
The "S", "T", "V" and "W" contour designation codes fall into the
"Commercial Vehicles, Flat Base Rims" category. The "E", "F", "G" and
"H" codes fall into the "Commercial Vehicles, Semi-Drop Centre Rims"
category. Are you beginning to see just how complex this all is?
I think the best thing for you, dear reader, is a general rule-of-thumb, and it is this : if your wheels are stamped 5J15 and you buy 5K15 tyres, rest assured they absolutely won't fit.
If you're obsessive-compulsive and absolutely must know everything there is to know about bead profiles and rim flanges, you can check out the ETRTO (European Tyre and Rim Technical Organisation website from where you can purchase their manuals and documents. Go nuts. Meanwhile, the rest of us will move on to the next topic.
A good question. Styling and performance are the only two reasons. Most cars come with horrible narrow little tyres and 13 inch rims. More recently the manufacturers have come to their senses and started putting decent combinations on factory cars so that's not so much of a problem any more. The first reason is performance. Speed in corners more specifically. If you have larger rims, you get smaller sidewalls on the tyres. And if you have smaller sidewalls, the tyre deforms less under the immense sideways forces involved in cornering.
Point to note: 1 inch = 25.4mm. You need to know that because tyre/wheel manufacturers insist on mixing mm and inches in their ratings.
Also note that a certain amount of artistic licence is required when
calculating these values. The tyre's rolling radius will change the
instant you put load on it, and calculating values to fractions of a
millimetre just isn't worth it - tyre tread wear will more than see off
that sort of accuracy.
Lets take an average example: a car with factory fitted 6x14 wheels and 185/65 R14's on them.
With me so far? Good. Now lets assume I want 15 inch rims which are slightly wider to give me that nice fat look. I'm after a set of 7x15's
First we need to determine the ideal width of tyre for my new wider
wheels. 7 inches = 177.8mm. The closest standard tyre width to that is
actually 205mm so that's what we'll use. (remember the tyre width is
larger than the width of the bead fitting.)
Well if all that maths seems a little beyond you, and judging by the volume of e-mails I get on this subject, it might well be, I've made a little Javascript application below to help you out. Select the tyre size you currently have, and then the size you're interested in. Calculate each tyre size and then click on the click to calculate the difference button. It will show you all the rolling radii, circumferences, percentage differences and even speedometer error. Enjoy. Note: For some reason, this little java app doesn't work with Netscape 4.x. IE is fine and Netscape 6.x is fine. I'm working on it.
 Aspect ratio is, as you know if you read the bit above, the ratio of
the tyre's section height to its section width. The aspect ratio is
sometimes referred to as the tyre 'series'. So a 50-series tyre means
one with an aspect ratio of 50%. The maths is pretty simple and the
resulting figure is stamped on all tyres as part of the sizing
information:
Aspect ratio is, as you know if you read the bit above, the ratio of
the tyre's section height to its section width. The aspect ratio is
sometimes referred to as the tyre 'series'. So a 50-series tyre means
one with an aspect ratio of 50%. The maths is pretty simple and the
resulting figure is stamped on all tyres as part of the sizing
information:
| Aspect ratio = | Section height |
| Section width |
The actual dimensions of a tyre are dependent on the rim on which it is
mounted. The dimension that changes the most is the tyre's section
width; a change of about 0.2" for every 0.5" change in rim width.
The ratio between the section width and the rim width is pretty
important. If the rim width is too narrow, you pinch the tyre in and
cause it to balloon more in cross-section. If the rim width is too
wide, you run the risk of the tyre ripping away at high speed.
For 50-series tyres and above, the rim width is 70% of the tyre's section width, rounded off to the nearest 0.5.
For example, a P255/50R16 tyre, has a design section width of 10.04"
(255mm = 10.04inces). 70% of 10.04" is 7.028", which rounded to the
nearest half inch, is 7". Ideally then, a 255/50R16 tyres should be
mounted on a 7x16 rim.
For 45-series tyres and below, the rim width is 85% of the tyre's section width, rounded off to the nearest 0.5.
For example, a P255/45R17 tyre, still has a design section width of
10.04" (255mm = 10.04inces). But 85% of 10.04" is 8.534", which rounded
to the nearest half inch, is 8.5". Ideally then, a 255/45R17 tyre
should be mounted on an 8½x17 rim.
Blimey I'm good to you. Can't figure that maths out either? Click away my friend and Chris's Rimwidthulatortm will tell you what you need to know.
Given all the information above, you ought to know one last thing.
A rim that is too narrow in relation to the tyre width will allow the
tyre to distort excessively sideways under fast cornering. On the other
hand, unduly wide rims on an ordinary car tend to give rather a harsh
ride because the sidewalls have not got enough curvature to make them
flex over bumps and potholes. That's why there is a range of rim sizes
for each tyre size in my Rimwidthulator above. Put a 185/65R14 tyre on
a rim narrower than 5inches or wider than 6.5inches and suffer the
consequences.
The plus one concept describes the proper sizing up of a wheel and tyre combo without all that spiel I've gone through above. Basically, each time you add 1 inch to the wheel diameter, add 20mm to the tyre width and subtract 10% from the aspect ratio. This compensates nicely for the increases in rim width that generally accompany increases in diameter too. By using a larger diameter wheel with a lower profile tyre it's possible to properly maintain the overall rolling radius, keeping odometer and speedometer changes negligible. By using a tyre with a shorter sidewall, you gain quickness in steering response and better lateral stability. The visual appeal is obvious, most wheels look better than the sidewall of the tyre, so the more wheel and less sidewall there is, the better it looks.
![[plusone]](tyre_bible_files/plusone.gif) |
Here, for those of you who can't or won't calculate your tyre size, is a table of equivalent tyres. These all give rolling radii within a few mm of each other and would mostly be acceptable, depending on the wheel rim size you're after.
| 80 SERIES | 75 SERIES | 70 SERIES | 65 SERIES | 60 SERIES | 55 SERIES | 50 SERIES |
|---|---|---|---|---|---|---|
| 135/80 R 13 | - | 145/70 R 13 | - | 175/60 R 13 | - | - |
| - | - | 155/70 R 13 | 165/65 R 13 | - | - | - |
| - | - | - | 175/65 R 13 | - | - | - |
| 145/80 R 13 | - | 155/70 R 13 | 175/65 R 13 | 185/60 R 13 | 185/55 R 14 | - |
| - | - | 165/70 R 13 | 165/65 R 14 | 175/60 R 14 | - | - |
| - | - | 175/70 R 13 | - | - | - | - |
| 155/80 R 13 | 165/75 R 13 | 175/70 R 13 | 165/65 R 14 | 175/60 R 14 | 195/55 R 14 | 195/50 R 15 |
| - | - | 185/70 R 13 | 175/65 R 14 | 185/60 R 14 | 185/55 R 15 | - |
| - | - | 165/70 R 14 | - | 195/60 R 14 | - | - |
| 165/80 R 13 | - | 185/70 R 13 | 175/65 R 14 | 195/60 R 14 | 205/55 R 14 | 205/50 R 15 |
| - | - | 165/70 R 13 | 185/65 R 14 | 205/60 R 14 | 185/55 R 15 | 195/50 R 16 |
| - | - | 175/70 R14 | - | - | 195/55 R 15 | - |
| - | - | - | - | - | 205/55 R15 | - |
| 175/80 R 13 | 175/75 R 14 | 175/70 R 14 | 185/65 R 14 | 205/60 R 14 | 195/55 R 15 | 215/50 R 16 |
| - | - | 185/70 R 14 | 195/65 R 14 | 215/60 R 14 | 205/55 R 15 | 195/50 R 16 |
| - | - | - | 185/65 R 15 | 195/60 R 15 | - | 205/50 R 16 |
| 185/80 R 13 | 185/75 R 14 | 185/70 R 14 | 195/65 R 14 | 215/60 R 14 | 205/55 R 16 | 205/50 R 16 |
| - | - | 195/70 R 14 | 185/65 R 15 | 225/60 R 14 | - | 225/50 R 16 |
| - | - | - | 195/65 R 15 | 195/60 R 15 | - | 205/50 R 17 |
| - | - | - | - | 205/60 R 15 | - | - |
| - | - | - | - | 215/60 R 15 | - | - |
Yes - that's it. A little time with a calculator, a pen and some paper will enable to you confidently stride into your local tyre/wheel supplier and state exactly what you want.
If you want the fat look but don't want to go bonkers with new wheels, you can oversize the tyres on the rims usually by about 20mm (to be safe). So if your standard tyres are 185/60 R14s, you can oversize them to about 205mm. But make sure you recalculate the percentage value to keep the sidewall height the same.
And finally, you might like to check out this little program written by Brian Cassidy (skyline6969@btinternet.com),which helps with tyre size calculation.
If there's one question guaranteed to promote argument and counter argument, it's this : do wide tyres give me better grip?
Fat tyres look good. In fact they look stonkingly good. In the dry they
are mercilessly full of grip. In the wet, you might want to make sure
your insurance is paid up, especially if you're in a rear-wheel-drive
car. Contrary to what you might think (and to what I used to think),
bigger contact patch does not necessarily mean increased grip. Better yet, fatter tyres do not mean bigger contact patch. Confused? Check it out:
Pressure=weight/area.
That's about as simple a physics equation as you can get. For the
general case of most car tyres travelling on a road, it works pretty
well. Let me explain. Let's say you've got some regular tyres, as
supplied with your car. They're inflated to 30psi and your car weighs
1500Kg. Roughly speaking, each tyre is taking about a quarter of your
car's weight - in this case 375Kg. In metric, 30psi is about 2.11Kg/cm².
By that formula, the area of your contact patch is going to be roughly 375 / 2.11 = 177.7cm² (weight divided by pressure)
Let's say your standard tyres are 185/65R14 - a good middle-ground,
factory-fit tyre. That means the tread width is 18.5cm side to side. So
your contact patch with all these variables is going to be about
177.7cm² / 18.5, which is 9.8cm. Your contact patch is a rectangle
18.5cm across the width of the tyre by 9.8cm front-to-back where it
sits 'flat' on the road.
Still with me? Great. You've taken your car to the tyre dealer and with
the help of my tyre calculator, figured out that you can get some
swanky 225/50R15 tyres. You polish up the 15inch rims, get the tyres
fitted and drive off. Let's look at the equation again. The weight of
your car bearing down on the wheels hasn't changed. The PSI in the
tyres is going to be about the same. If those two variables haven't
changed, then your contact patch is still going to be the same :
177.7cm²
However
you now have wider tyres - the tread width is now 22.5cm instead of
18.5cm. The same contact patch but with wider tyres means a narrower
contact area front-to-back. In this example, it becomes 177.7cm² /
22.5, which is 7.8cm.
 |
| Imagine driving on to a glass road and looking up underneath your tyres. This is the example contact patch (in red) for the situation I explained above. The narrower tyre has a longer, thinner contact patch. The fatter tyre has a shorter, wider contact patch, but the area is the same on both. |
And there is your 'eureka' moment. Overall, the area of your contact patch has remained more or less the same. But by putting wider tyres on, the shape of the contact patch has changed. Actually, the contact patch is really a squashed oval rather than a rectangle, but for the sake of simplicity on this site, I've illustrated it as a rectangle - it makes the concept a little easier to understand. So has the penny dropped? I'll assume it has. So now you understand that it makes no difference to the contact patch, this leads us on nicely to the sticky topic of grip.
The area of the contact patch does not affect the actual grip of the tyre. The things that do affect grip are the coefficient of friction and the load on the tyre - tyre load sensitivity. Get out your geek-wear because this is going to get even more nauseatingly complicated now.

The graph up above here shows an example plot of normalised lateral force versus slip angle. Slip angle is best described as the difference between the angle of the tyres you've set by steering, and the direction in which the tyres actually want to travel. Looking at it, you can see that for any given slip angle, a higher coefficient of friction is obtained with less vertical load on the tyre.

As the load on the tyre is increased, the peak obtainable lateral force
is increased but at a decreasing rate. ie. more load doesn't mean
infinitely more lateral force - at some point it's going to tail off.
Rubber friction is broken into two primary components - adhesion and
deformation or mechanical keying. Rubber has a natural adhesive
property and high elasticity which allows it readily deform and fill
the microscopic irregularities on the surface of any road. This has the
effect of bonding to various surfaces, which aids in dry weather grip
but is diminished in wet road conditions. Look at this next drawing -
this depicts the deformation process as the load varies.

As the load is increased the amount of tire deformation also increases. Increasing the load also increases the contact between the tire and road improving adhesion. As the load increases, the rubber penetrates farther into the irregularities, which increases grip but at a diminishing rate. This next little graph shows the change in deformation friction (Fdef) and the deformation coefficient of friction (Cdef) with change in load.
As far as cars are concerned, any reduction in load usually results in
an increase in the coefficient of friction. So for a given load
increasing the contact patch area reduces the load per unit area, and
effectively increases the coefficient of friction.
If this change in coefficient of friction were not true then load
transfer would not be an issue. During acceleration grip is reduced
partly from the change is suspension geometry and party from the
transfer of load from one set of tires to another. Since the
coefficient of friction is changing (non-linearly lower for higher
loads), the net grip during acceleration is reduced. In other words
maximum grip occurs when all four tires are loaded equally.
That last paragraph also explains why dynamic setup on your car is pretty important. In reality the contact patch is effectively spinning around your tyre at some horrendous speed. When you brake or corner, load-transfer happens and all the tyres start to behave differently to each other. This is why weight transfer makes such a difference the handling dynamics of the car. Braking for instance; weight moves forward, so load on the front tyres increases. The reverse happens to the rear at the same time, creating a car which can oversteer at the drop of a hat. The Mercedes A-class had this problem when it came out. The load-transfer was all wrong, and a rapid left-right-left on the steering wheel would upset the load so much that the vehicle lost grip in the rear, went sideways, re-acquired grip and rolled over. (That's since been changed.) The Audi TT had a problem too because the load on it's rear wheels wasn't enough to prevent understeer which is why all the new models have that daft little spoiler on the back.
If your brain isn't running out of your ears already, then here's a link to where you can find many raging debates that go on in the Subaru forums about this very subject. If you decide to read this, you should bear in mind that Simon de Banke, webmaster of ScoobyNet, is a highly respected expert in vehicle dynamics and handling, and is also an extremely talented rally driver. It's also worth noting that he holds the World Record for driving sideways...........
If you decide to fatten up the tyres on your car, another consideration should be clearance with bits of your car. There's no point in getting super-fat tyres if they're going to rub against the inside of your wheel arches. Also, on cars with McPherson strut front suspension, there's a very real possibility that the tyre will foul the steering linkage on the suspension. Check it first!
This is the general term used to gloss over the next three points:

This is the forward (negative) or backwards (positive) tilt of the spindle steering axis. It is what causes your steering to 'self-centre'. Correct caster is almost always positive. Look at a bicycle - the front forks have a quite obvious rearward tilt to the handlebars, and so are giving positive caster. The whole point of it is to give the car (or bike) a noticeable centre point of the steering - a point where it's obvious the car will be going in straight line.
Camber is the tilt of
the top of a wheel inwards or outwards (negative or positive). Proper
camber (along with toe and caster) make sure that the tyre tread
surface is as flat as possible on the road surface. If your camber is
out, you'll get tyre wear. Too much negative camber (wheels tilt
inwards) causes tread and tyre wear on the inside edge of the tyre.
Consequently, too much positive camber causes wear on the outside edge.
Negative camber is what counteracts the tendency of the inside wheel during a turn
to lean out from the centre of the vehicle. 0 or Negative camber is almost always desired.
Positive camber would create handling problems.
The technical reason for this is because when the tyres on the inside
of the turn have negative camber, they will tend to go toward 0 camber,
using the contact patch more efficiently during the turn. If the tyres
had positive camber, during a turn, the inside wheels would tend to
even more positive camber, compromising the efficiency of the contact
patch because the tyre would effectively only be riding on its outer
edge.
'Toe' is the term given to the left-right alignment of the front wheels relative to each other. Toe-in is where the front edge of the wheels are closer together than the rear, and toe-out is the opposite. Toe-in counteracts the tendency for the wheels to toe-out under power, like hard acceleration or at motorway speeds (where toe-in disappears). Toe-out counteracts the tendency for the front wheels to toe-in when turning at motorway speeds. It's all a bit bizarre and contradictory, but it does make a difference. A typical symptom of too much toe-in will be excessive wear and feathering on the outer edges of the tyre tread section. Similarly, too much toe-out will cause the same feathering wear patterns on the inner edges of the tread pattern.
Firstly, let me state my
views on rotating your tyres. This is the practice of swapping the
front and back tyres to even out the wear. I personally don't think
this is a particularly clever thing to do. Think about it: the tyres
begin to wear in a pattern, however good or bad, that matches their
position on the car. If you now change them all around, you end up with
tyres worn for the rear being placed on the front and vice versa. The
upside of it, of course, (which many people will tell you) is even overall
tyre wear. By this, they mean wear in the tread depth. This is a valid
point, but if you can't be bothered to buy a new pair of tyres when the
old pair wear too much, then you shouldn't be on the road, let alone
kidding yourself that putting worn front tyres on the back and partly
worn back tyres on the front will cure your problem. But that's only my point of view.
Your tyre wear pattern can tell you a lot about any problems you might
be having with the wheel/tyre/suspension geometry setup. The first two
signs to look for are over- and under-inflation. These are relatively
easy to spot:
![[wear]](tyre_bible_files/wear_patterns.gif) |
||
| Under-inflation | Correct | Over-inflation |
|---|---|---|
Here's a generic fault-finding table for most types of tyre wear:
| Problem | Cause |
|---|---|
| Shoulder Wear Both Shoulders wearing faster than the centre of the tread | |
| Under-inflation | |
| Repeated high-speed cornering | |
| Improper matching of rims and tyres | |
| Tyres haven't been rotated recently | |
| Centre Wear The centre of the tread is wearing faster than the shoulders | |
| Over-inflation | |
| Improper matching of rims and tyres | |
| Tyres haven't been rotated recently | |
| One-sided wear One side of the tyre wearing unusually fast | |
| Improper wheel alignment (especially camber) | |
| Tyres haven't been rotated recently | |
| Spot wear A part (or a few parts) of the circumference of the tread are wearing faster than other parts. | |
| Faulty suspension, rotating parts or brake parts | |
| Dynamic imbalance of tyre/rim assembly | |
| Excessive runout of tyre and rim assembly | |
| Sudden braking and rapid starting | |
| Under inflation | |
| Diagonal wear A part (or a few parts) of the tread are wearing diagonally faster than other parts. | |
| Faulty suspension, rotating parts or brake parts | |
| Improper wheel alignment | |
| Dynamic imbalance of tyre/rim assembly | |
| Tyres haven't been rotated recently | |
| Under inflation | |
| Feather-edged wear The blocks or ribs of the tread are wearing in a feather-edge pattern | |
| Improper wheel alignment (faulty toe-in) | |
| Bent axle beam |
It's amazing that so many people pay such scant attention to their tyres. If you're travelling at 70mph on the motorway, four little 20-square-centimetre pads of rubber are all that sits between you and a potential accident. If you don't take care of your tyres, those contact patches will not be doing their job properly. If you're happy with riding around on worn tyres, that's fine, but don't expect them to be of any help if you get into a sticky situation. The key of course, is to check your tyres regularly. If you're a motorcyclist, do it every night before you lock the bike up. For a car, maybe once a week. You're looking for signs of adverse tyres wear (see the section above). You're looking for splits in the tyre sidewall, or chunks of missing rubber gouged out from when you failed to negotiate that kerb last week. More obvious things to look for are nails sticking out of the tread. Although if you do find something like this, don't pull it out. As long as it's in there, it's sealing the hole. When you pull it out, then you'll get the puncture. That doesn't mean I'm recommending you drive around with a nail in your tyre, but it does mean you can at least get the car to a tyre place to get it pulled out and have the resulting hole plugged. The more you look after your tyres, the more they'll look after you.
Whilst on the subject of checking your tyres, you really ought to check
the pressures once every couple of weeks too. Doing this does rather
rely on you having, or having access to a working, accurate tyre
pressure gauge. If you've got one of those free pencil-type gauges that
car dealerships give away free, then I'll pop your bubble right now and
tell you it's worth nothing. Same goes for the ones you find on a
garage forecourt. Sure they'll fill the tyre with air, but they can be
up to 20% out either way. Don't trust them. Only recently - since about
2003 - have I been able to trust digital gauges. Before that they were
just junk - I had one which told me that the air in my garage was at
18psi with nothing attached to the valve. That's improved now and
current-generation digital gauges are a lot more reliable. One thing to
remember with digital gauges is to give them enough time to sample the
pressure. If you pop it on and off, the reading will be low. Hold it on
the valve cap for a few seconds and watch the display (if you can).
Generally speaking you should only trust a decent, branded pressure
gauge that you can buy for a small outlay - $30 maybe - and keep it in
your glove box. The best types are the ones housed in a brass casing
with a radial display on the front and a pressure relief valve. I keep
one in the car all the time and it's interesting to see how badly out
the other cheaper or free ones are. My local garage forecourt has an
in-line pressure gauge which over-reads by about 1.5psi. This means
that if you rely on their gauge, your tyres are all 1.5psi short of
their recommended inflation pressure. That's pretty bad. My local
garage in England used to have one that under-read by nearly 6 psi,
meaning everyone's tyres were rock-hard because they were 6psi
over-inflated. I've yet to find one that matches my little calibrated
gauge.
One reader pointed something else out to me. Realistically even a cheap
pressure gauge is OK provided it is consistent. This is easy to check
by taking three to five readings of the same tyre and confirming they
are all the same, then confirming it reads (consistently) more for
higher pressure and less for lower pressure.
One last note : if you're a motorcyclist, don't carry your pressure
gauge in your pocket - if you come off, it will tear great chunks of
flesh out of you as you careen down the road....

For the first two years of our new life in America, I'd take our Subaru
for its service, and it would come back with the tyres pumped up to
40psi. Each time, I'd check the door pillar sticker which informed me
that they should be 32psi front and 28psi rear, and let the air out to
get to those values. Eventually, seeing odd tyre wear and getting fed
up of doing this, I asked one of the mechanics "why do you always
over-inflate the tyres?" I got a very long and technical response which
basically indicated that Subaru are one of the manufacturers who've
never really adjusted their recommended tyre pressures in line with new
technology. It seems that the numbers they put in their manuals and
door stickers are a little out of date. I'm a bit of a skeptic so I
researched this on the Internet in some of the Impreza forums and chat
rooms and it turns out to be true. So I pumped up the tyres to 40psi
front and rear, as the garage had been doing, and as my research
indicated. The result, of course, is a much stiffer ride. But the odd
tyre wear has gone, and my gas-mileage has changed from a meagre
15.7mpg (U.S) to a slightly more respectable 20.32 mpg (U.S). That's
with mostly stop-start in-town driving. Compare that to the official
quoted Subaru figures of 21mpg (city) and 27mpg (freeway) and you'll
see that by changing the tyre pressures to not match the manual and
door sticker, I've basically achieved their quoted figures.
So what does this prove? Well for one it proves that tyre pressure is
absolutely linked to your car's economy. I can get an extra 50 miles
between fill-ups now. It also proves that it's worth researching things
if you think something is a little odd. It does also add weight to the
above motto about not trusting forecourt pressure gauges. Imagine if
you're underfilling your tyres because of a dodgy pressure gauge - not
only is it dangerous, but it's costing you at the pump too.
For those of you who live in America and are in to cars, you'll no doubt remember the Ford Explorer / Firestone Bridgestone lawsuits of the early 21st century. A particular variety of Firestone tyre, sold as standard on Ford Explorers, had a nasty knack of de-laminating at speed causing high-speed blowouts, which, because the Explorer was an S.U.V, resulted in high-speed rollover accidents. After the smoke cleared, it turned out that the tyres were particularly susceptible to running at low-pressure. Where most tyres could handle this, the Firestones could not, heated up, delaminated and blammo - instant lawsuit.
The American
National Highways and Transport Safety Association made some sweeping
regulatory changes in 2002 because of the Ford Explorer case. Section
13 of the Transportation Recall Enhancement, Accountability and
Documentation (TREAD) Act, required the Secretary of Transportation to
mandate a warning system in all new vehicles to alert operators when
their tires are under inflated.
After extensive study, NHTSA determined that a direct tire pressure
monitoring system should be installed in all new vehicles. In a "return
letter" issued after meetings with the auto industry, the Office of
Management and Budget (OMB) demurred, claiming its cost-benefit
calculations provided a basis for delaying a requirement for direct
systems. The final rule, issued May 2002, would have allowed auto
makers to install ineffective TPMS and would have left too many drivers
and passengers unaware of dangerously underinflated tires. The full
text of the various rulings and judgments, along with a lot more NHTSA
information on the subject can be found at this NHSA link.
The current generation of tyre pressure monitoring systems all work on
the same basic principle, but have two distinctly different designs.
The idea is that a small sensor/transmitter unit is placed in each
wheel, in the airspace inside the tyre. The unit monitors tyre pressure
and air temperature, and sends information back to some sort of central
console for the driver to see. This is a prime example of trickle-down
technology from motor racing. Formula 1 teams have been using this
technology for years and now it's coming to consumer vehicles.
At its most basic, the system has 4 lights in the cabin and a buzzer or
some other sound. When one of the tyre pressure monitors registers
over-temperature or under-inflation, the driver is alerted by a sound
and a light indicating which tyre has the problem.


Strap-on sensors.
The first type of sensor is a strap-on type. It's about the size of
your thumb and it clamped to the inside of the wheel rim with a steel
radial belt. SmartTire
manufacture an aftermarket kit that can be fitted to most vehicles.
Typically these sensors weigh in at about 42g (about 1½ ounces) and the
load is centred on the wheel rim. Normal wheel-balancing procedures can
compensate for these devices. The downside is that you have the
potential for the steel strap to fail and start flailing about inside
your tyre, and if you do get a flat, the location of the sensor means
it will be crushed and destroyed within the first wheel rotation of
your tyre going flat. Then again, these devices are there to warn you
of weird operating conditions. They cannot predict a blowout.

Valve-stem sensors.
The second type of sensor is a small block which forms part of the
inside of the tyre valve stem. It's a little smaller than the strap-on
type and doesn't have the associated steel band to go with it. Autodax
are one of the manufacturers of this type of system. This is the type
that you can now get on some GM and Subaru vehicles. These sensors are
lighter and weigh about 28g (an ounce). Because they are smaller and
are part of the valve stem itself, they are mounted to one side of the
wheel rim. Again, regular wheel-balancing can account for this weight.
The disadvantage of this system is that because of its
proximity to the side of the wheel, a ham-fisted tyre-changer can
easily destroy the sensor with the machine that is used to take tyres
off the rims. Also, when re-fitting the tyres, the tyre bead itself, if
not correctly located, can crush the sensor.
Driver displays.
As I
mentioned above, the driver displays range from the über simple buzzer
and light, to items which would look at home on the bridge of the
starship Enterprise. In the SmarTire picture above, you can see their
sensor has 4 lights on it to the right of the box - an example of the
basic system. The Autodax image shows a more complex system which shows
actual pressures and temperatures as well. SmarTire have a second
generation display available now which shows a graphic representation
of the vehicle along with the problem tyre. Their new system can be set
to trigger at specific temperatures and inflation pressures. For
example it can go off when the tyre gets too hot, when the pressure
goes below a set threshold, or the pressure gets a specified amount
below the "starting" pressure (eg if it loses 1psi of pressure). This
is SmartTire's second-generation display showing some of their
operating modes:

The limits of what TPMS can do.
All TPMS systems have limits. These are usually around ±1.5 PSI/.1 BAR
in pressure accuracy, and ±5.4°F/3°C temperature accuracy. They cannot warn you of an impending blowout. Tyre blowouts are caused by instantaneous failure of the tyre. However
they can tell you about the symptoms that lead to blowouts, and that is
the primary reason for having TPMS. Tyre failures are usually preceded
by long periods of running at lower-than-acceptable pressures - TPMS
would warn you about that. When the tyre pressure is low, the sidewall
flexes a lot more, generating more heat - TPMS can tell you about that
too.
Typically, tyre pressure is transmitted as soon as your
vehicle starts moving. Pressure data is then transmitted every 4-6
minutes randomly, although the sensors read tire pressure every 7
seconds. If the new pressure reading differs from the last transmitted
pressure by more than 3 PSI/.21 BAR, then the data is transmitted
immediately to alert you of a problem.
Tyre temperature is also normally transmitted as soon as the vehicle
starts moving. As with pressure data, temperature data is then
transmitted every 4-6 minutes randomly. Again the sensors will read the
temperature more frequently, however the system will only alert you if
the temperature exceeds 80°C/176°F.
One thing to note is that if you rotate the tyres on your vehicle, you
MUST re-program the receiver unit inside otherwise it will think the
sensor is on a different wheel.
The hidden down-side of current TPMS.
TPMS sensors need power to work. All the current sensors use batteries.
Whilst these are rated for about 5 years use, or 250,000 miles, the
batteries are not replaceable
in any system. The manufacturers don't want a battery cover to come
loose and start zipping around inside your tyre. For one it is
dangerous to the inside of the tyre and for another, if the battery
compartment opened, the battery would come out and you'd lose all
sensor data for that wheel. As a result, the batteries are built-in to
the sealed unit during manufacture. If you get a dead sensor, you need
to buy a whole new one. Also, you know what batteries are like in
extreme cold and extreme hot - bear that in mind if you regularly park
in snow and ice....
Currently, there are no laws mandating
manufacture dates to be put on these third-party systems. So if you buy
one from a store, it could be brand new, or it could have been sitting
on the shelf for a year. You've been warned.
Several companies are working on the battery problem for the sensor modules. As I mentioned above, the basic pitfall of all existing systems is that at some point, the battery will wear out, and you'll need a new sensor. The two competing, emerging technologies right now are the Pera Piezotag and the ALPS Batteryless TPMS. Both companies are working to perfect transmitter-sensors that don't require a battery. The Pera system relies on the inherent properties of piezoelectric materials - that is a material which generates current when pressure is applied to it. The inside of a tyre is constantly at pressure so it seems reasonable that a correctly-manufactured piezoelectric wafer could generate enough current to operate the sensor just from the pressure inside the tyre. The ALPS system is similar to an RFID chip in that it gets its power from the radio signal which interrogates it. Current systems, (including the Pera proposal) are classified as "active" transmitter / receiver systems. The sensors transmit signals of their own accord and the in-car receiver picks them up. The ALPS system is a "passive" RFID transceiver system. The sensors remain dormant and un-powered until the in-car transceiver sends a high-power short-range radio signal out which basically carries a "tell me your status" command. The RF power in the radio signal is enough to cause the RFID unit in the sensor to power up, take a reading, transmit it and power down. Clever eh?
If all
this electronic wizardry seems too much for you, you can always go to
the low-tech approach. Valve-cap pressure sensors. These are available
over-the-counter at just about any car parts store and are about as
simple a device as you can get. You inflate your tyre, and replace the
dust cap on the valve with one of these. If it shows green, you're OK.
If it shows yellow, your tyres have lost some pressure. If it shows
red, your tyres are dangerously underinflated. This system does of
course require you to walk around the car and check each time you want
to drive off.
There are some drawbacks to this system which you should be aware of.
For the pressure sensor to read the tyre pressure, it has to depress
the valve stem when its screwed on. This means that the tyre valve is
no longer the thing keeping the air in your tyre - it's now the seal
between this pressure cap and the screw threads. If it's not snug, it
will leak slowly and let air out of your tyre. Secondly, there's the
question of balance. If you use these screw-on caps, you should get
your wheels re-balanced afterwards because it's adding weight to the
rim. Third there's the question of durability - it's better for one of
these things to come off completely if you hit a pothole because then
the valve stem will re-seal. If you crack the pressure cap, you'll let
all the air out of the tyre very quickly. And finally, the question of
accuracy. Typically these things are very coarse in their readings. A
"yellow" signal might not appear until you're 4psi down, and it might
not show red until you're as much as 8psi down. Even 1psi can be a
problem so 4psi or 8psi is dangerously underinflated.

Drivers are lazy. That is the very simple reason that all these companies are burning off millions in R&D budgets, sales and marketing. If we all checked our tyre pressures once a week using one of the tyre pressure gauges mentioned above, we'd know if there was a problem brewing. That is the ultra-low-tech approach. The problem is that 90% of drivers don't ever bother to check their tyres. They either rely on their servicing mechanic or garage to do it for them, or they rely on blind dumb luck. For as long as uneducated people drive around blissfully unaware of the latent danger in their tyres, governments and safety regulators will mandate TPMS. The real question is this : given how unaware some drivers are of their surroundings and their instruments (think of the number of people you see driving with their indicators on on the motorway, or with their fog lights on in bright sunshine) do we really believe that an extra warning light in the vehicle is going to make any difference? Probably not. The key is that if the system was installed, and it worked, and the driver ignored it, then the car, wheel and tyre manufacturers can no longer be held accountable for blowouts and rollovers.
Google Search.
Subaru / GM valve-stem info (PDF file).
TyreAlert. A US manufacturer of TPMS products.
TyreAlert-UK. A UK manufacturer of TPMS products.
Action Imports of Australia, dealing with TPMS products.
| | | |
All the links for relevant sites have now been moved to a dedicated links page which you can find here.

These pages were last updated on 8th December 2005.
Copyright © Chris Longhurst 1994 - 2005 unless otherwise stated.
This
site and all contents unless otherwise noted are copyrighted. The
author will respond expeditiously to any intellectual property
infringement. Reproduction in whole or in part in any form or medium
without express written permission of Chris Longhurst is prohibited.
Copyright info.