Previous Next

INSTRUMENTS AND SWITCHES

Instrument Cluster

REMOVAL & INSTALLATION

Mirage
  1. Disconnect the negative battery cable. Remove the center trim panel.
  2. Remove the knee protector. If pin type clips are used, they may be removed using the following procedure:
    1. Press down on the center pin with a suitable blunt pointed tool. Press down a little more than 116 in. (2mm). This releases the clip. Pull the clip outward to remove it.
    2. Do not push the pin inward more than necessary because it may damage the grommet or the pin may fall in, if pushed in too far. Once the clips are removed, use a plastic trim stick if necessary to pry the knee protector loose.
  3. Remove the instrument cluster bezel.
  4. Remove the instrument cluster. Disassemble and remove gauges or the speedometer as required.

    NOTE: If the speedometer cable adapter requires service, disconnect the cable at the transaxle end. Pull the cable slightly toward the vehicle interior, release the lock by turning the adapter to the right or left and remove the adapter.

  5. The installation is the reverse of the removal procedure. Use care not to damage the printed circuit board or any gauge components.
  6. Connect the negative battery cable and check all cluster-related items for proper operation.
Galant

Fig. 1: Remove the retainer screws from the underside top portion of the meter hood . . .

Fig. 2: . . . then remove the hood from the instrument panel

Fig. 3: Remove the retaining screws from the driver's side . . .

Fig. 4: . . . and also from the passenger side of the instrument cluster

Fig. 5: Grasp the instrument cluster and carefully pull it out of the instrument panel

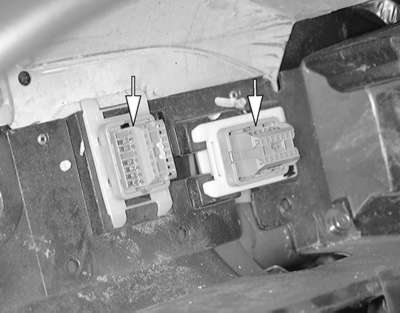
Fig. 6: On some models, the instrument cluster requires no connections to be detached; the cluster has sockets on the back . . .

Fig. 7: . . . these sockets engage connectors solidly mounted behind the cluster

  1. Disconnect negative battery cable.
  2. Remove the 2 retainer screws from the lower surface of the meter hood.
  3. Remove the retainer screws from the underside top portion of the meter hood.
  4. Carefully remove the meter hood from the face of the combination meter.
  5. Remove the 4 retainer screws and the combination meter assembly with the bezel attached. Remove the front bezel and remove gauges or the speedometer as required.

    NOTE: If the speedometer cable adapter requires service, disconnect the cable at the transaxle end. Pull the cable slightly toward the vehicle interior, release the lock by turning the adapter to the right or left and remove the adapter.

  6. The installation is the reverse of the removal procedure. Use care not to damage the printed circuit board or any gauge components.
  7. Connect the negative battery cable and check all cluster-related items for proper operation.
Diamante
  1. Disconnect the negative battery cable.

    NOTE: If equipped with an air bag, be sure to disarm it before entering the vehicle.

  2. Remove the hood lock release handle and switches from the knee protector below the steering column. Then remove the exposed retaining screws and remove the knee protector.
  3. Remove the upper and the lower steering column covers.
  4. Remove the instrument cluster bezel.
  5. Remove the instrument cluster. Disassemble and remove gauges or the speedometer as required.

    NOTE: If the speedometer cable adapter must be serviced, disconnect the cable at the transaxle end. Pull the cable slightly toward the vehicle interior, release the lock by turning the adapter to the right or left and remove the adapter.

  6. The installation is the reverse of the removal procedure. Use care not to damage the printed circuit board or any gauge components.
  7. Connect the negative battery cable and check all cluster-related items for proper operation.

Previous Next