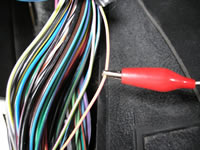
This shows the (TYPE B) PINK/YELLOW LOCK wire, marked with the RED Clip, in the Larger of the (2) Harnesses in the Drivers Kick Panel.
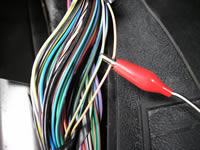
This shows the (TYPE B) PINK/LIGHT GREEN UNLOCK wire, marked with the RED Clip, in the Larger of the (2) Harnesses in the Drivers Kick Panel.

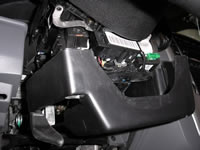
To gain access to the Under Dash wiring of this vehicle, start by removing this UNDER DASH PANEL, it is held in place by (2) 7mm screws, after the screws are removed, pull on the panel at each upper corner, one at a time, the panel in snapped into place a
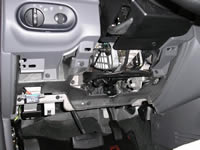
With the Under Dash Panel removed, you will can look inside the dash to locate the Brake Switch above the Brake Pedal, and locate the wire harnesses from the Steering Column.
To gain access to the IGNITION SWITCH HARNESS Plug and the Factory Transponder Anti-Theft System, you will need to remove the (2) Philips Head screws in the Bottom cover.
After removing these (2) screws and then unsnap the Upper Cover from the Lower cover, (this is a Clamshell type Steering Column cover) you can then pull the lower cover off and remove.

After removing the Column cover, look on the Left hand side of the Steering column and you will see the IGNITION SWITCH HARNESS Plug, this plug is plugged into the BLACK Ignition Switch Plug built on to the back of the Ignition Switch Tumbler on this vehi
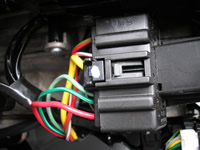
This is a close up of the IGNITION Harness Plug and the Ignition wires in this vehicle at the Steering column.
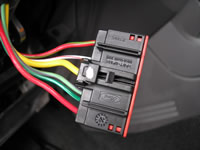
This is a picture of the IGNITION SWITCH Harness Plug, unplugged from the Ignition Switch, this only need to be unplugged if you are adding the FD-3 T-Harness to this vehicle.

To get to the Parking Light wire, you will need to pull the Head Light Switch out of the dash, it is just snapped into place on this vehicle.

The (+) TAN/BLACK BRAKE wire, marked with the RED Clip in this picture is located at the BRAKE SWITCH attached to the Brake Pedal on this vehicle.
This shows the (+) BLACK/LIGHT BLUE DOME LIGHT SUPERVISION wire, marked with the RED Clip, in the Larger of the (2) Harnesses in the Drivers Kick Panel.

On the back of the Head Light Switch, you will find the (+) BROWN PARKING LIGHT wire, this wire is marked with the RED Clip in this picture. Note ** in testing for the Parking Light wire, (2) wires on this switch tested correct, both are BROWN and small g
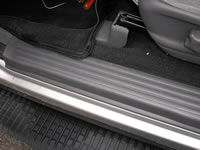
To gain access to the Drivers Kick Panel, you will need to remove the Drivers Door Sill cover, it is just snapped into place, pulling up on this panel will unsnap it, and set it aside.
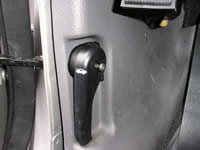
before you can remove the DRIVERS KICK PANEL you will need to remove the HOOD RELEASE HANDLE, to do this requires a #15 TORX bit, removing the screw from the middle of this handle and the handle will pull off.

After the Hood Release Handle is removed, you will need to remove the Plastic Push Pin that holds this panel in place, this Plastic Pin is towards the back of this plastic kick panel. With this pin removed, the panel will snap off to expose the wire harne

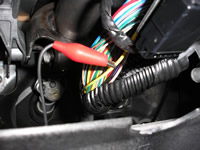
With the Plastic Kick Panel removed, you will see (2) Harnesses in the Kick, (1) Large Harrness wrapped in covering and (1) Small Harness wrapped in electrical tape. Open the Larger of the 2 Harnesses to find the LOCK, UNLOCK and DOME LIGHT/DOOR TRIGGER w
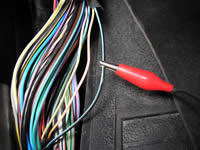
The (-) YELLOW/LIGHT GREEN HORN wire, marked with the RED Clip, is a little harder to find. The Horn wire is in a large BLACK harness exiting the Right Hand side of the Steering Column. This large harness is in Black Split Loom covering and wrapped with e
|