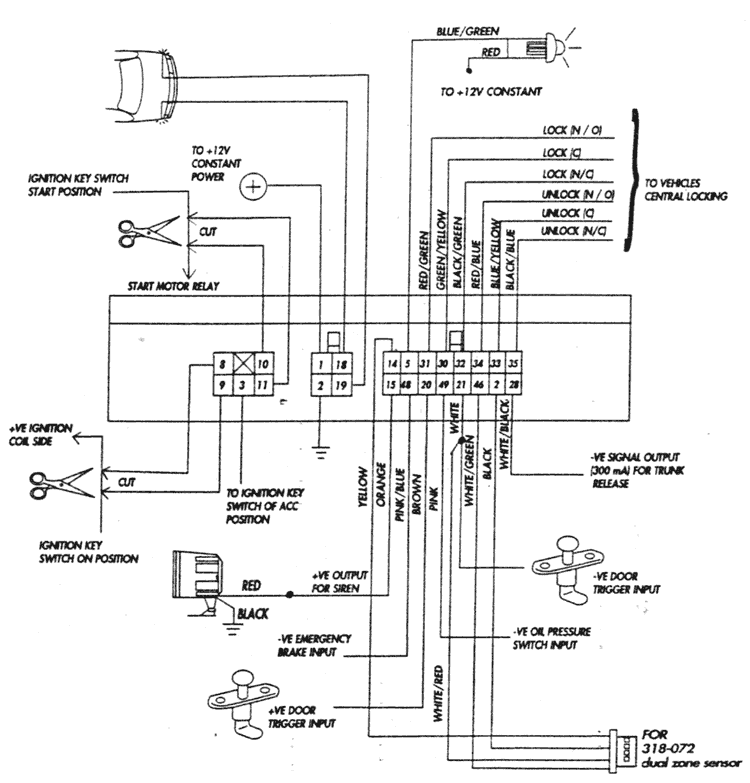
| Wire No. | Description |
|---|---|
| 1 | To + 12V constant (15A fuse) |
| 2 | To ground |
| 3 | To ACC of ignition key switch + 12V |
| 5 | -VE output connect to LED |
| 8,9 | Cut +VE ignition coil wire from ignition key switch to connect wire #9 to ignition key switch ON position and wire #8 connect to ignition coil side |
| 10,11 | Cut start motor relay wire from ignition key switch to connect wire #10 to the start motor relay side and wire #11 connect to ignition start position |
| 15 | +VE to siren |
| 18,19 | + 15A (with 7.5A X 2 fuse) connect to signal light (indicator) |
| 20 | To +VE door switch input. Please checking your vehicle door switch if -VE output, connect to wire #21 |
| 21 | To -VE door switch input. Please check your vehicle door switch if +VE output, connect to wire #20 |
| 28 | -VE signal output (300mA) for trunk release |
| 30 31 32 33 34 35 |
#30 to #35, these 6 wires are interface to existing central door locking from manually to remote activate when you arm & disarm (15A lock/ unlock output). To submit many different existing central door locking, please refer to the wiring diagram. |
| 48 | Input, connect to emergency brake switch -VE position |
| 49 | Input, connect to oil pressure switch -VE position. Used only when 6 starting attempt feature is needed |
| 4 pin connector | Connect to 318-072 dual zone sensor |
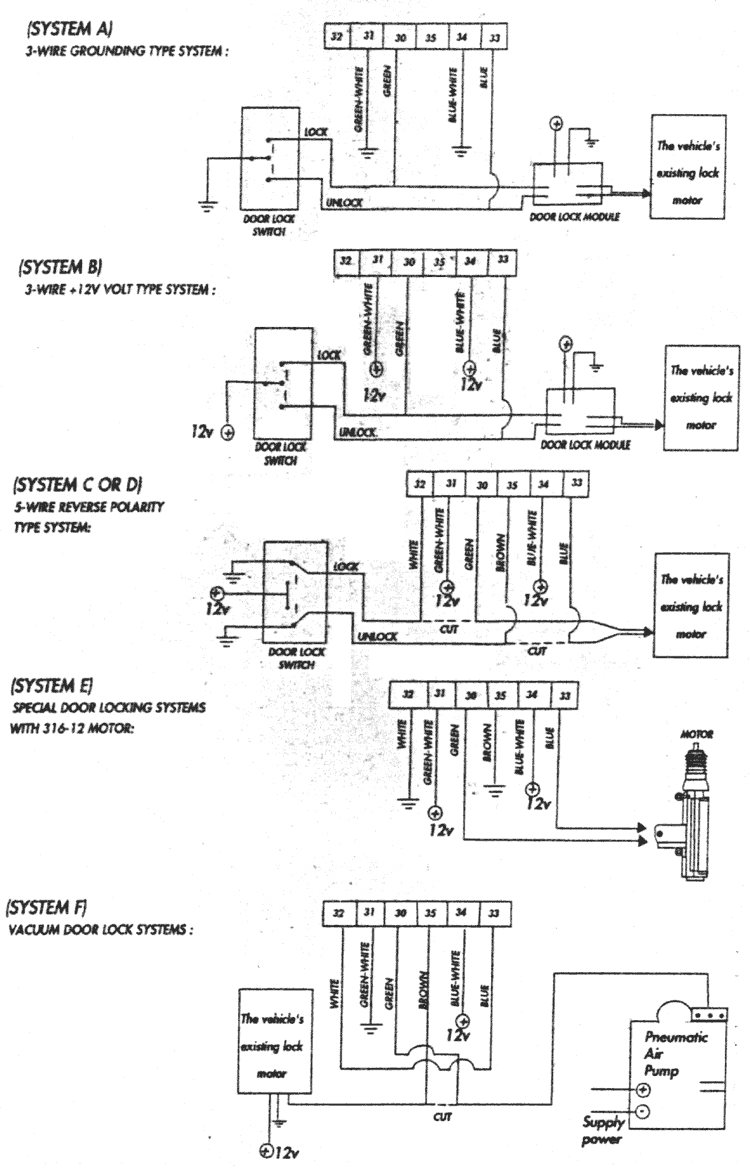
HOW TO IDENTIFY THE TYPE OF C.D.L SYSTEM IN YOUR VEHICLES
One wire is grounded all the time.
One wire is grounded only when switch is moved to the lock position.
One wire is grounded only when switch is moved to the unlock position.
One wire has + 12 volts oll the time.
One wire has + 12 volts only when switch is moved to the lock position
One wire has + 12 volts only when switch is moved to unlock position.
One wire has + 12 volts ŕll the time.
One wire is grounded ŕll the time.
One wire has + 12 volts only when switch is moved to lock position.
One wire has + 12 volts only when switch is moved to unlock position.
One wire has +12 volts ŕll the time.
Two wires are grounded all the tine.
One wire is grounded normally but will switch to + 12 volts when switch is moved to the lock position.
One wire is grounded normally but will switch to +12 volts when switch is moved to the unlock position.
If the driver's door key unlocks & locks. All the doors and when the key is used to lock or unlock the passenger's door the driver's door remains unchanged then you need to install model VAE-316-12 motor to the driver's door.
If when you lock or unlock the doors you see or hear each door locking one after the other (not all at the same time) then you should have a vacuum system.
The system provides the most convenient selectable features, if you have any feature change requirement, you can use the ignition key to program.
(A) How to program :
If you want to change any function opposite of the existing one, please follow the steps of Table 2.
| Step | What you need to do | Response |
|---|---|---|
| 1 | Disarm the system, leave the drive door open, and turn ignition key to ON position | Same response as active disarm |
| 2 | Press ŃH-1, quickly press CH-2 within 5 seconds | LED will be ON for 2 seconds, and then flash to select features (total are 7 flashes) |
| 3 | Turn ignition key OFF when the LED flashes the number of time you selected | Siren will emit 1 or 2 chirps to confirm the feature is programmed.
|
(B) Features you may program
The system provides different features (table 3) you may change as required.
| LED flash | Selectable Feature | Pre-set |
|---|---|---|
| 3 flashes | Last door Arming ON/OFF | OFF |
| 4 fleshes | Re-arm ON/OFF | ON |
| 5 flashes | Exterior illumination ON/OFF | OFF |
| Step | What you need to do | Response |
|---|---|---|
| 1 | Disarm the system. Turn ignition key on/off 3 times, and then stay in ON position Set and release emergency brake SET until the LED flashes |
|
| 2 | Press each transmitter CH-1 once (maximum of 3 transmitters can be learned) | One chirp confirm each transmitter is programmed |
| 3 | Release the emergency brake of 10 seconds has elapsed | Same response as disarm |
| Step | What you need to do | Response |
|---|---|---|
| 1 | Disarm the system.Tturn ignition key to ON position. Set and release emergency brake 4 times, stay emergency brake in SET position |
|
| 2 | Turn the Ignition key the number of times you selected (ą 1-9) | System will chirp each time ignition is turned ON |
| 3 | Release the emergency brake or 10 second elapsed | Same response as disarm |