A/C Pressure Switch Circuit Troubleshooting - Without Climate Control (Without ETCS)
A/C Pressure Switch Circuit Troubleshooting - Without Climate Control
| 1. | Disconnect the A/C pressure switch 2P connector. |
| 2. | Turn the ignition switch ON (II). |
| 3. | Measure the voltage between the No. 2 terminal of the A/C pressure switch 2P connector and body ground.
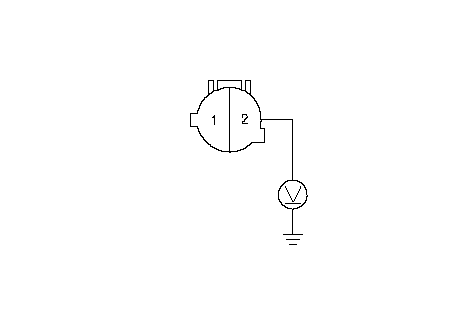 A/C PRESSURE SWITCH 2P CONNECTORWire side of female terminalsBLU/WHT A/C PRESSURE SWITCH 2P CONNECTORWire side of female terminalsBLU/WHTIs there about 5 V? YES - Go to 4. NO - Go to 22. |
| 4. | Turn the ignition switch OFF. |
| 5. | Check for continuity between the No. 1 and No. 2 terminals of the A/C pressure switch.
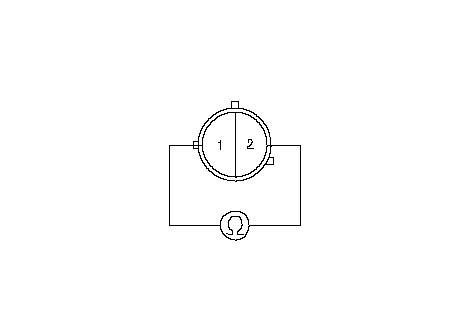 A/C PRESSURE SWITCH A/C PRESSURE SWITCHIs there continuity? YES - Go to 6. NO - Go to 27. |
| 6. | Reconnect the A/C pressure switch 2P connector. |
| 7. | Disconnect the A/C switch 5P connector. |
| 8. | Turn the ignition switch ON (II). |
| 9. | Measure the voltage between the No. 2 terminal of the A/C switch 5P connector and body ground.
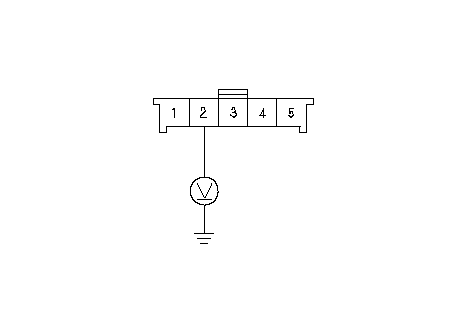 A/C SWITCH 5P CONNECTORWire side of female terminalsBLU A/C SWITCH 5P CONNECTORWire side of female terminalsBLUIs there about 5 V? YES - Go to 10. NO - Repair open in the wire between the A/C pressure switch and the A/C switch.n |
| 10. | Turn the ignition switch OFF. |
| 11. | Test the A/C switch. Is the A/C switch OK? YES - Go to 12. NO - Replace the A/C switch.n |
| 12. | Disconnect the heater fan switch 7P connector. |
| 13. | Check for continuity between the No. 1 terminal of the A/C switch 5P connector and the No. 6 terminal of the heater fan switch 7P connector.
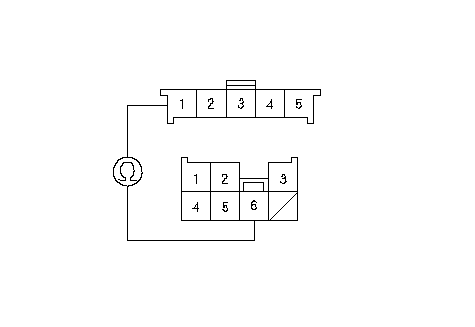 A/C SWITCH 5P CONNECTORWire side of female terminalsHEATER FAN SWITCH 7P CONNECTORWire side of female terminalsPNKPNK A/C SWITCH 5P CONNECTORWire side of female terminalsHEATER FAN SWITCH 7P CONNECTORWire side of female terminalsPNKPNKIs there continuity? YES - Go to 14. NO - Repair open in the wire between the A/C switch and the heater fan switch.n |
| 14. | Test the heater fan switch. Is the heater fan switch OK? YES - Go to 15. NO - Replace the heater fan switch.n |
| 15. | Check for continuity between the No. 3 terminal of the heater fan switch 7P connector and body ground.
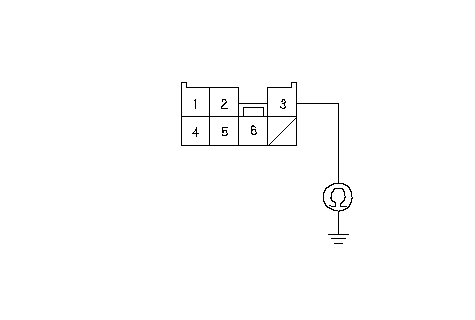 HEATER FAN SWITCH 7P CONNECTORWire side of female terminalsBLK HEATER FAN SWITCH 7P CONNECTORWire side of female terminalsBLKIs there continuity? YES - Go to 16. NO - Check for an open in the wire between the heater fan switch and body ground. If the wire is OK, check for poor ground at G402.n |
| 16. | Disconnect the evaporator temperature sensor 2P connector. |
| 17. | Measure the resistance between the No. 1 and No. 2 terminals of the evaporator temperature sensor.
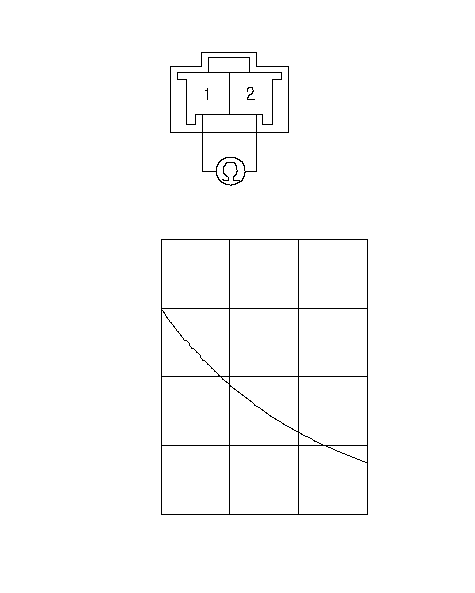 10 105020 6830 °C 86 °FTEMPERATURERESISTANCE kW10203040EVAPORATOR TEMPERATURE SENSORTerminal side of male terminals Is the resistance within the specifications shown on the graph? YES - Go to 18. NO - Replace the evaporator temperature sensor.n |
| 18. | Disconnect the negative cable from the battery. |
| 19. | Disconnect ECM/PCM connector E (31P). |
| 20. | Check for continuity between the following terminals of ECM/PCM connector E (31P) and the evaporator temperature sensor 2P connector.
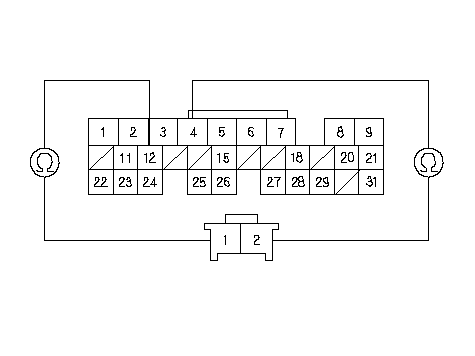 ECM/PCM CONNECTOR E (31P)Wire side of female terminalsPNKBLUEVAPORATOR TEMPERATURE SENSOR 2P ECM/PCM CONNECTOR E (31P)Wire side of female terminalsPNKBLUEVAPORATOR TEMPERATURE SENSOR 2PCONNECTORWire side of female terminalsPNKBLU Is there continuity? YES - Go to 21. NO - Repair any open in the wire(s) between the ECM/ PCM and the evaporator temperature sensor.n |
| 21. | Check for continuity between the No. 12 terminal of ECM/PCM connector E (31P) and body ground.
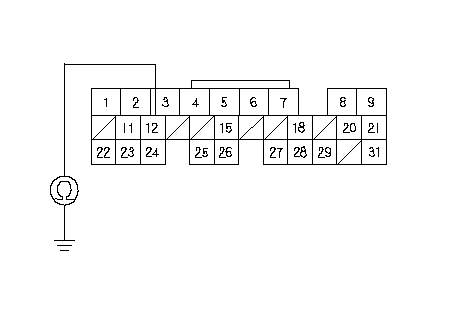 ECM/PCM CONNECTOR E (31P)Wire side of female terminalsBLU ECM/PCM CONNECTOR E (31P)Wire side of female terminalsBLUIs there continuity? YES - Repair short to body ground in the wire between the ECM/ PCM and the evaporator temperature sensor.n NO - Check for loose wires or poor connections at ECM/PCM connector E (31P), the evaporator temperature sensor 2P connector, the A/C pressure switch 2P connector, the A/C switch 5P connector and at the heater fan switch 7P connector. If the connections are good, substitute a known-good ECM/ PCM, and recheck. If the symptom/indication goes away, replace the original ECM/PCM.n |
| 22. | Turn the ignition switch OFF. |
| 23. | Reconnect the A/C pressure switch 2P connector. |
| 24. | Make sure the A/C switch is OFF. |
| 25. | Turn the ignition switch ON (II). |
| 26. | Measure the voltage between the No. 28 terminal of ECM/PCM connector E (31P) and body ground with the ECM/PCM connectors connected.
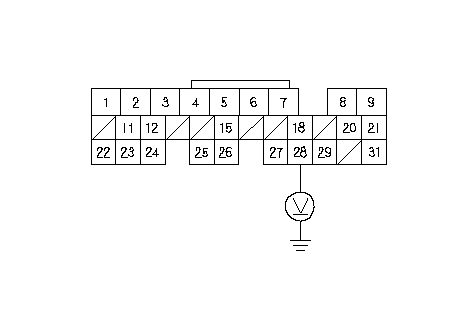 ECM/PCM CONNECTOR E (31P)Wire side of female terminalsBLU/WHT ECM/PCM CONNECTOR E (31P)Wire side of female terminalsBLU/WHTIs there about 5 V? YES - Repair open in the wire between the ECM/ PCM and the A/C pressure switch.n NO - Check for loose wires or poor connections at ECM/PCM connector E (31P). If the connections are good, substitute a known-good ECM/ PCM, and recheck. If the symptom/indication goes away, replace the original ECM/PCM.n |
| 27. | Check for proper A/C system pressure. Is the pressure within specifications? YES - Replace the A/C pressure switch.n NO - Repair the A/C pressure problem.n |