WINDSHIELD GLASS > REMOVAL |
| 1. REMOVE FRONT WIPER ARM HEAD CAP |
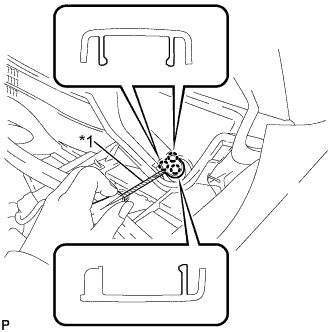 |
Using a screwdriver, disengage the 3 claws and remove the front wiper arm head cap.
| *1 | Protective Tape |
| 2. REMOVE FRONT WIPER ARM AND BLADE ASSEMBLY LH |
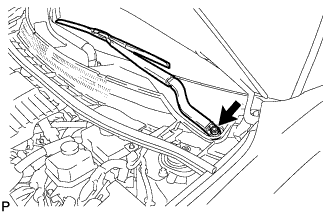 |
Remove the nut and the front wiper arm and blade assembly LH.
| 3. REMOVE FRONT WIPER ARM AND BLADE ASSEMBLY RH |
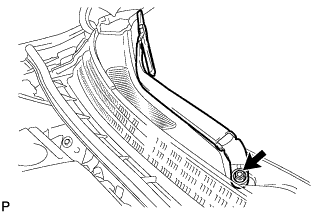 |
Remove the nut and the front wiper arm and blade assembly RH.
| 4. REMOVE FRONT NO. 2 SIDE PANEL PROTECTOR LH |
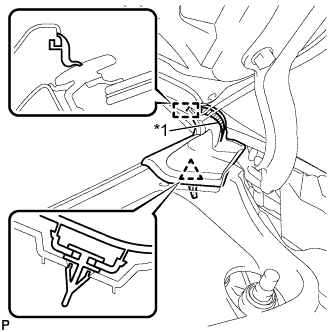 |
Disengage the clip and guide, and remove the front No. 2 side panel protector LH.
| *1 | Double-sided Tape |
| 5. REMOVE FRONT NO. 2 SIDE PANEL PROTECTOR RH |
| 6. REMOVE COWL TOP VENTILATOR LOUVER SUB-ASSEMBLY |
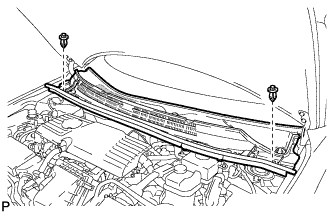 |
Remove the 2 clips.
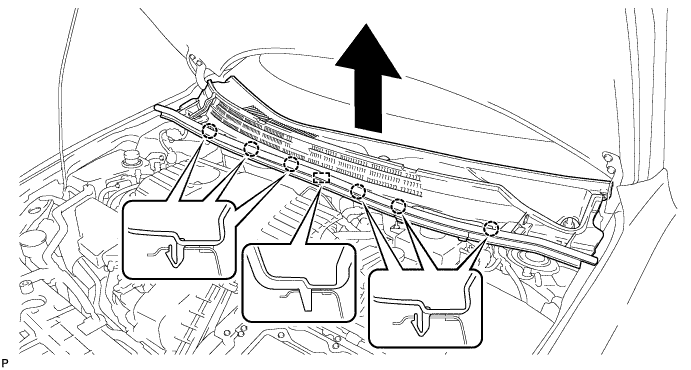
Disengage the 6 claws and guide as shown in the illustration.
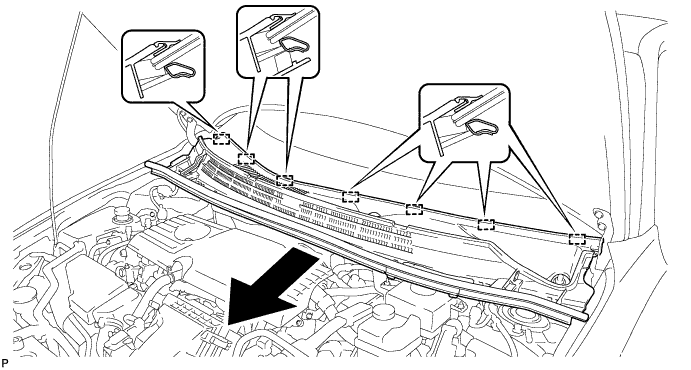
Disengage the 7 guides and pull out the cowl top ventilator louver sub-assembly as shown in the illustration.
| 7. REMOVE WINDSHIELD OUTSIDE MOULDING LH |
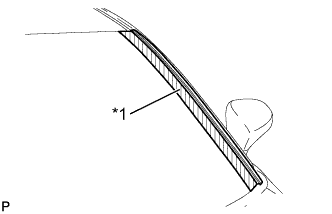 |
Put protective tape around the windshield outside moulding.
| *1 | Protective Tape |
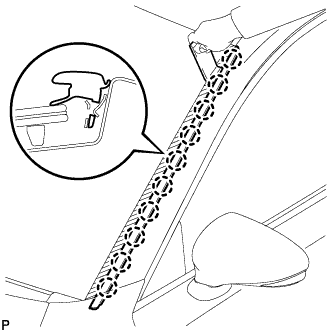 |
Using a moulding remover, disengage the 10 claws.
Disengage the guide and remove the windshield outside moulding.
| 8. REMOVE WINDSHIELD OUTSIDE MOULDING RH |
| 9. REMOVE INNER REAR VIEW MIRROR STAY HOLDER COVER (w/ EC Mirror) |
w/o Rear View Monitor System:
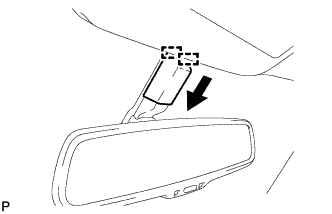 |
Disengage the 2 guides and slide the inner rear view mirror stay holder cover as shown in the illustration.
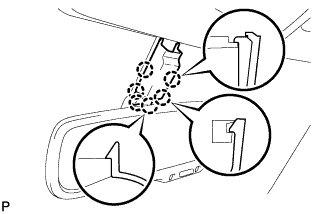 |
Disengage the 6 claws and remove the inner rear view mirror stay holder cover.
w/ Rear View Monitor System:
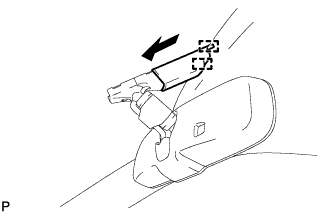 |
Disengage the 2 guides and slide the inner rear view mirror stay holder cover as shown in the illustration.
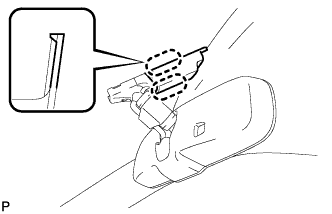 |
Disengage the 2 claws and remove the inner rear view mirror stay holder cover.
| 10. REMOVE INNER REAR VIEW MIRROR ASSEMBLY (w/o EC Mirror) |
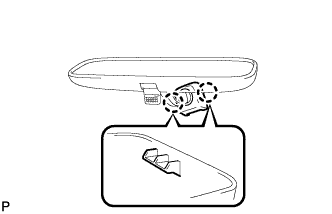 |
Disengage the 2 claws and disconnect the inner mirror base cover.
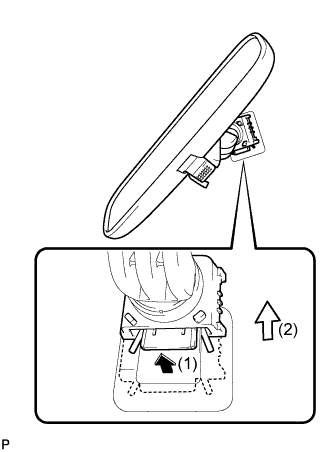 |
Pull the lever in the direction indicated by the arrow in the illustration, and slide the inner rear view mirror assembly upward to remove it.
| 11. REMOVE INNER REAR VIEW MIRROR ASSEMBLY (w/ EC Mirror) |
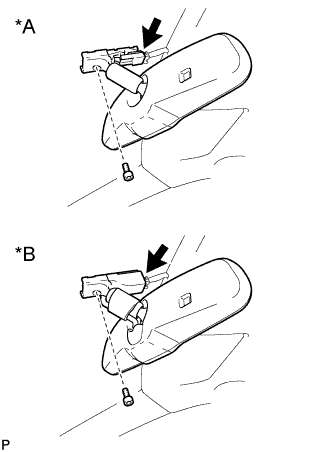 |
Disconnect the connector.
| *A | w/o Rear View Monitor System |
| *B | w/ Rear View Monitor System |
Using a T20 "TORX" socket wrench, remove the screw and inner rear view mirror assembly.
| 12. REMOVE RAIN SENSOR COVER (w/ Rain Sensor) |
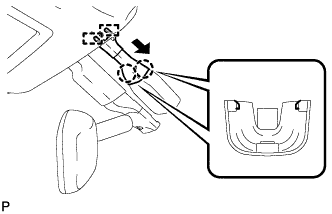 |
Disengage the 2 guides and disconnect the rain sensor cover as shown in the illustration.
Disengage the 2 claws and remove the rain sensor cover.
| 13. REMOVE RAIN SENSOR (w/ Rain Sensor) |
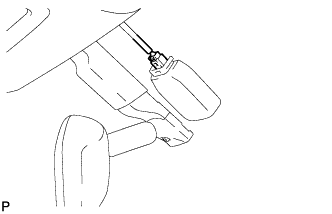 |
Disconnect the connector.
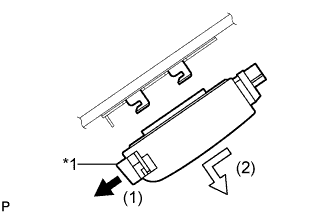 |
Release the stopper by pulling the stopper down and disconnect the rain sensor as shown in the illustration.
| *1 | Stopper |
| 14. REMOVE PROTECTOR (w/ Humidity Sensor) |
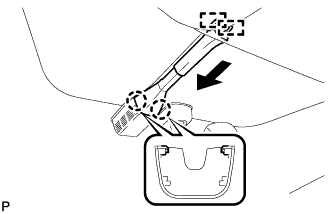 |
Disengage the 2 guides and slide the protector as shown in the illustration.
Disengage the 2 claws and remove the protector.
| 15. REMOVE HUMIDITY SENSOR (w/ Humidity Sensor) |
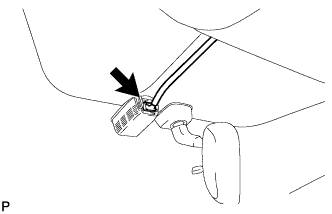 |
Disconnect the connector.
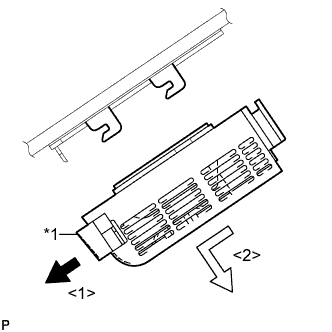 |
Release the stopper by pulling it down.
| *1 | Stopper |
Remove the humidity sensor as shown in the illustration.
| 16. DISCONNECT FRONT DOOR OPENING TRIM WEATHERSTRIP LH |
Remove the front door opening trim weatherstrip LH.
Remove the residual weatherstrip sealant from the body of the vehicle using cleaner.
| 17. REMOVE FRONT PILLAR GARNISH LH |
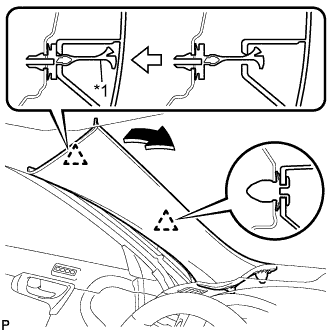 |
Pull the upper part of the garnish toward the inside of the cabin and disengage the 2 clips.
| *1 | Front Pillar Garnish Clip |
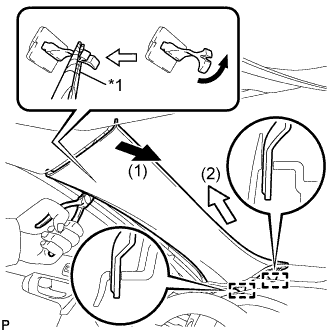 |
Turn the end of the front pillar garnish clip 90° with needle-nosed pliers and remove it from the front pillar garnish LH.
| *1 | Protective Tape |
Disengage the 2 guides.
w/o Front Center Speaker:
Remove the front pillar garnish LH by pulling it in the direction indicated by the arrow (2) in the illustration.
w/ Front Center Speaker:
Disconnect the front pillar garnish LH by pulling it in the direction indicated by the arrow (2) in the illustration.
Disconnect the connector and remove the front pillar garnish LH.
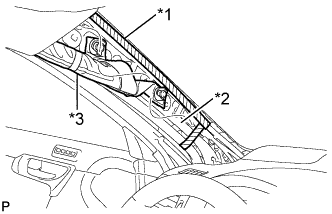 |
Protect the curtain shield airbag assembly.
| *1 | Adhesive Tape |
| *2 | Protective Cover |
| *3 | Curtain Shield Airbag Assembly |
Cover the airbag with a cloth or piece of nylon and secure the ends of the cover with tape as shown in the illustration.
| 18. DISCONNECT FRONT DOOR OPENING TRIM WEATHERSTRIP RH |
| 19. REMOVE FRONT PILLAR GARNISH RH |
| 20. REMOVE MAP LIGHT ASSEMBLY |
Open the overhead console.
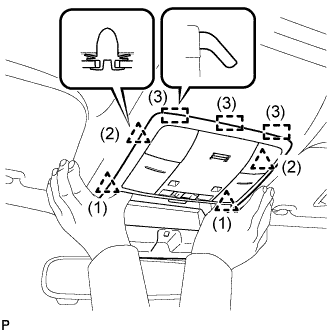 |
Disengage the 4 clips and 3 guides as shown in the illustration.
Disconnect the connector and remove the map light assembly.
| 21. REMOVE NO. 1 ROOM LIGHT ASSEMBLY |
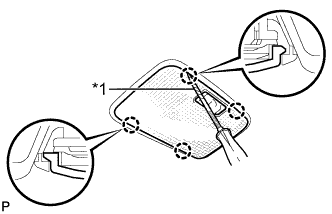 |
Using a screwdriver with its tip wrapped with protective tape, disengage the 4 claws and remove the No. 1 room light lens.
| *1 | Protective Tape |
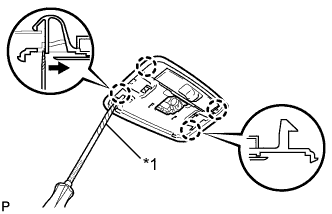 |
Using a screwdriver with its tip wrapped with protective tape, disengage the 4 claws and disconnect the No. 1 room light housing as shown in the illustration.
| *1 | Protective Tape |
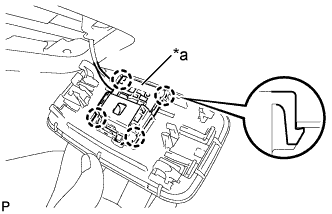 |
Disengage the 4 claws and disconnect the room light switch base from the No. 1 room light housing.
| *a | Room Light Switch Base |
| 22. REMOVE ASSIST GRIP SUB-ASSEMBLY |
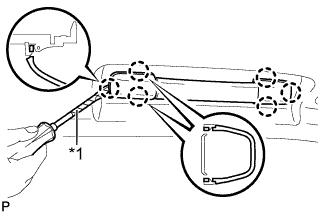 |
Using a screwdriver, disengage the 6 claws and remove the 2 assist grip covers.
| *1 | Protective Tape |
Disengage the 2 clips and remove the assist grip sub-assembly.
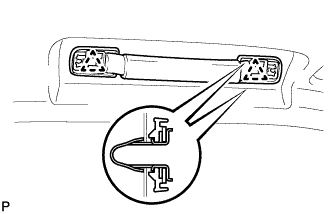 |
Remove the 2 clips from the vehicle body.
| 23. REMOVE VISOR BRACKET COVER (for LH Side) |
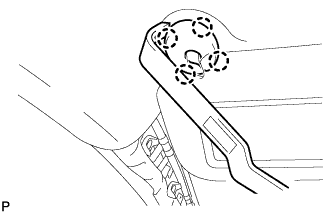 |
Using a moulding remover, disengage the 4 claws and remove the visor bracket cover LH.
| 24. REMOVE VISOR ASSEMBLY LH |
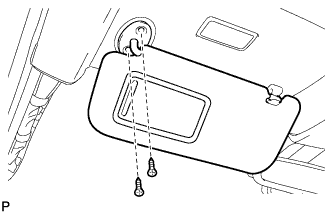 |
Remove the 2 screws and the visor assembly LH.
| 25. REMOVE VISOR BRACKET COVER (for RH Side) |
| 26. REMOVE VISOR ASSEMBLY RH |
| 27. REMOVE VISOR HOLDER |
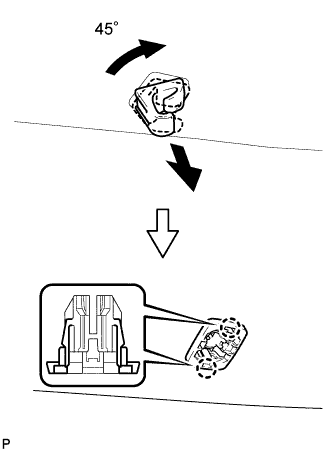 |
Turn the visor holder approximately 45° and pull it out as shown in the illustration.
Disengage the 2 claws and remove the visor holder.
| 28. REMOVE SLIDING ROOF OPENING TRIM MOULDING (w/ Sliding Roof) |
Remove the sliding roof opening trim moulding.
| 29. REMOVE ROOF HEADLINING ASSEMBLY |
Slightly lower the front section of the roof headlining assembly so that the windshield glass can be removed.
| 30. REMOVE WINDSHIELD GLASS SUB-ASSEMBLY |
w/ Front Window Deicer System:
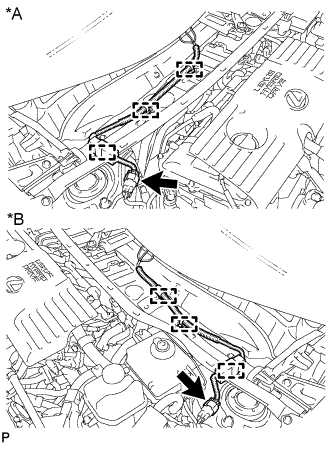 |
Disengage the 3 clamps.
| *A | LHD |
| *B | RHD |
Disconnect the connector.
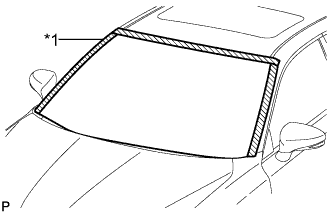 |
Apply protective tape to the area around the installation position of the windshield glass on the vehicle body to prevent it from being scratched.
| *1 | Protective Tape |
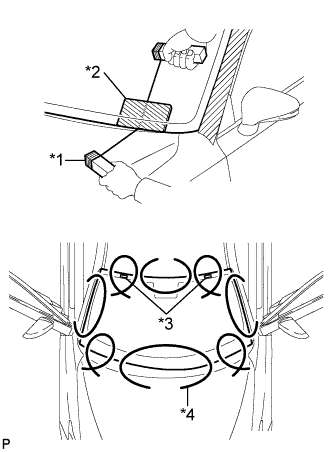 |
Pass a piano wire between the vehicle body and glass from the interior, as shown in the illustration.
| *1 | Wooden Block |
| *2 | Plastic Sheet |
| *3 | Stopper |
| *4 | Piano Wire |
Tie both wire ends to wooden blocks or similar objects that can serve as handles.
Cut off the adhesive by pulling the piano wire around the windshield glass sub-assembly.
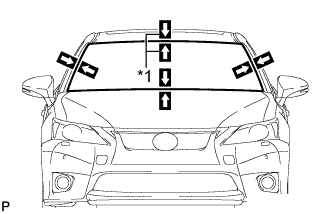 |
Place matchmarks on the windshield glass sub-assembly and vehicle body on the locations indicated in the illustration.
| *1 | Matchmark |
Disconnect the windshield glass stoppers.
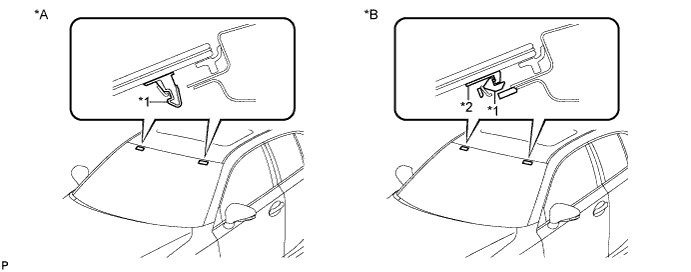
| *A | 1-piece Type | *B | 2-pieceType |
| *1 | No. 1 Stopper | *2 | No. 2 Stopper |
Using suction cups, remove the windshield glass sub-assembly.
| 31. REMOVE WINDSHIELD GLASS ADHESIVE DAM |
When reusing the windshield glass sub-assembly:
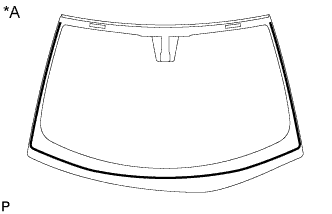 |
Using a scraper, remove the windshield glass adhesive dam.
| *A | Back Side |
| 32. REMOVE WINDSHIELD OUTSIDE MOULDING |
When reusing the windshield glass sub-assembly:
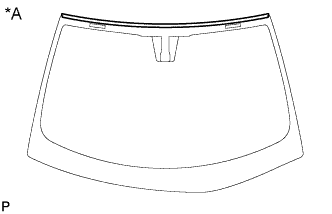 |
Using a scraper, remove the windshield outside moulding.
| *A | Back Side |
| 33. REMOVE NO. 1 WINDSHIELD GLASS STOPPER (for 1-piece Type) |
When reusing the windshield glass sub-assembly:
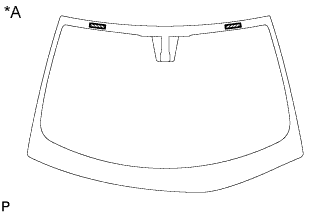 |
Using a scraper, remove the 2 No. 1 windshield glass stoppers.
| *A | Back Side |
| 34. REMOVE NO. 2 WINDSHIELD GLASS STOPPER (for 2-piece Type) |
When reusing the windshield glass sub-assembly:
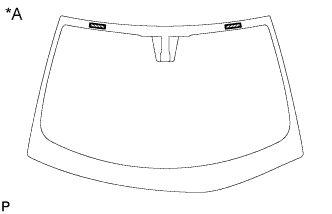 |
Using a scraper, remove the 2 No. 2 windshield glass stoppers.
| *A | Back Side |
| 35. REMOVE NO. 1 WINDSHIELD GLASS STOPPER (for 2-piece Type) |
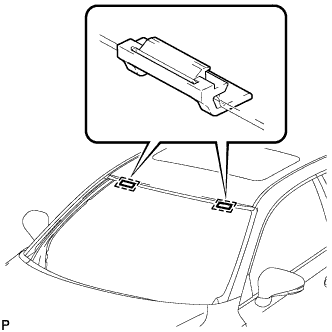 |
Remove the 2 No. 1 windshield glass stoppers.
| 36. CLEAN WINDSHIELD GLASS |
When reusing the windshield glass:
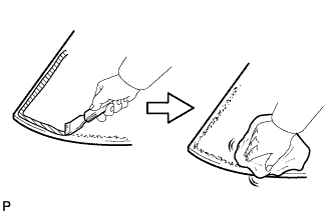 |
Using a scraper, remove any adhesive tape and adhesive residue from the windshield glass.
Clean the outer circumference of the windshield glass with a non-residue solvent.
| 37. CLEAN VEHICLE BODY |
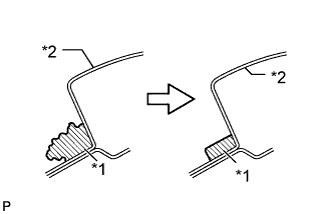 |
Clean and shape the contact surfaces of the vehicle body.
| *1 | Adhesive |
| *2 | Body |
Using a knife, cut away excess adhesive on the contact surfaces of the vehicle body as shown in the illustration.
Clean the contact surfaces of the vehicle body with a piece of cloth saturated with cleaner.
