DTC    P0327    Knock Sensor 1 Circuit Low Input (Bank 1 or Single Sensor)

DTC    P0328    Knock Sensor 1 Circuit High Input (Bank 1 or Single Sensor)

for Preparation Click here


DESCRIPTION

A flat type knock control sensor is used. Flat type knock control sensors (non-resonant type) have a structure that can detect vibrations over a wide band of frequencies: between approximately 6 kHz and 15 kHz.
Knock control sensors are fitted onto the engine block to detect engine knocking.
The knock control sensor contains a piezoelectric element which generates a voltage when it becomes deformed.
The voltage is generated when the engine block vibrates due to knocking. Occurrence of engine knocking can be suppressed by delaying the ignition timing.

DTC No.
DTC Detection Condition
Trouble Area
P0327
Output voltage of knock control sensor below 0.5 V for 1 second or more (1 trip detection logic).
  1. Short in knock control sensor circuit
  1. Knock control sensor
  1. ECM
P0328
Output voltage of knock control sensor higher than 4.5 V for 1 second or more (1 trip detection logic).
  1. Open in knock control sensor circuit
  1. Knock control sensor
  1. ECM

HINT:
When either DTC P0327 or P0328 is set, the ECM enters fail-safe mode. During fail-safe mode, the ignition timing is delayed to its maximum retardation. Fail-safe mode continues until the power switch is turned off.

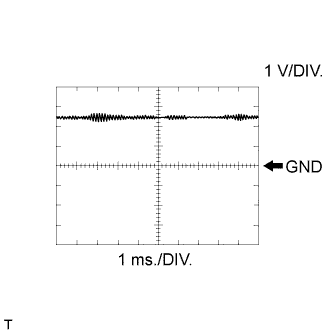
Reference: Inspection using an oscilloscope
A194185E01

Standard:

Tester Connection
Tool Setting
Condition
Specified Condition
D27-87 (KNK1) - D27-110 (EKNK)
1 V/DIV.
1 ms./DIV.
Engine speed maintained at 2500 rpm after warming engine
The correct waveform is as shown


MONITOR DESCRIPTION

If the output voltage transmitted by the knock sensor remains low or high for 1 second, the ECM interprets this as a malfunction in the sensor circuit, and sets a DTC.

MONITOR STRATEGY


Frequency of Operation
Continuous

CONFIRMATION DRIVING PATTERN

  1. Connect the intelligent tester to the DLC3.
  2. Turn the power switch on (IG) and turn the tester on.
  3. Clear the DTCs (even if no DTCs are stored, perform the clear DTC operation).
  4. Turn the power switch off and wait for 30 seconds.
  5. Turn the power switch on (IG) and turn the tester on.
  6. Put the engine in inspection mode (maintenance mode) (Click here).
  7. Start the engine and wait 5 minutes.
  8. Enter the following menus: Powertrain / Engine and ECT / DTC.
  9. Read the pending DTCs.

    HINT:
    1. If a pending DTC is output, the system is malfunctioning.
    2. If a pending DTC is not output, perform the following procedure.

  10. Enter the following menus: Powertrain / Engine and ECT / Utility / All Readiness.
  11. Input the DTC: P0327 or P0328.
  12. Check the DTC judgment result.

    Tester Display
    Description
    NORMAL
    1. DTC judgment completed
    2. System normal
    ABNORMAL
    1. DTC judgment completed
    2. System abnormal
    INCOMPLETE
    1. DTC judgment not completed
    2. Perform driving pattern after confirming DTC enabling conditions
    UNKNOWN
    1. Unable to perform DTC judgment
    2. Number of DTCs which do not fulfill DTC preconditions has reached ECU memory limit

    HINT:
    1. If the judgment result shows NORMAL, the system is normal.
    2. If the judgment result shows ABNORMAL, the system has a malfunction.
    3. If the judgment result shows INCOMPLETE or UNKNOWN, idle the engine for 5 minutes and check the DTC judgment result again.


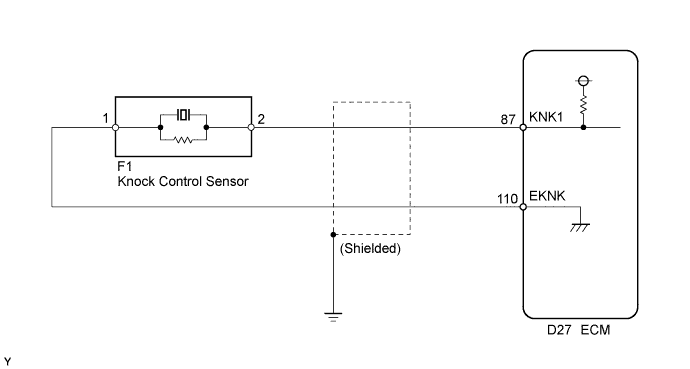
WIRING DIAGRAM


A220565E16


INSPECTION PROCEDURE

HINT:
Read freeze frame data using the intelligent tester. The ECM records vehicle and driving condition information as freeze frame data the moment a DTC is stored. When troubleshooting, freeze frame data can be helpful in determining whether the vehicle was running or stopped, whether the engine was warmed up or not, whether the air fuel ratio was lean or rich, as well as other data recorded at the time of a malfunction.

1.READ VALUE USING INTELLIGENT TESTER (KNOCK FEEDBACK VALUE)
  1. Connect the intelligent tester to the DLC3.

  1. Turn the power switch on (IG) and turn the tester on.

  1. Put the engine in inspection mode (maintenance mode) (Click here).

  1. Start the engine.

  1. Warm up the engine.

  1. Enter the following menus: Powertrain / Engine and ECT / Knock Feedback Value.

  1. Read the value while driving the vehicle.

    OK:
    The value changes.

    HINT:
    Malfunction does not occur
    Knock Feedback Value changes
    Malfunctions occur
    Knock Feedback Value does not change
    The knock feedback value change can be confirmed by running the engine with a high load, for example, by racing the engine.


NG
Go to step 2
OK

CHECK FOR INTERMITTENT PROBLEMS (Click here)  

2.INSPECT ECM (KNK1 VOLTAGE)


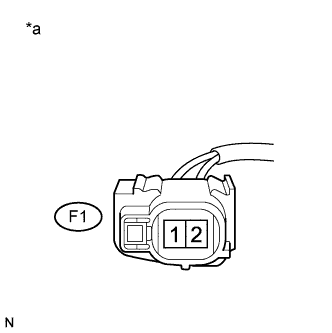
    A194105E74
  1. Disconnect the knock control sensor connector.

  1. Turn the power switch on (IG).

  1. Measure the voltage according to the value(s) in the table below.

    Standard Voltage:
    Tester Connection
    Switch Condition
    Specified Condition
    F1-2 - F1-1
    Power switch on (IG)
    4.5 to 5.5 V

    Text in Illustration 
    *a
    Front view of wire harness connector
    (to Knock Control Sensor)


NG
Go to step 4
OK


3.INSPECT KNOCK CONTROL SENSOR
  1. Inspect the knock control sensor (Click here).


NG
REPLACE KNOCK CONTROL SENSOR (Click here)
OK

REPLACE ECM (Click here)  

4.CHECK HARNESS AND CONNECTOR (ECM - KNOCK CONTROL SENSOR)
  1. Disconnect the knock control sensor connector.

  1. Disconnect the ECM connector.

  1. Measure the resistance according to the value(s) in the table below.

    Standard Resistance:

    Tester Connection
    Condition
    Specified Condition
    F1-2 - D27-87 (KNK1)
    Always
    Below 1 Ω
    F1-1 - D27-110 (EKNK)
    Always
    Below 1 Ω
    F1-2 or D27-87 (KNK1) - Body ground
    Always
    10 kΩ or higher
    F1-1 or D27-110 (EKNK) - Body ground
    Always
    10 kΩ or higher


NG
REPAIR OR REPLACE HARNESS OR CONNECTOR
OK

REPLACE ECM (Click here)