SIDE AIRBAG SENSOR > REMOVAL

for Preparation Click here


HINT:
  1. Use the same procedure for the RH side and LH side.
  2. The procedure listed below is for the LH side.


1. PRECAUTION

CAUTION:
Be sure to read Precaution thoroughly before servicing (Click here).

NOTICE:
After turning the power switch off, waiting time may be required before disconnecting the cable from the negative (-) auxiliary battery terminal. Therefore, make sure to read the disconnecting the cable from the negative (-) auxiliary battery terminal notices before proceeding with work (Click here).


2. REMOVE REAR NO. 2 FLOOR BOARD
  1. Remove the rear No. 2 floor board.


3. REMOVE REAR DECK FLOOR BOX
  1. Remove the rear deck floor box.


4. REMOVE REAR NO. 3 FLOOR BOARD
  1. Remove the rear No. 3 floor board.


5. REMOVE DECK FLOOR BOX RH


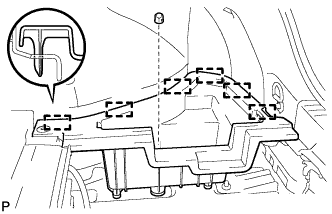
    B270546
  1. Remove the clip.

  1. Disengage the 6 guides and remove the deck floor box RH.


6. REMOVE REAR FLOOR BOARD UPPER NO. 3 PLATE


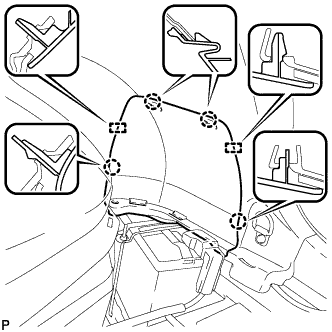
    B270547
  1. Disengage the 4 claws and 2 guides, and remove the rear floor board upper No. 3 plate.


7. DISCONNECT CABLE FROM NEGATIVE AUXILIARY BATTERY TERMINAL

CAUTION:
Wait at least 90 seconds after disconnecting the cable from the negative (-) auxiliary battery terminal to disable the SRS system.

NOTICE:
When disconnecting the cable, some systems need to be initialized after the cable is reconnected (Click here).


8. REMOVE FRONT DOOR SCUFF PLATE


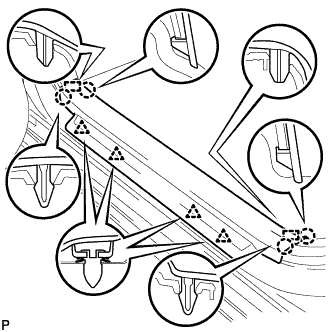
    B270515
  1. Disengage the 4 claws, 2 guides and 4 clips, and remove the front door scuff plate LH.


9. DISCONNECT FRONT DOOR OPENING TRIM WEATHERSTRIP

HINT:
Separate the front door opening trim weatherstrip to the extent that allows the removal of the center pillar lower garnish.


10. REMOVE REAR DOOR SCUFF PLATE


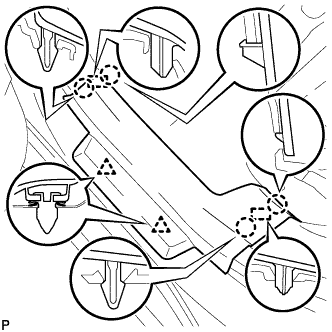
    B270519
  1. Disengage the 4 claws, 2 guides and 2 clips, and remove the rear door scuff plate LH.


11. DISCONNECT REAR DOOR OPENING TRIM WEATHERSTRIP

HINT:
Separate the rear door opening trim weatherstrip to the extent that allows the removal of the center pillar lower garnish.


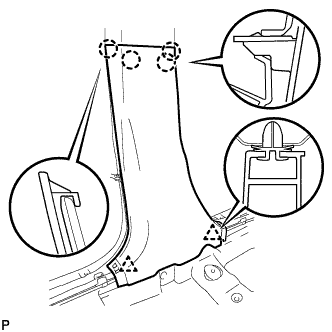
12. REMOVE CENTER PILLAR LOWER GARNISH


    B270537
  1. Disengage the 4 claws and 2 clips, and remove the center pillar lower garnish LH.


13. REMOVE SIDE AIRBAG SENSOR ASSEMBLY
  1. Check that the power switch is off.

  1. Check that the cable is disconnected from the negative (-) auxiliary battery terminal.

    CAUTION:
    Wait at least 90 seconds after disconnecting the cable from the negative (-) auxiliary battery terminal to disable the SRS system.


  1. Disconnect the connector.

    NOTICE:
    When disconnecting any airbag connector, take care not to damage the airbag wire harness.


    1. Push and hold the white housing lock, and slide the outer connector locking sleeve.
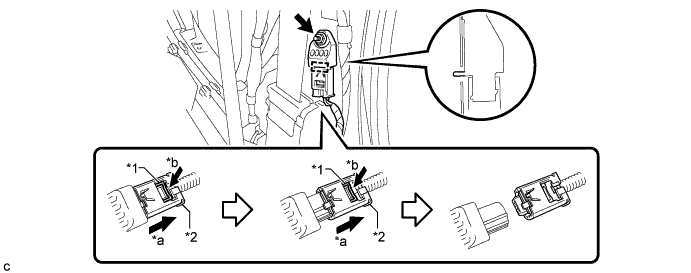

      B268546E01


      Text in Illustration 
      *1
      Housing Lock
      *2
      Outer Connector Locking Sleeve
      *a
      Slide
      *b
      Push

    2. Push and hold the white housing lock again, and slide the outer connector locking sleeve to disconnect the connector.

  1. Remove the nut and side airbag sensor assembly.

    NOTICE:
    Loosen the nut while holding the side airbag sensor assembly because the side airbag sensor assembly pin (stopper) is easily damaged.