CAN COMMUNICATION SYSTEM > Navigation ECU Communication Stop Mode

for Preparation Click here


DESCRIPTION


Detection Item
Symptom
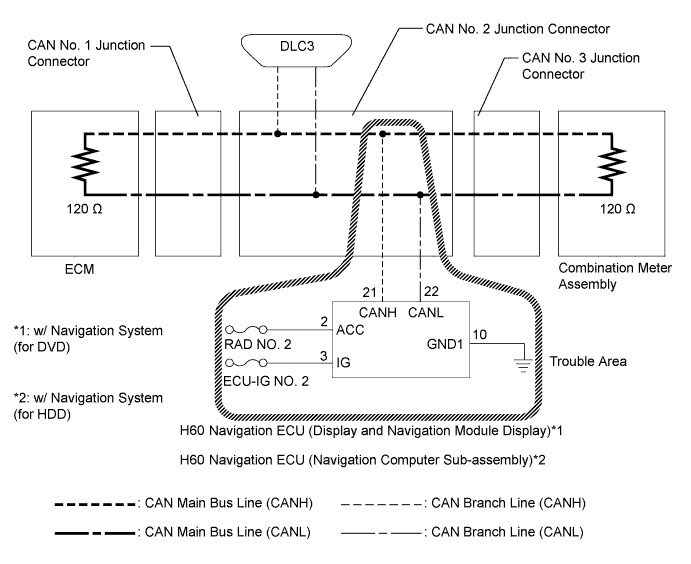
Trouble Area
Navigation ECU Communication Stop Mode
  1. "AVN1" is not displayed on the "Communication Bus Check" screen of the intelligent tester
  2. Applies to Navigation ECU Communication Stop Mode in DTC Combination Table
  1. Navigation ECU branch line or connector
  2. Power source circuit of Navigation ECU
  3. Navigation ECU (Display and navigation module display)*1
  4. Navigation ECU (Navigation computer sub-assembly)*2
  1. *1: w/ Navigation System (for DVD)
  2. *2: w/ Navigation System (for HDD)

WIRING DIAGRAM


C236214E03


INSPECTION PROCEDURE

NOTICE:
  1. Turn the power switch off before measuring the resistances between CAN main bus lines and between CAN branch lines.
  2. Turn the power switch off before inspecting CAN bus lines for a ground short.
  3. After the power switch is turned off, check that the key reminder warning system and light reminder warning system are not operating.
  4. Before measuring the resistance, leave the vehicle as is for at least 1 minute and do not operate the power switch, any other switches or the doors. If any doors need to be opened in order to check connectors, open the doors and leave them open.

HINT:
  1. Operating the power switch, any other switches or a door triggers related ECU and sensor communication on the CAN. This communication will cause the resistance value to change.
  2. Even after DTCs are cleared, if a DTC is stored again after driving the vehicle for a while, the malfunction may be occurring due to vibration of the vehicle. In such a case, wiggling the ECUs or wire harness while performing the inspection below may help determine the cause of the malfunction.

1.CHECK CAN BUS LINE FOR DISCONNECTION (NAVIGATION ECU BRANCH LINE)
  1. Turn the power switch off.


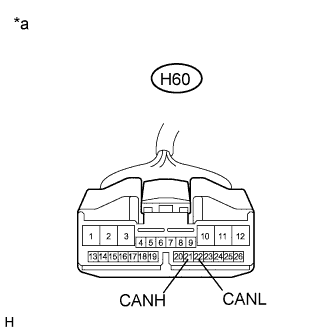
    E159991E65
  1. Disconnect the navigation ECU connector.

  1. Measure the resistance according to the value(s) in the table below.

    Standard Resistance:
    Tester Connection
    Switch Condition
    Specified Condition
    H60-21 (CANH) - H60-22 (CANL)
    Power switch off
    54 to 69 Ω

    Text in Illustration 
    *a
    Front view of wire harness connector
    (to Navigation ECU)


NG
REPAIR OR REPLACE CAN BRANCH LINE OR CONNECTOR (NAVIGATION ECU)
OK


2.CHECK HARNESS AND CONNECTOR (POWER SOURCE CIRCUIT)


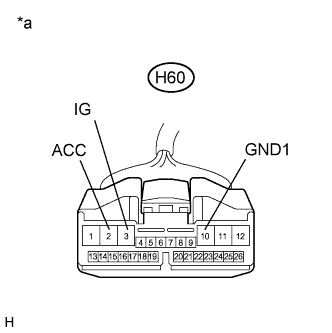
    E159991E66
  1. Measure the resistance according to the value(s) in the table below.

    Standard Resistance:
    Tester Connection
    Condition
    Specified Condition
    H60-10 (GND1) - Body ground
    Always
    Below 1 Ω

  1. Measure the voltage according to the value(s) in the table below.

    Standard Voltage:
    Tester Connection
    Switch Condition
    Specified Condition
    H60-2 (ACC) - Body ground
    Power switch on (ACC)
    11 to 14 V
    H60-3 (IG) - Body ground
    Power switch on (IG)
    11 to 14 V

    Text in Illustration 
    *a
    Front view of wire harness connector
    (to Navigation ECU)

    Result:
    Result
    Proceed to
    OK (w/ navigation system (for DVD))
    A
    OK (w/ navigation system (for HDD))
    B
    NG
    C


B
REPLACE NAVIGATION COMPUTER SUB-ASSEMBLY (NAVIGATION ECU) (Click here)

C
REPAIR OR REPLACE HARNESS OR CONNECTOR (POWER SOURCE CIRCUIT)
A

REPLACE DISPLAY AND NAVIGATION MODULE DISPLAY (NAVIGATION ECU) (Click here)