NAVIGATION SYSTEM (for HDD) > SYSTEM DESCRIPTION

for Preparation Click here


NAVIGATION SYSTEM OUTLINE


  1. Vehicle position tracking methods
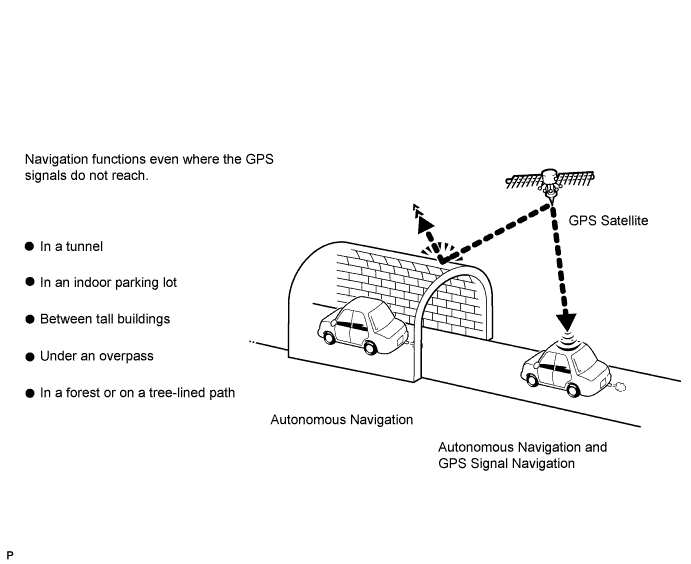
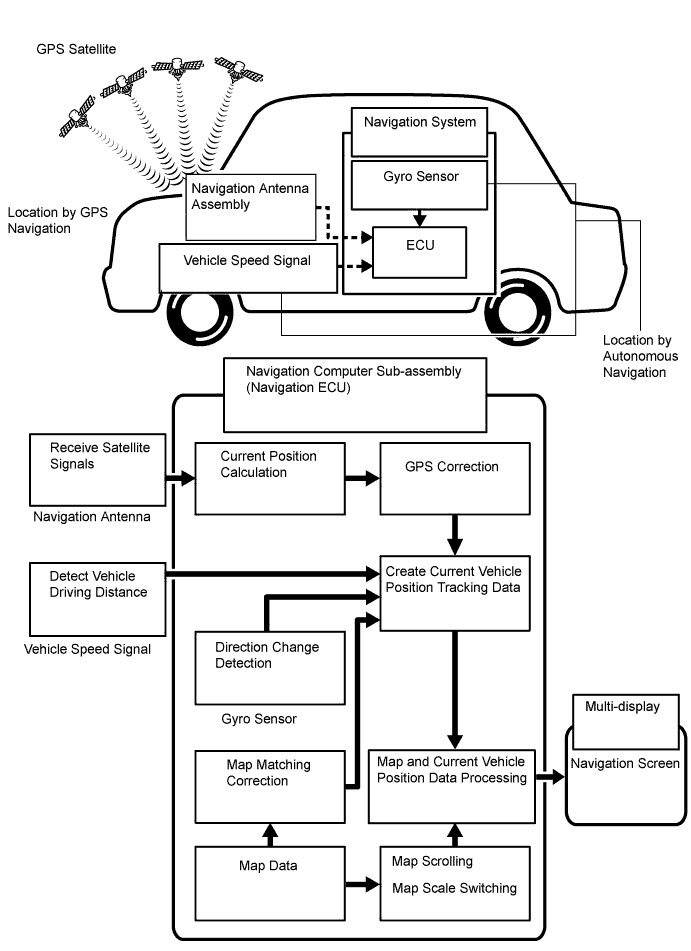
    It is essential that the navigation system correctly tracks the current vehicle position and displays it on the map. There are 2 methods to track the current vehicle position: autonomous (dead reckoning) and GPS* (satellite) navigation. Both navigation methods are used in conjunction with each other.
    *: GPS (Global Positioning System)

    E142555E14


    Operation
    Description
    Vehicle Position Calculation
    The navigation computer sub-assembly calculates the current vehicle position (direction and current position) using the direction deviation signal from the gyro sensor and driving distance signal from the vehicle speed sensor and creates the driving route.
    Map Display Processing
    The navigation computer sub-assembly processes the vehicle position data, vehicle driving track and map data from the hard disk drive.
    Map Matching
    The map data from the hard disk drive is compared to the vehicle position and driving track data. Then, the vehicle position is matched with the nearest road.
    GPS Correction
    The vehicle position is matched to the position measured by the GPS. Then, the GPS measurement position data is compared with the vehicle position and driving track data. If the position is very different, the GPS measurement position is used.
    Distance Correction
    The vehicle speed signal includes error caused by tire wear and slippage between the tires and road surface. Distance correction is performed to account for this. The navigation computer sub-assembly automatically offsets the signal to make up for the difference between the distance signal and distance data of the map. The offset is automatically updated.

    I100028E24

    HINT:
    The combination of autonomous and GPS navigation makes it possible to display the vehicle position even when the vehicle is in places where GPS signals cannot be received. When only autonomous navigation is used, however, the mapping accuracy may slightly decrease.

  2. Autonomous navigation
    This method determines the relative vehicle position based on the driving track determined by the gyro located in the navigation computer sub-assembly and the vehicle speed signal.

    1. Gyro sensor
      Used to calculate the direction by detecting angular velocity. It is located in the navigation computer sub-assembly.

    2. Vehicle speed signal
      Used to calculate the vehicle driving distance.


  3. GPS* navigation (Satellite navigation)
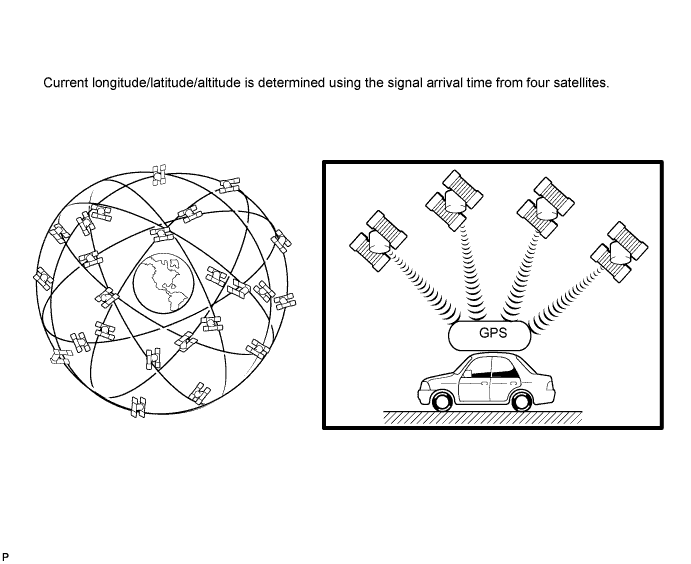
    This method detects the absolute vehicle position using radio waves from GPS satellites.
    *: GPS satellites were launched by the U.S. Department of Defense for military purposes.

    I100029E07


    Number of Satellites
    Measurement
    Description
    2 or less
    Measurement is impossible
    Vehicle position cannot be obtained because the number of satellites is not enough.
    3
    2-dimensional measurement is possible
    Vehicle position is obtained based on the current longitude and latitude. (This is less precise than 3-dimensional measurement.)
    4
    3-dimensional measurement is possible
    Vehicle position is obtained based on the current longitude, latitude and altitude.


  4. Map matching
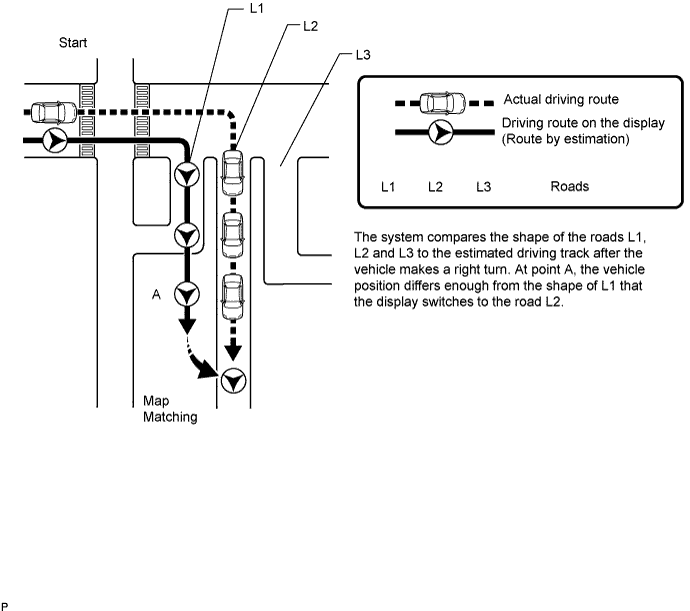
    The current driving route is calculated by autonomous navigation (according to the gyro sensor and vehicle speed signal) and GPS navigation. This information is then compared with possible road shapes from the map data in the hard disk drive and the vehicle position is set onto the most appropriate road.

    I100030E21


MULTI-DISPLAY OUTLINE


  1. A pop-up type multi-display is built into the center instrument cluster finish panel assembly. Opening, closing and tilt angle adjustments of the multi-display can be performed using the multi-display switch.
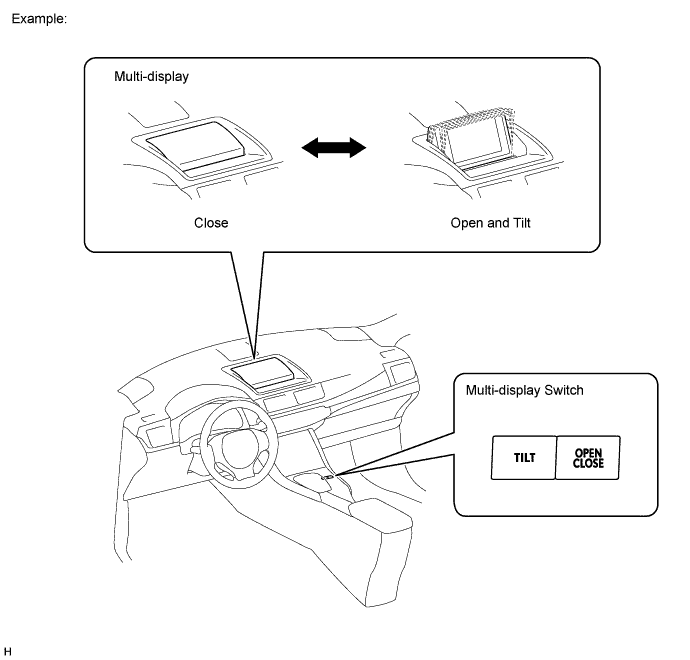

    E210257E02


REMOTE TOUCH OUTLINE

HINT:
  1. The navigation system is remotely controlled using the remote touch switch knob and switches.
  2. The remote touch is equipped with a feedback force function.
  3. When the remote touch switch knob is operated, the built-in 2-axis motors are controlled. The motors are used to provide feedback force for the knob according to the pointer operation displayed on the multi-display.
  4. The feedback force of the remote touch allows the users to select icons easily when operating the navigation system.


  1. Remote Touch Switch Knob Operation


    E176765E01


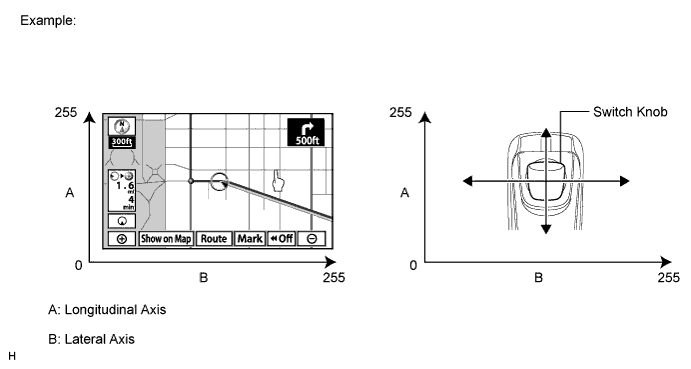
    1. Movement of the pointer on the multi-display screen is synchronized with knob operation.

      HINT:
      1. During remote touch switch knob operation, the distance that the knob moves is sent to the navigation computer sub-assembly as operational coordinates. The range of operational coordinates for the lateral and longitudinal axes is between 0 and 255.
      2. The multi-display also has operational coordinates that range from 0 to 255 for the lateral and longitudinal axes. The navigation computer sub-assembly displays the pointer according to the operational coordinates from the knob.


  2. Remote Touch Switch Knob Feedback Force
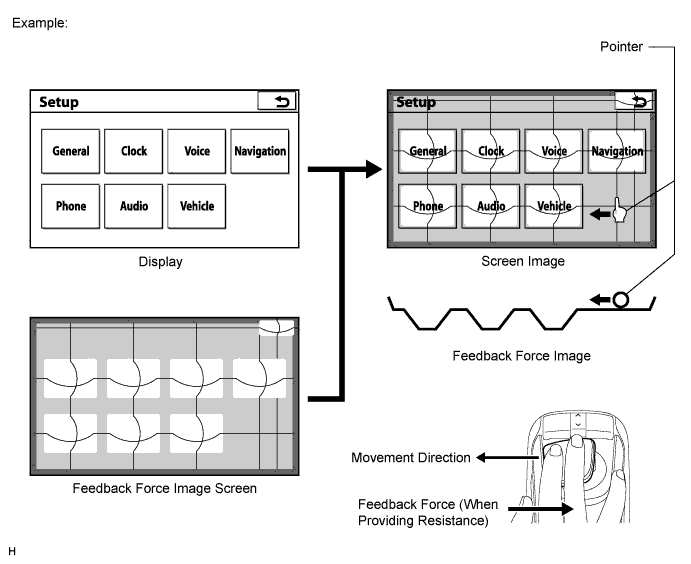

    E176766E01


    1. The remote touch has 2 built-in motors. These motors control both lateral and longitudinal axes and generate feedback force according to remote touch switch knob operation.

      HINT:
      1. There are 3 types of feedback force image areas (Icons, Frames and Others) are provided on the multi-display screen. The feedback force changes depending on the area.
      2. The navigation computer sub-assembly sends a feedback force request signal to the remote touch according to the pointer location displayed on the multi-display.
      3. When the remote touch receives the feedback force request signal, the remote touch controls the motors and generates 3 types of feedback force according to the operation direction of the remote touch switch knob.
      4. The strength of feedback force generated by the remote touch can be adjusted. Refer to the owner's manual for further information.


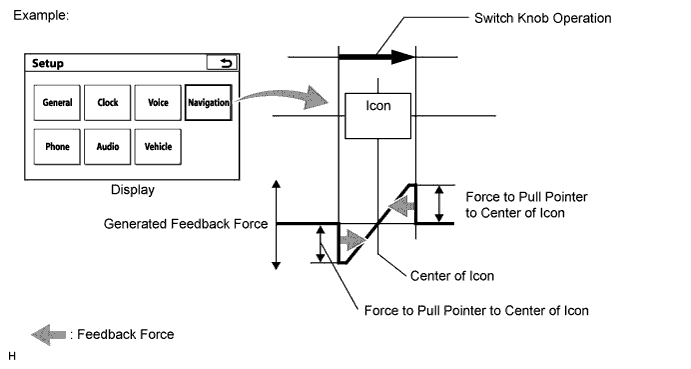
    2. Icon Area


      E187322E01

      HINT:
      1. When the pointer comes close to an icon area, force will be provided to pull the pointer toward the center of the icon area.
      2. Stronger force is provided while driving than while parked.


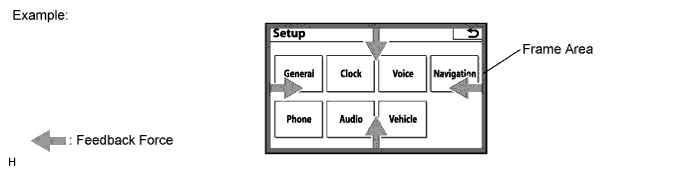
    3. Frame Area


      E187382E01

      HINT:
      Frame areas are provided for the edges of all display screens. When the pointer comes close to the edge of the screen, force will be provided to move the pointer away from the edge of the screen.


    4. Other Area


      E176767E01

      HINT:
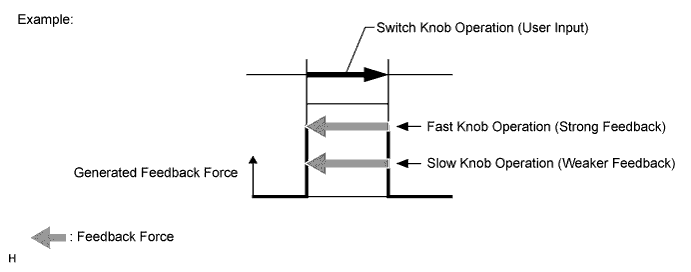
      1. When the pointer is in an area other than one of those specified, resistance will be provided that is proportional to the remote touch switch knob operation speed.
      2. Stronger resistance is provided on the map screen than on other screens.


DVD (DIGITAL VERSATILE DISC) PLAYER OUTLINE


  1. The DVD player can only play DVD videos, DVD audio and video CDs that have any of the following marks:


    E183980


    1. Precaution for use of discs

      NOTICE:
      1. SECAM color television standard discs cannot be played (PAL and NTSC discs can be played).
      2. Keep the discs away from dirt. Be careful not to damage the discs or leave fingerprints on them.
      3. Hold discs by the outer edge and center hole with the label side up.
      4. Leaving the disc exposed halfway out of the slot for a long time after pressing the disc eject button may cause deformation of the disc, making the disc unusable.
      5. Do not use odd-shaped discs because these may cause player malfunctions.
      6. Do not use discs whose recording portion is transparent or translucent because they may not be inserted, ejected or played normally.
      7. Dual Discs that mate DVD recorded material on one side with CD digital audio material on the other cannot be played.


  2. I100151
  3. Cleaning

    NOTICE:
    Do not use a lens cleaner because it may cause a malfunction in the pickup portion of the player.


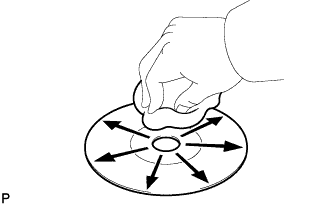
    1. If dirt is on the disc surface, wipe it clean with a soft dry cloth such as an eyeglass cleaner for plastic lenses from the inside to the outside in a radial direction.

      NOTICE:
      1. Pressing on the disc by hand or rubbing the disc with a hard cloth may scratch the disc surface.
      2. Use of solvents such as record spray, antistatic agents, alcohol, benzine, thinners or a chemical cloth may cause damage to the disc, making the disc unusable.


"Bluetooth" OUTLINE
  1. "Bluetooth" is a trademark owned by Bluetooth SIG, Inc.

  2. "Bluetooth" is a wireless connection technology that uses the 2.4 GHz frequency band.

    HINT:
    The communication performance of "Bluetooth" may vary depending on obstructions or radio wave conditions between communication devices, electromagnetic radiation, communication device sensitivity or antenna capacity.


  3. Hands-free function


    1. The "Bluetooth" built-in radio receiver assembly and a "Bluetooth" compatible cellular phone*1 can be connected using a "Bluetooth" wireless connection. This enables the use of the hands-free function on the cellular phone even if the phone is in a pocket or bag. For this reason, it is not necessary to use a connector or cable to connect the cellular phone.
      *1: Some versions of "Bluetooth" compatible cellular phones may not function.
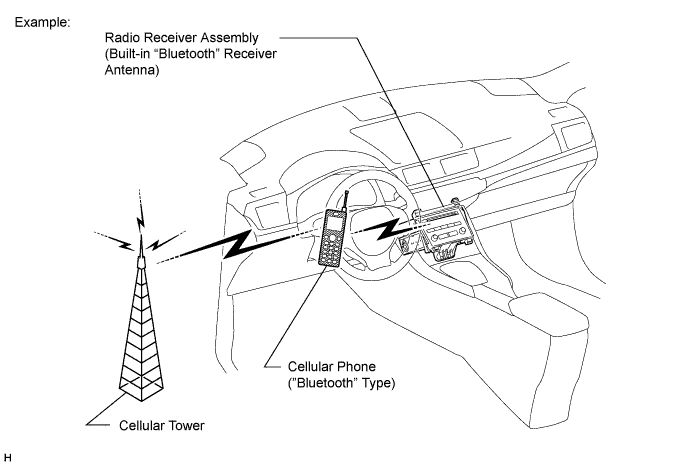

      E210256E02


RDS-TMC FUNCTION OUTLINE (BROADCAST IN EUROPE ONLY)
  1. This system has a function which allows the reception of traffic information from Radio Data System Traffic Message Channel (RDS-TMC) stations based on FM-multiplex broadcasting. It assists the driver to avoid areas with traffic congestion. It also helps to improve traffic flow and road safety.

  2. The radio receiver assembly receives RDS-TMC signals and then transmits these signals to the navigation computer sub-assembly via the MOST network.


COMMUNICATION SYSTEM


  1. MOST Network Outline


    E176686E07


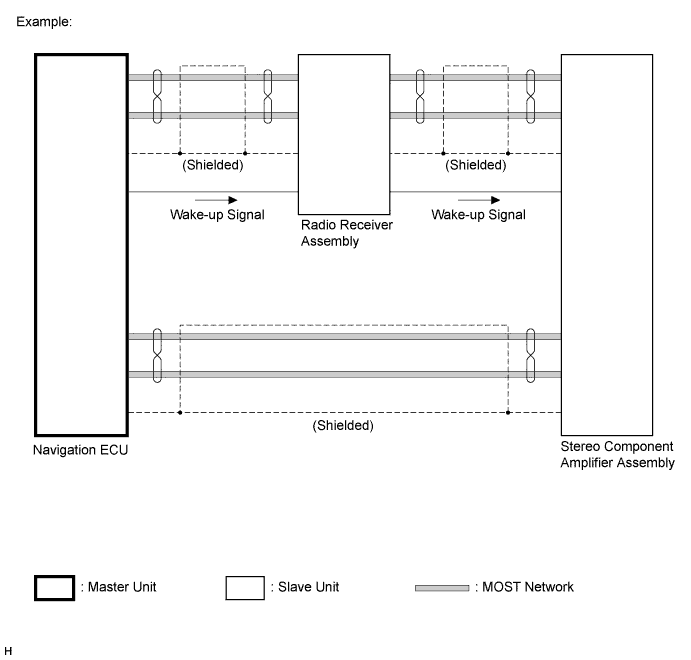
    1. Navigation system components communicate with each other via the MOST network.

    2. The MOST network uses a shielded twisted pair of wires for its communication lines.

    3. The master unit of the MOST network is the navigation ECU (navigation computer sub-assembly).

    4. MOST communication lines connect each slave unit centering around the master unit to form a MOST network ring.

    5. The master unit sends a wake-up signal to activate each slave unit connected to the MOST network.

      HINT:
      If a short or open circuit occurs in the MOST circuit, communication will be interrupted and the system will not operate normally.


  2. AVC-LAN Outline


    E176501E29


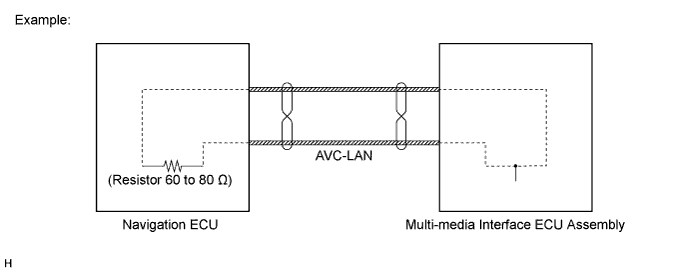
    1. Components of the navigation system communicate with each other via the AVC-LAN.

    2. The AVC-LAN uses a twisted pair of wires for its communication lines.

    3. The master unit of the AVC-LAN is the navigation ECU (navigation computer sub-assembly).

      HINT:
      1. The navigation computer sub-assembly has the resistance (60 to 80 Ω) necessary for communication.
      2. If a short or open circuit occurs in the AVC-LAN circuit, communication is interrupted and the system will not operate normally.


DIAGNOSTIC FUNCTION OUTLINE
  1. The navigation system has a diagnostic function (the result will be displayed on the master unit or the intelligent tester).


DIAGNOSIS DISPLAY DETAILED DESCRIPTION

HINT:
  1. This section contains a detailed description of displays in diagnostic mode.
  2. Illustrations may differ from the actual vehicle screen depending on the device settings and options. Therefore, some detailed areas may not be shown exactly the same as on the actual vehicle screen.


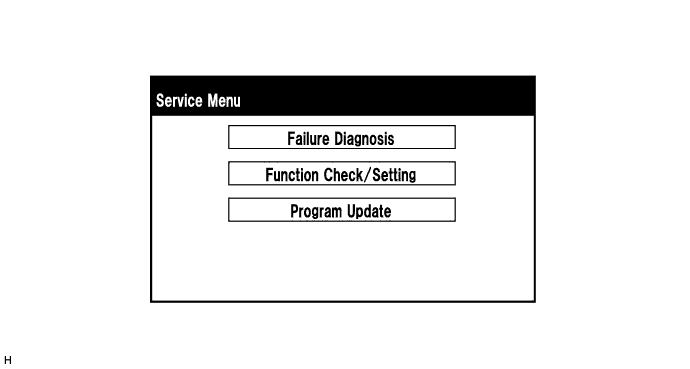
  1. Service Menu Screen


    E221766

    HINT:
    Some items are grayed out or not displayed based on the device settings.


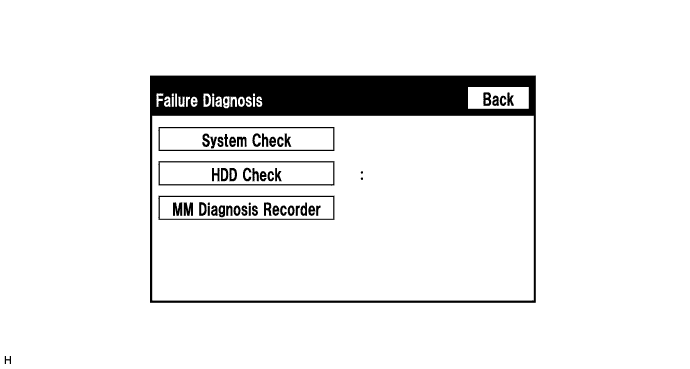
  2. Failure Diagnosis Screen


    E221767

    HINT:
    Some items are grayed out or not displayed based on the device settings.


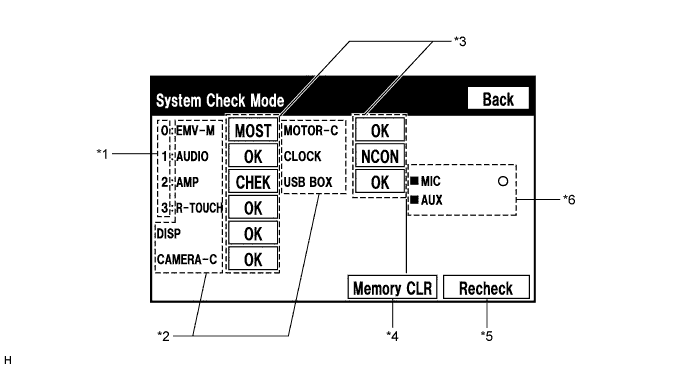
    1. System Check Mode Screen


      E210273E01

      1. *1: Node position number for devices connected to the MOST network.

        HINT:
        MOST node position numbers are provided for devices connected to the MOST network.

      2. *2: Device Name List No. 1

        HINT:
        1. Device Name List No. 1 displays some of the devices that make up the navigation system.
        2. The names of the components from Device Name List No. 1 are shown in the following table.

          Name
          Component
          Connection Method
          EMV-M
          Navigation computer sub-assembly
          -
          AUDIO
          Radio receiver assembly
          Communication line for MOST network
          AMP
          Stereo component amplifier assembly
          Communication line for MOST network
          R-TOUCH
          Remote touch
          Communication line for MOST network
          DISP
          Multi-display
          Communication line for AVC-LAN
          CAMERA-C
          Parking assist ECU
          Communication line for AVC-LAN
          MOTOR-C
          Display module board
          Communication line for AVC-LAN
          CLOCK
          Center cluster module circuit
          Communication line for AVC-LAN
          USB BOX
          Multi-media interface ECU assembly
          Communication line for AVC-LAN

      1. *3: Check Result

        HINT:
        1. Result codes for all devices are displayed.
        2. When "MOST" is displayed for the result, press "MODE" on the steering pad switch assembly to display the "MOST Line Check" screen.
        3. Changing to the "MOST Line Check" screen is possible only when "MOST" is displayed for the result.

          Result
          Meaning
          Action
          OK
          The device does not respond with a DTC.
          -
          MOST
          MOST communication error
          Perform "MOST Line Check" to check the connection of each device on the MOST network.
          EXCH
          The device responds with a "replace"-type DTC.
          Look up the DTC in "Unit Check Mode" and replace the device.
          CHEK
          The device responds with a "check"-type DTC.
          Look up the DTC in "Unit Check Mode".
          NCON
          The device was previously present, but does not respond in diagnostic mode.
          - Check power supply wire harness of the device.
          - Check the AVC-LAN or MOST network for the device.
          NRES
          The device responds in diagnostic mode, but gives no DTC information.
          - Check power supply wire harness of the device.
          - Check the AVC-LAN or MOST network for the device.

      1. *4: Memory Clear

        HINT:
        1. Present and history DTCs and registered connected device names are cleared.
        2. Press the "Memory CLR" switch for 3 seconds.

      1. *5: Recheck

        HINT:
        1. A system check will be performed again after the memory is cleared.
        2. The "Recheck" switch will dim during a system check.

      1. *6: Device Name List No. 2

        HINT:
        1. Device Name List No. 2 displays some of the devices that make up the navigation system.
        2. The names of the components from Device Name List No. 2 are shown in the following table.

          Name
          Component
          Connection Method
          MIC
          Telephone microphone assembly
          Vehicle wire harness
          AUX
          No. 1 stereo jack adapter assembly
          Vehicle wire harness


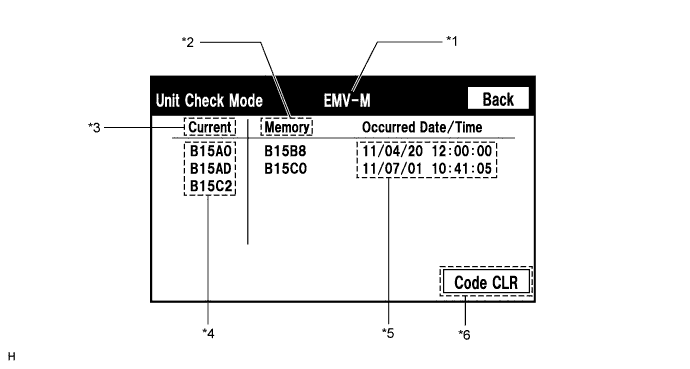
    2. Unit Check Mode Screen


      E176710E04


      Screen Description 
      Display
      Content
      *1: Device name
      Target device
      *2: History DTC
      Diagnostic memory results and stored DTCs are displayed.
      *3: Present DTC
      DTCs output in the service check are displayed.
      *4: DTC
      DTC (Diagnostic Trouble Code)
      *5: Timestamp
      The time and date of history DTCs are displayed. (The year is displayed in 2-digit format.)
      *6: Diagnosis clear switch
      Selecting this switch for 3 seconds clears the diagnostic memory data of the target device. (Both response to diagnostic system check result and the displayed data are cleared.)

      HINT:
      A maximum of 6 DTCs can be displayed for history and present DTCs.


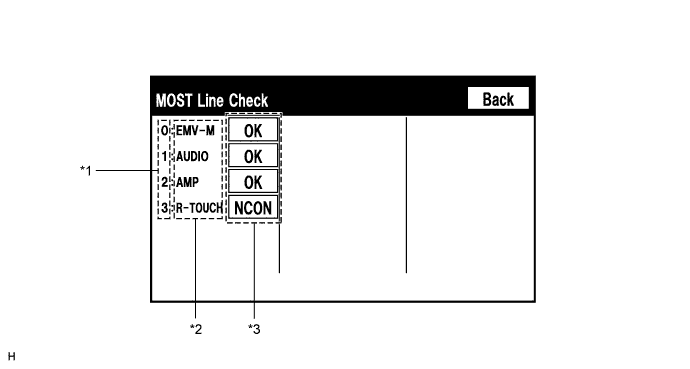
    3. MOST Line Check Screen

      HINT:
      1. The inspection will be performed at the time the screen changes from "System Check Mode" to "MOST Line Check".
      2. The master unit checks the connection of each device on the MOST network.


      E187327E01

      1. *1: Node position number for devices connected to the MOST network.
      2. *2: Device Name List

        HINT:
        1. Device Name List displays some of the devices that make up the navigation system.
        2. The names of the components from Device Name List are shown in the following table.

          Name
          Component
          EMV-M
          Navigation computer sub-assembly
          AUDIO
          Radio receiver assembly
          AMP
          Stereo component amplifier assembly
          R-TOUCH
          Remote touch

      1. *3: Check Result

        HINT:
        1. The master unit displays the check result on the screen based on the response information from each slave unit.
        2. Result codes for all devices are displayed.

          Result
          Meaning
          OK
          There was a response for the connection check during the MOST line check.
          NCON
          There was no response for the connection check during the MOST line check.
        3. The device name and result will not be displayed if there is no system registration record and no response for the connection check during the MOST line check even if the device is connected to the MOST network.


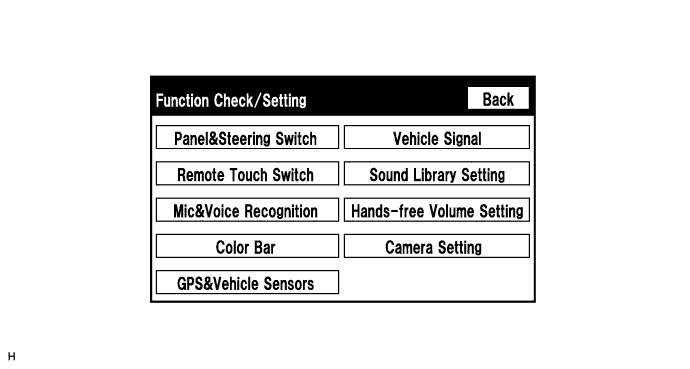
  3. Function Check/Setting Screen


    E176721

    HINT:
    Some items are grayed out or not displayed based on the device settings.


    1. Microphone & Voice Recognition Check Screen
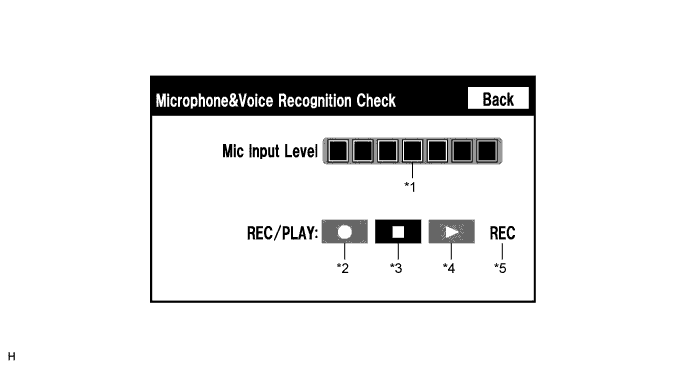

      E176507E01


      Screen Description 
      Display
      Content
      *1: Microphone input level meter
      Monitors the microphone input level every 0.1 seconds and displays the results in 8 different levels.
      *2: Recording switch
      Starts recording.
      *3: Stop switch
      Stops recording and playing.
      *4: Play switch
      Plays the recorded voice.
      *5: Recording indicator
      Comes on while recording.

      HINT:
      1. The microphone is active at all times when this screen is displayed.
      2. Select the recording switch with the blower motor of the air conditioning system stopped. If an outlet of the air conditioning system is facing the microphone, noise may be recorded.
      3. While recording or playing, the switches other than the stop switch cannot be selected.
      4. When no recording is present, the play switch cannot be selected.
      5. Recording will stop after 5 seconds or when the stop switch is selected.


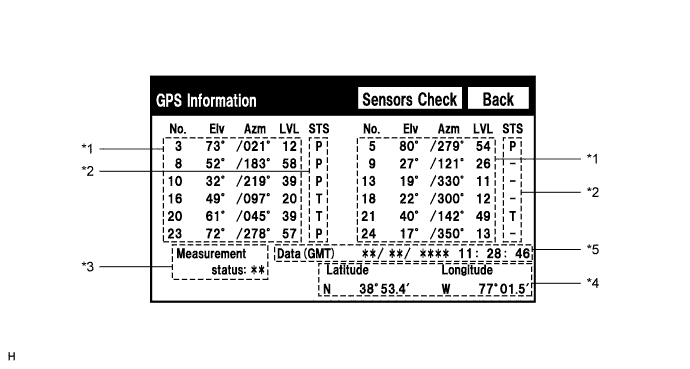
    2. GPS Information Screen


      E187328E01

      1. *1: Satellite information

        HINT:
        Information from a maximum of 12 satellites is displayed on the screen. This information includes the target GPS satellite number, elevation angle, direction and signal level.

      1. *2: Receiving condition

        Screen Description 
        Display
        Content
        T
        The system is receiving a GPS signal, but is not using it for location.
        P
        The system is using the GPS signal for location.
        -
        The system cannot receive a GPS signal.
      1. *3: Measurement status

        Screen Description 
        Display
        Content
        2D
        2-dimensional location method is being used.
        3D
        3-dimensional location method is being used.
        NG
        Location data cannot be used.
        Error
        Reception error has occurred.
        -
        Any other state
      1. *4: Position information

        Screen Description 
        Display
        Content
        Position
        Latitude and longitude information on the current position is displayed.
      1. *5: Date information

        Screen Description 
        Display
        Content
        Data
        The date/time information obtained from GPS signals is displayed in Greenwich Mean Time (GMT).


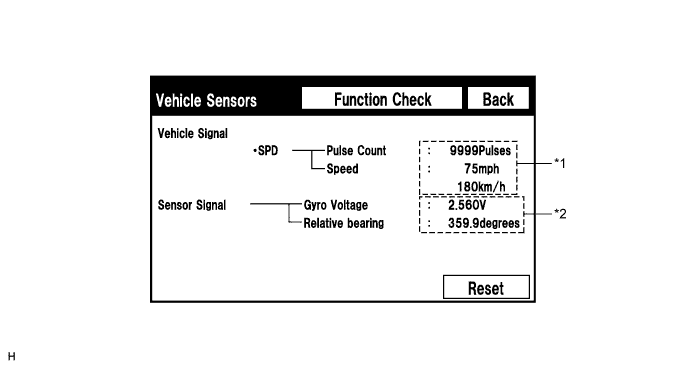
    3. Vehicle Sensors Screen


      E176506E01


      Vehicle Signal 
      Display
      Content
      *1: SPD
      SPD signal condition is displayed.

      Sensor Signal 
      Display
      Content
      *2: Gyro sensor
      Gyro sensor output condition is displayed.

      HINT:
      Signals are updated once per second only when vehicle sensor signals change.


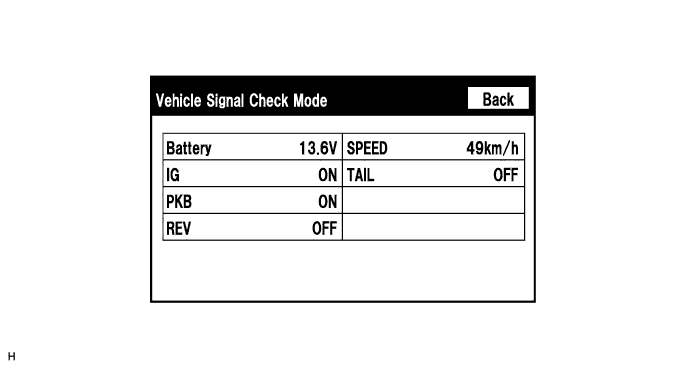
    4. Vehicle Signal Check Mode Screen


      E176505


      Screen Description 
      Display
      Content
      Battery
      Auxiliary battery voltage is displayed.
      IG
      Power switch ON/OFF state is displayed.
      PKB
      Parking brake ON/OFF state is displayed.
      REV
      Reverse signal ON/OFF state is displayed.
      SPEED
      Vehicle speed is displayed in km/h.
      TAIL
      Tail signal (Light control switch) ON/OFF state is displayed.

      HINT:
      1. Only items sending vehicle signals will be displayed.
      2. This screen is updated once per second when vehicle input signals change.