FRONT DOOR > DISASSEMBLY |
| 1. PRECAUTION |
| 2. REMOVE REAR NO. 2 FLOOR BOARD |
Remove the rear No. 2 floor board.
| 3. REMOVE REAR DECK FLOOR BOX |
Remove the rear deck floor box.
| 4. REMOVE REAR NO. 3 FLOOR BOARD |
Remove the rear No. 3 floor board.
| 5. REMOVE DECK FLOOR BOX RH |
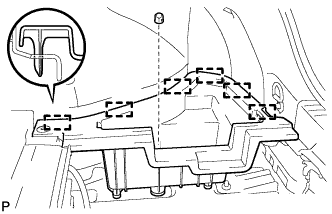 |
Remove the clip.
Disengage the 6 guides and remove the deck floor box RH.
| 6. REMOVE REAR FLOOR BOARD UPPER NO. 3 PLATE |
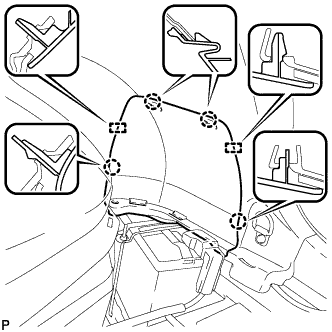 |
Disengage the 4 claws and 2 guides, and remove the rear floor board upper No. 3 plate.
| 7. DISCONNECT CABLE FROM NEGATIVE BATTERY TERMINAL |
| 8. REMOVE FRONT DOOR INSIDE HANDLE BEZEL PLUG |
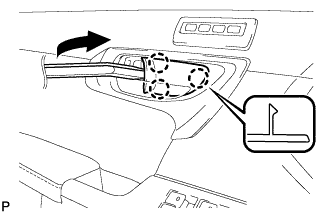 |
Using a moulding remover, disengage the 3 claws and remove the front door inside handle bezel plug as shown in the illustration.
| 9. REMOVE FRONT DOOR LOWER FRAME BRACKET GARNISH |
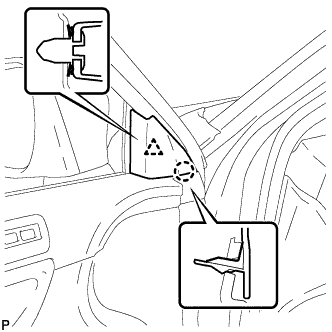 |
Disengage the clip and claw, and remove the front door lower frame bracket garnish.
| 10. REMOVE POWER WINDOW REGULATOR MASTER SWITCH ASSEMBLY WITH FRONT DOOR ARMREST BASE PANEL (for Driver Side) |
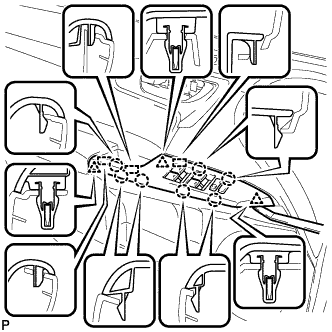 |
Using a moulding remover, disengage the 3 clips, 7 claws and 2 guides as shown in the illustration.
Disconnect the connector and remove the power window regulator master switch assembly with front door armrest base panel.
| 11. REMOVE DOOR ARMREST COVER (for Driver Side) |
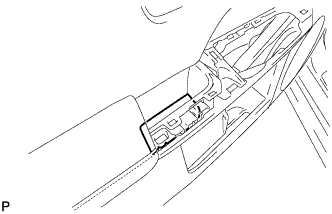 |
Remove the door armrest cover.
| 12. REMOVE FRONT DOOR TRIM BOARD SUB-ASSEMBLY (for Driver Side) |
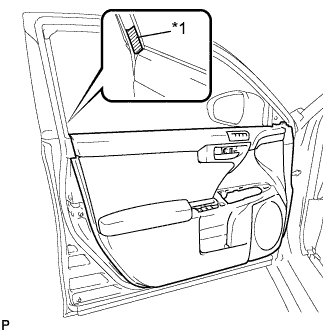 |
Put protective tape around the front door panel.
| *1 | Protective Tape |
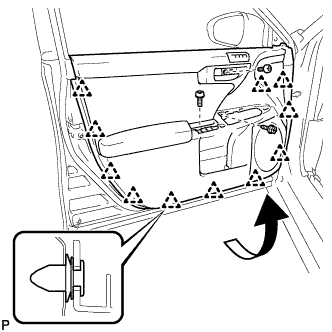 |
Remove the 3 screws.
Using a clip remover, disengage the 11 clips.
Pull out the front door trim board sub-assembly in the direction indicated by the arrow in the illustration.
Raise the front door trim board sub-assembly and remove it.
w/ Seat Position Memory System:
Disconnect the connector.
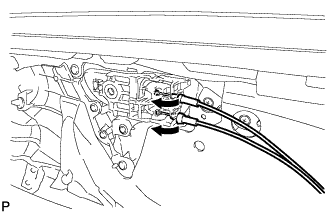 |
Disconnect the front door lock remote control cable assembly and front door inside locking cable assembly.
| 13. REMOVE DOOR ASSIST GRIP COVER (for Front Passenger Side) |
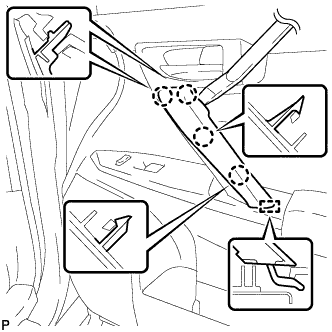 |
Using a moulding remover, disengage the 4 claws and guide, and remove the door assist grip cover.
| 14. REMOVE DOOR ASSIST GRIP ASSEMBLY (for Front Passenger Side) |
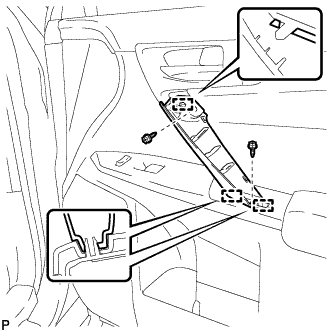 |
Remove the 2 screws.
Disengage the 3 guides and remove the door assist grip assembly.
| 15. REMOVE POWER WINDOW REGULATOR SWITCH ASSEMBLY WITH FRONT DOOR ARMREST BASE PANEL (for Front Passenger Side) |
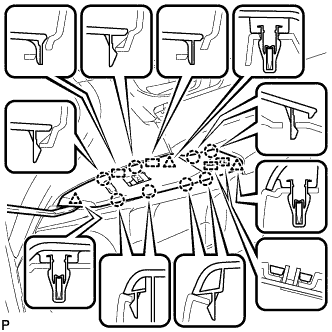 |
Using a moulding remover, disengage the 3 clips, 8 claws and 4 guides as shown in the illustration.
Disconnect each connector and remove the power window regulator switch assembly with front door armrest base panel.
| 16. REMOVE FRONT DOOR TRIM BOARD SUB-ASSEMBLY (for Front Passenger Side) |
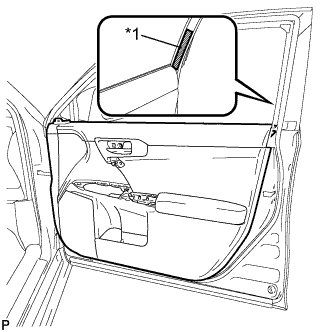 |
Put protective tape around the front door panel.
| *1 | Protective Tape |
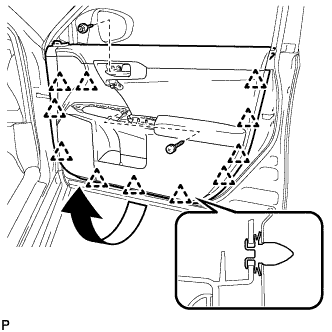 |
Remove the 2 screws.
Using a clip remover, disengage the 11 clips.
Pull out the front door trim board sub-assembly in the direction indicated by the arrow in the illustration.
Raise the front door trim board sub-assembly and remove the front door trim board sub-assembly .
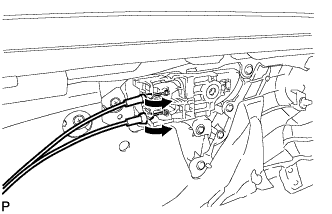 |
Disconnect the front door lock remote control cable assembly and front door inside locking cable assembly.
| 17. REMOVE FRONT DOOR INSIDE HANDLE SUB-ASSEMBLY |
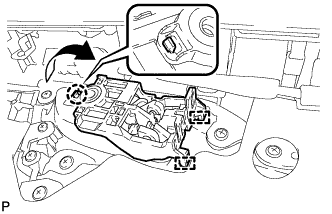 |
Disengage the claw and 2 guides, and remove the front door inside handle sub-assembly as shown in the illustration.
| 18. REMOVE SEAT MEMORY SWITCH (w/ Seat Position Memory System) |
Disconnect the connector.
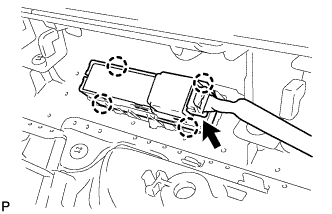 |
Disengage the 4 claws and remove the seat memory switch.
| 19. REMOVE FRONT DOOR WIRING SUB-ASSEMBLY (w/ Seat Position Memory System) |
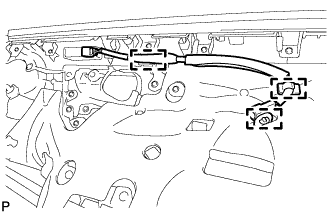 |
Disengage the 3 clamps and remove the front door wiring sub-assembly.
| 20. REMOVE FRONT DOOR INNER GLASS WEATHERSTRIP |
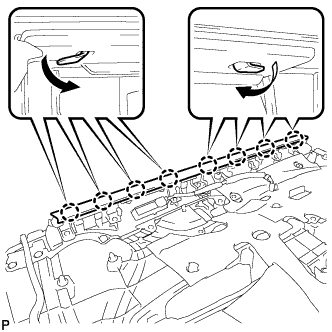 |
Disengage the 8 claws and remove the front door inner glass weatherstrip as shown in the illustration.
| 21. REMOVE FRONT DOOR TRIM SEAL |
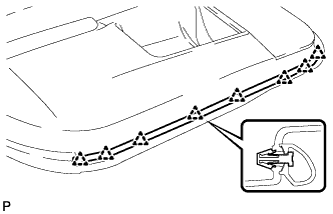 |
Using a clip remover, disengage the 8 clips and remove the front door trim seal.
| 22. REMOVE DOOR FRAME GARNISH |
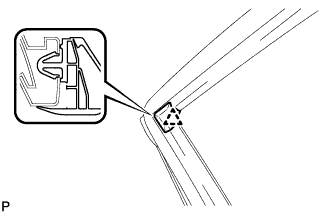 |
Disengage the clip and remove the door frame garnish.
| 23. REMOVE FRONT NO. 1 SPEAKER ASSEMBLY |
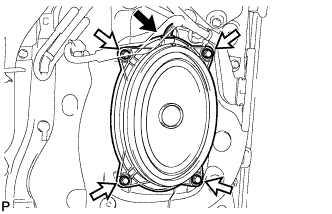 |
Disconnect the connector.
Remove the 4 bolts and front No. 1 speaker assembly.
| 24. REMOVE OUTER MIRROR CONTROL ECU ASSEMBLY (w/ Memory) |
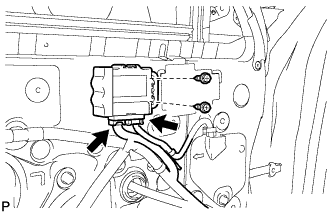 |
Disconnect each connector.
Remove the 2 screws and outer mirror control ECU assembly.
| 25. REMOVE OUTER MIRROR INSTALL HOLE COVER |
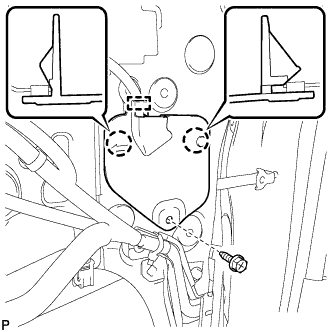 |
Remove the screw.
Disengage the 2 claws.
Disengage the clamp and remove the outer mirror install hole cover.
| 26. REMOVE OUTER MIRROR PROTECTOR |
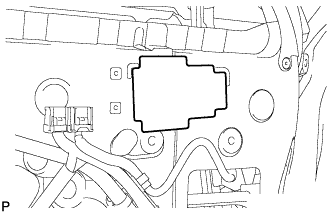 |
Remove the outer mirror protector.
| 27. REMOVE OUTER REAR VIEW MIRROR ASSEMBLY |
w/o Memory:
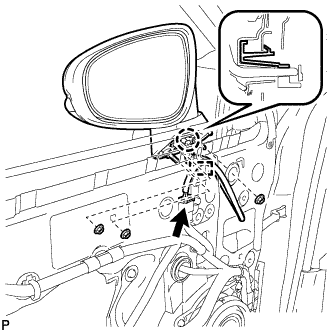 |
Disconnect the connector.
Disengage the clamp.
Remove the 3 nuts.
w/ Memory:
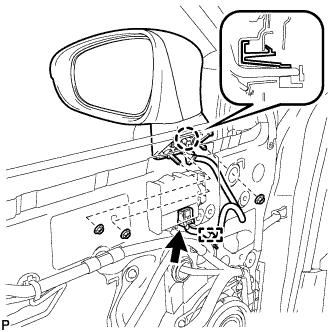 |
Disconnect the connector.
Disengage the clamp.
Remove the 3 nuts.
Disengage the claw and remove the outer rear view mirror assembly.
| 28. REMOVE WIRING HARNESS CLAMP BRACKET (w/o Memory) |
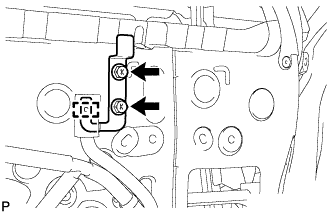 |
Disengage the clamp.
Remove the 2 screws and wiring harness clamp bracket.
| 29. REMOVE FRONT DOOR TRIM BRACKET (for Driver Side) |
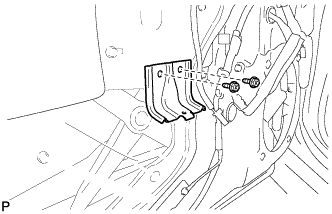 |
Remove the 2 screws and front door trim bracket.
| 30. REMOVE FRONT DOOR TRIM BRACKET (for Front Passenger Side) |
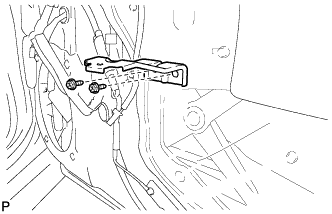 |
Remove the 2 screws and front door trim bracket.
| 31. REMOVE FRONT DOOR SERVICE HOLE COVER |
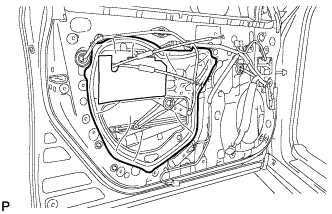 |
Remove the front door service hole cover.
| 32. REMOVE FRONT DOOR GLASS SUB-ASSEMBLY |
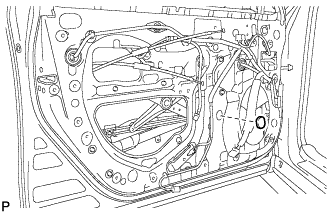 |
Remove the grommet.
Connect the cable to the negative (-) battery terminal.
Connect the power window regulator master switch assembly and move the front door glass sub-assembly so that the door glass bolts can be seen.
Disconnect the cable from the negative (-) battery terminal.
Disconnect the power window regulator master switch assembly.
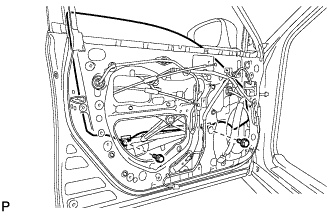 |
Remove the 2 bolts.
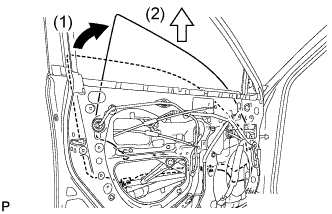 |
Remove the front door glass sub-assembly as indicated by the arrows, in the order shown in the illustration.
| 33. REMOVE FRONT DOOR WINDOW REGULATOR ASSEMBLY |
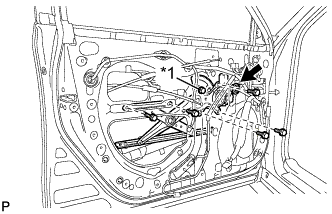 |
Disconnect the connector.
Loosen the temporary bolt.
| *1 | Temporary Bolt |
Remove the 5 bolts.
Remove the front door window regulator assembly.
Remove the temporary bolt from the front door window regulator assembly.
| 34. REMOVE FRONT POWER WINDOW REGULATOR MOTOR ASSEMBLY |
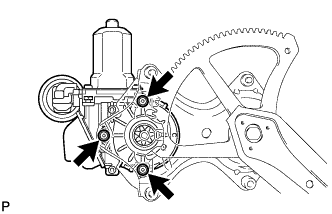 |
Using a T25 "TORX" socket wrench, remove the 3 screws and front power window regulator motor assembly.
| 35. REMOVE FRONT DOOR GLASS RUN |
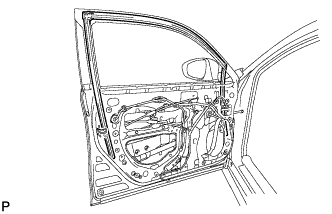 |
Remove the front door glass run.
| 36. REMOVE NO. 2 FRONT DOOR STIFFENER CUSHION |
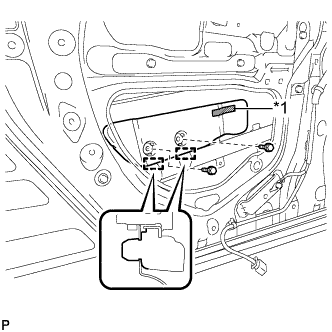 |
Remove the 2 bolts.
| *1 | Double-sided Tape |
Disengage the 2 guides and remove the No. 2 front door stiffener cushion.
| 37. REMOVE FRONT DOOR REAR LOWER FRAME SUB-ASSEMBLY |
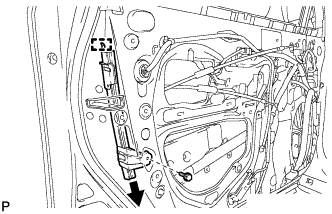 |
Remove the bolt.
Disengage the guide and remove the bolt and front door rear lower frame sub-assembly as shown in the illustration.
| 38. REMOVE FRONT DOOR OUTSIDE HANDLE COVER WITH LOCK CYLINDER ASSEMBLY (for Driver Side) |
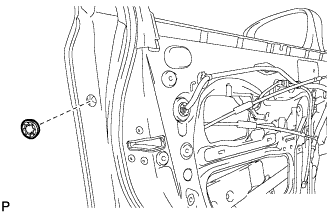 |
Remove the hole plug.
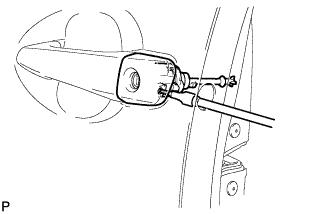 |
Using a T30 "TORX" socket wrench, loosen the screw and remove the front door outside handle cover with lock cylinder assembly.
| 39. REMOVE FRONT DOOR OUTSIDE HANDLE COVER (for Driver Side) |
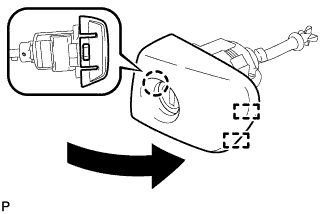 |
Using a screwdriver, disengage the claw and 2 guides, and remove the front door outside handle cover as shown in the illustration.
| 40. REMOVE FRONT DOOR OUTSIDE HANDLE COVER (for Front Passenger Side) |
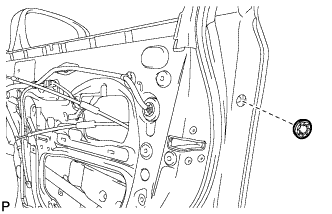 |
Remove the hole plug.
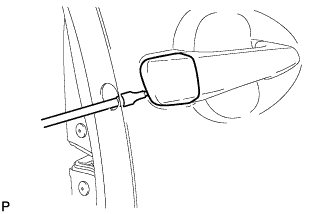 |
Using a T30 "TORX" socket wrench, loosen the screw and remove the front door outside handle cover.
| 41. REMOVE FRONT DOOR OUTSIDE HANDLE ASSEMBLY |
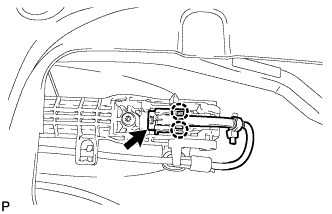 |
Disengage the 2 claws.
Disconnect the connector.
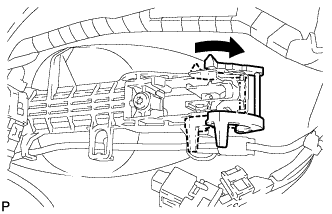 |
Move the lever in the direction indicated by the arrow in the illustration.
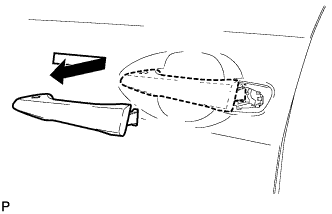 |
Remove the front door outside handle assembly as shown in the illustration.
| 42. REMOVE FRONT DOOR FRONT OUTSIDE HANDLE PAD |
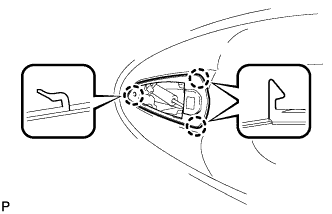 |
Disengage the 3 claws and remove the front door front outside handle pad.
| 43. REMOVE FRONT DOOR REAR OUTSIDE HANDLE PAD |
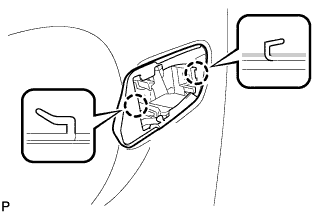 |
Disengage the 2 claws and remove the front door rear outside handle pad.
| 44. REMOVE FRONT DOOR LOCK ASSEMBLY |
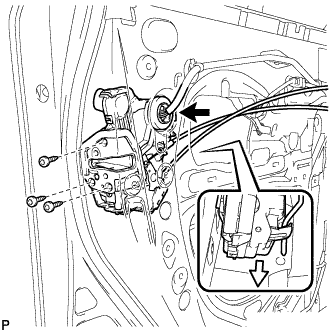 |
Disconnect the connector.
Using a T30 "TORX" socket wrench, remove the 3 screws.
Slide the front door lock assembly downward, and remove the front door lock assembly and cables as a unit.
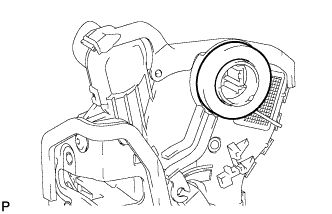 |
Remove the door lock wiring harness seal from the front door lock assembly.
| 45. REMOVE FRONT DOOR LOCK REMOTE CONTROL CABLE ASSEMBLY |
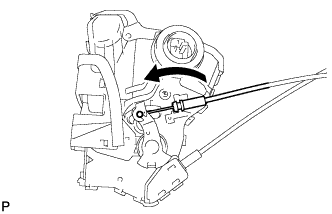 |
Remove the front door lock remote control cable assembly.
| 46. REMOVE FRONT DOOR INSIDE LOCKING CABLE ASSEMBLY |
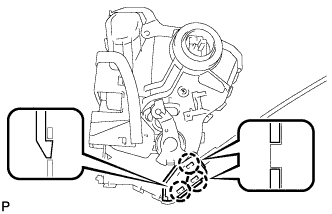 |
Using a screwdriver, disengage the 3 claws.
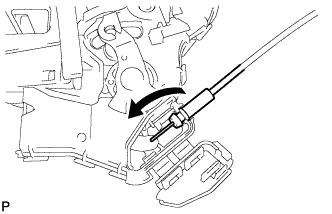 |
Remove the front door inside locking cable assembly.
| 47. REMOVE FRONT DOOR WIRE |
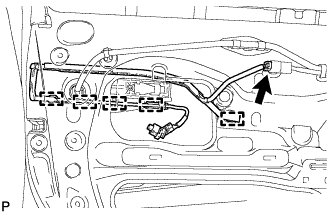 |
Disconnect the connector.
Disengage the 5 clamps and remove the front door wire.
| 48. REMOVE FRONT DOOR OUTSIDE HANDLE FRAME SUB-ASSEMBLY |
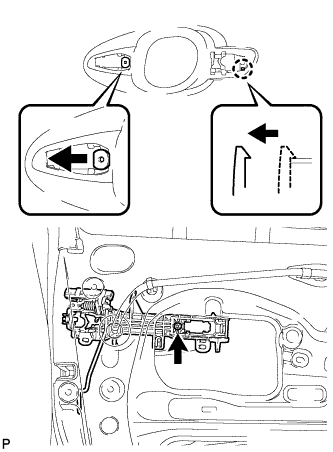 |
Using a T30 "TORX" socket wrench, loosen the screw.
Slide the front door outside handle frame sub-assembly to disengage the door handle nut and claw of the front door outside handle frame sub-assembly, and then remove it.
| 49. REMOVE FRONT DOOR LOCK OPEN ROD |
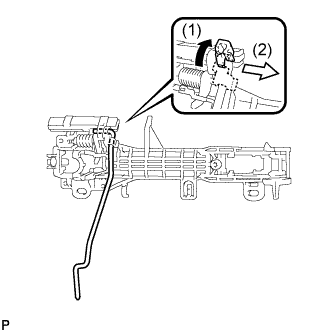 |
Remove the front door lock open rod as indicated by the arrows, in the order shown in the illustration.
| 50. REMOVE FRONT DOOR CHECK ASSEMBLY |
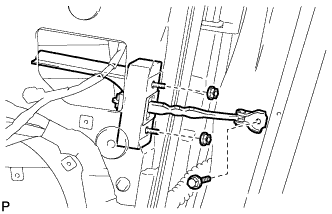 |
Remove the bolt, 2 nuts and front door check assembly.
| 51. REMOVE FRONT DOOR WEATHERSTRIP |
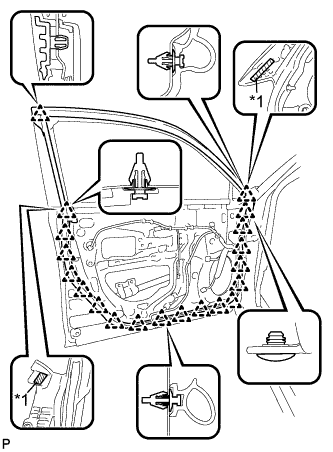 |
Using a clip remover, disengage the 20 clips and remove the front door weatherstrip.
| *1 | Double-sided Tape |
| 52. REMOVE FRONT DOOR NO. 2 WEATHERSTRIP |
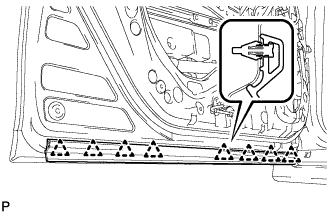 |
Using a clip remover, disengage the 8 clips and remove the front door No. 2 weatherstrip.
| 53. REMOVE FRONT DOOR PANEL CUSHION |
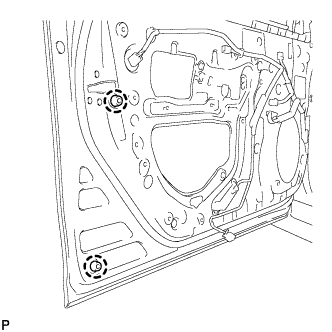 |
Using a clip remover, disengage the 2 claws and remove the 2 front door panel cushions.
| 54. REMOVE DOOR DUST PROOF SEAL |
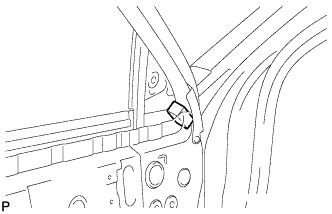 |
Remove the door dust proof seal.
| 55. REMOVE FRONT DOOR FRONT LOWER FRAME UPPER COVER |
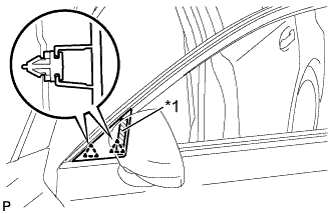 |
Disengage the 2 clips and remove the front door front lower frame upper cover.
| *1 | Double-sided Tape |
| 56. REMOVE FRONT DOOR BELT MOULDING ASSEMBLY |
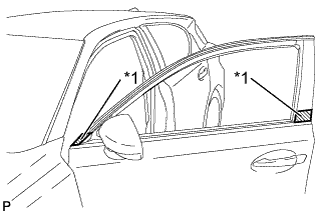 |
Put protective tape around the front door belt moulding assembly.
| *1 | Protective Tape |
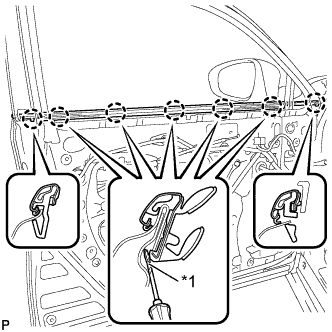 |
Using a screwdriver with the tip wrapped with protective tape, disengage the 7 claws and remove the front door belt moulding assembly.
| *1 | Protective Tape |
| 57. REMOVE FRONT DOOR OUTSIDE STRIPE |
Using a heat light, heat the front door outside stripe and vehicle body.
| Item | Temperature |
| Vehicle Body and Front Door Outside Stripe | 40 to 60°C (104 to 140°F) |
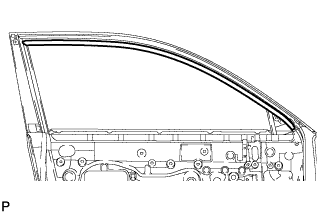 |
Pull back on one of the ends of the front door outside stripe to remove it.
| 58. REMOVE FRONT DOOR REAR OUTSIDE STRIPE |
Using a heat light, heat the front door rear outside stripe and vehicle body.
| Item | Temperature |
| Vehicle Body and Front Door Rear Outside Stripe | 40 to 60°C (104 to 140°F) |
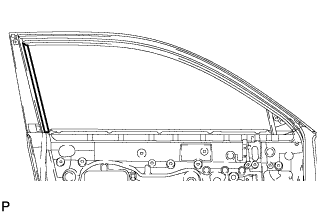 |
Pull back on one of the ends of the front door rear outside stripe to remove it.
| 59. REMOVE FRONT DOOR REAR WINDOW FRAME MOULDING |
| Item | Temperature |
| Vehicle Body | 40 to 60°C (104 to 140°F) |
| Moulding | 20 to 30°C (68 to 86°F) |
Using a heat light, heat the front door rear window frame moulding.
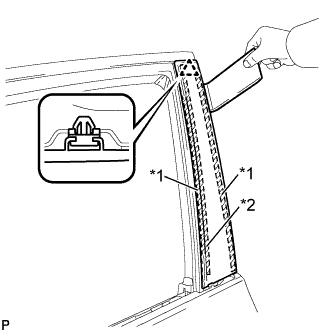 |
Using a moulding remover, disengage the clip and remove the front door rear window frame moulding.
| *1 | Double-sided Tape |
| *2 | Caulking Sponge |
| 60. REMOVE FRONT DOOR UPPER WINDOW FRAME MOULDING |
Insert a 4.0 mm (0.157 in.) drill bit into a drill.
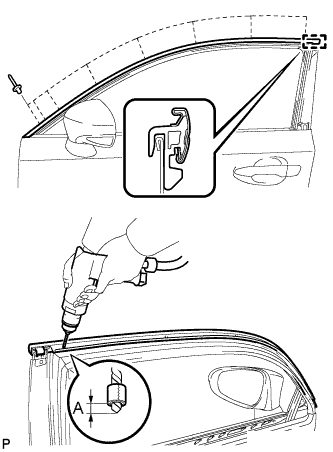 |
Tape a 4.0 mm (0.157 in.) drill bit 5.0 mm (0.197 in.) from the tip as shown in the illustration.
| Area | Dimension |
| A | 5.0 mm |
Lightly press the drill against the rivets to drill off the rivet flanges, and remove the 8 rivets.
Using a vacuum cleaner, remove the rivet fragments and shavings from the drilled areas.
Disengage the guide and remove the front door upper window frame moulding from the door frame.
