REAR DOOR > DISASSEMBLY |
| 1. PRECAUTION |
| 2. REMOVE REAR NO. 2 FLOOR BOARD |
Remove the rear No. 2 floor board.
| 3. REMOVE REAR DECK FLOOR BOX |
Remove the rear deck floor box.
| 4. REMOVE REAR NO. 3 FLOOR BOARD |
Remove the rear No. 3 floor board.
| 5. REMOVE DECK FLOOR BOX RH |
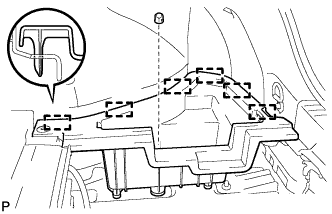 |
Remove the clip.
Disengage the 6 guides and remove the deck floor box RH.
| 6. REMOVE REAR FLOOR BOARD UPPER NO. 3 PLATE |
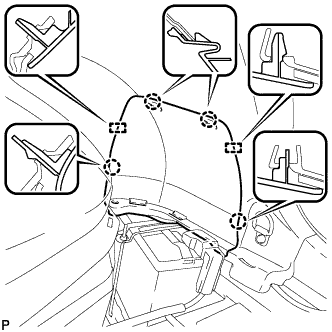 |
Disengage the 4 claws and 2 guides, and remove the rear floor board upper No. 3 plate.
| 7. DISCONNECT CABLE FROM NEGATIVE BATTERY TERMINAL |
| 8. REMOVE REAR DOOR INSIDE HANDLE BEZEL PLUG |
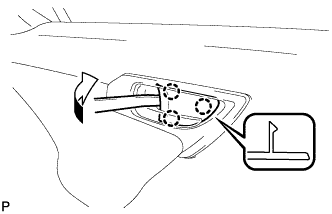 |
Using a moulding remover, disengage the 3 claws and remove the rear door inside handle bezel plug as shown in the illustration.
| 9. REMOVE REAR DOOR REAR FRAME BRACKET |
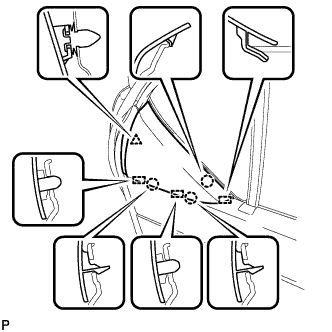 |
Disengage the clip, 3 claws and 3 guides and remove the rear door rear frame bracket.
| 10. REMOVE REAR POWER WINDOW REGULATOR SWITCH ASSEMBLY WITH REAR DOOR ARMREST BASE PANEL |
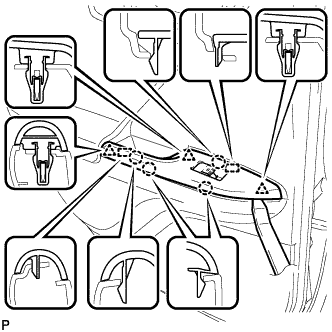 |
Using a moulding remover, disengage the 3 clips, 4 claws and 2 guides as shown in the illustration.
Disconnect the connector and remove the rear power window regulator switch assembly with rear door armrest base panel.
| 11. REMOVE REAR DOOR ARMREST COVER |
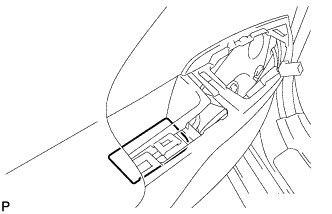 |
Remove the rear door armrest cover.
| 12. REMOVE REAR DOOR TRIM BOARD SUB-ASSEMBLY |
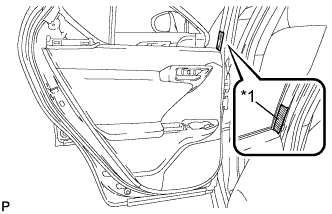 |
Put protective tape around the rear door panel.
| *1 | Protective Tape |
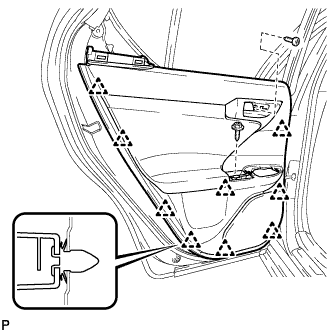 |
Remove the 2 screws.
Using a clip remover, disengage the 9 clips.
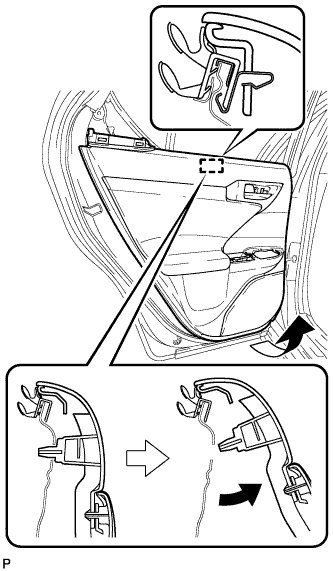 |
Pull out the rear door trim board sub-assembly in the direction indicated by the arrow as shown in the illustration.
Raise the rear door trim board sub-assembly to remove the rear door trim board sub-assembly together with the rear door inner glass weatherstrip.
Disconnect the connector.
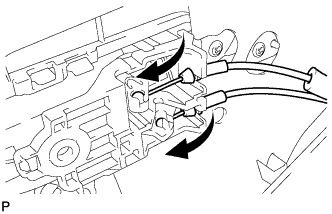 |
Disconnect the rear door lock remote control cable assembly and rear door inside locking cable assembly.
Remove the rear door trim board clip (blue) from the rear door trim board.
| 13. REMOVE REAR DOOR INSIDE HANDLE SUB-ASSEMBLY |
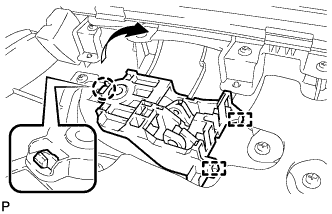 |
Disengage the claw and 2 guides, and remove the rear door inside handle sub-assembly as shown in the illustration.
| 14. REMOVE REAR DOOR INNER GLASS WEATHERSTRIP |
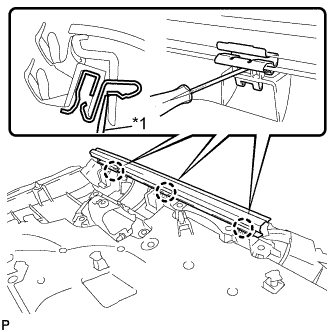 |
Using a screwdriver, disengage the 3 claws and remove the rear door inner glass weatherstrip from the rear door trim board sub-assembly as shown in the illustration.
| *1 | Screwdriver |
| 15. REMOVE REAR DOOR TRIM SEAL |
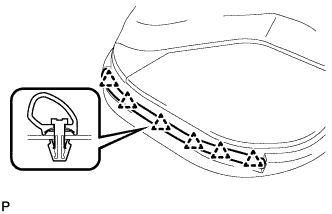 |
Using a clip remover, disengage the 6 clips and remove the rear door trim seal.
| 16. REMOVE REAR DOOR SPEAKER COVER (w/o Rear Speaker) |
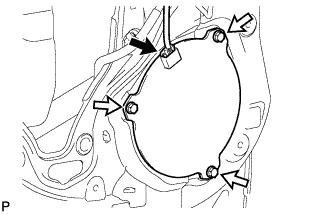 |
Disconnect the connector.
Remove the 3 bolts and rear door speaker cover.
| 17. REMOVE REAR SPEAKER ASSEMBLY (w/ Rear Speaker) |
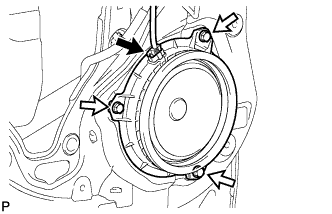 |
Disconnect the connector.
Remove the 3 bolts and rear speaker assembly.
| 18. REMOVE REAR DOOR FRAME GARNISH |
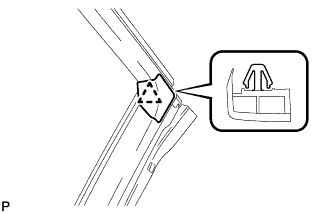 |
Disengage the clip and remove the rear door frame garnish.
| 19. REMOVE REAR DOOR TRIM BRACKET |
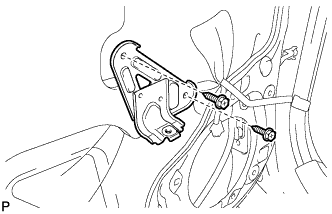 |
Remove the 2 screws and rear door trim bracket.
| 20. REMOVE REAR DOOR SERVICE HOLE COVER |
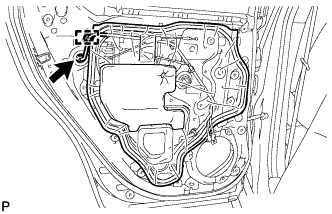 |
Disengage the clamp.
Disconnect the connector and remove the rear door service hole cover.
| 21. REMOVE REAR DOOR CHECK ASSEMBLY |
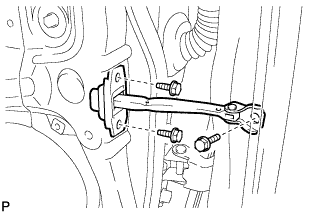 |
Remove the 3 bolts and rear door check assembly.
| 22. REMOVE REAR DOOR WEATHERSTRIP |
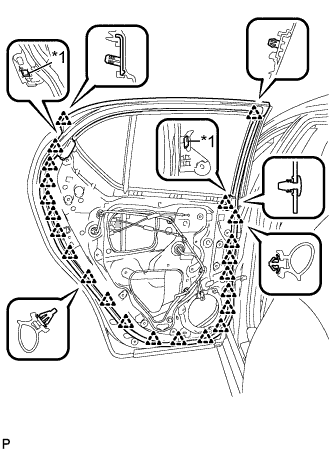 |
Using a clip remover, disengage the 23 clips and remove the rear door weatherstrip.
| *1 | Double-sided Tape |
| 23. REMOVE REAR DOOR GLASS RUN |
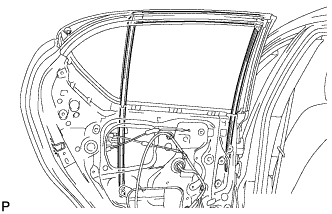 |
Remove the rear door glass run.
| 24. REMOVE NO. 1 REAR DOOR VENT SEAL |
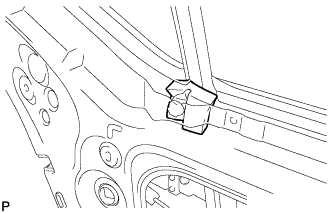 |
Remove the No. 1 rear door vent seal.
| 25. REMOVE REAR DOOR WINDOW DIVISION BAR SUB-ASSEMBLY |
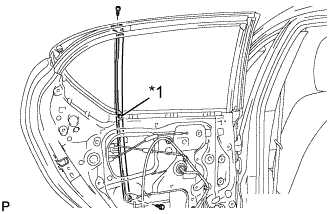 |
Loosen the temporary bolt.
| *1 | Temporary Bolt |
Remove the bolt and screw and rear door window division bar sub-assembly.
Remove the temporary bolt from the rear door window division bar sub-assembly.
| 26. REMOVE REAR DOOR QUARTER WINDOW GLASS |
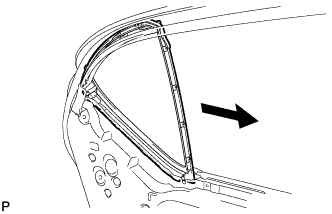 |
Remove the rear door quarter window glass with the rear door quarter window weatherstrip as shown in the illustration.
Remove the rear door quarter window glass from the rear door quarter window weatherstrip.
| 27. REMOVE NO. 2 REAR DOOR VENT SEAL |
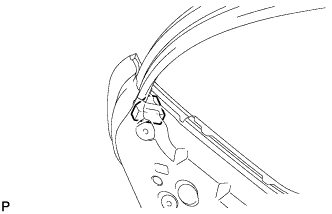 |
Remove the No. 2 rear door vent seal.
| 28. REMOVE REAR DOOR GLASS SUB-ASSEMBLY |
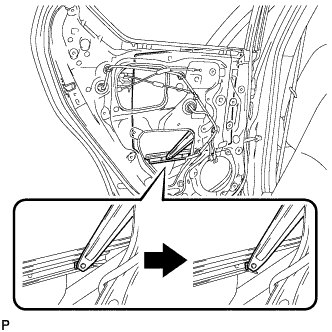 |
Remove the rear door glass sub-assembly from the rear door window regulator sub-assembly as shown in the illustration.
| 29. REMOVE REAR DOOR GLASS CHANNEL SUB-ASSEMBLY |
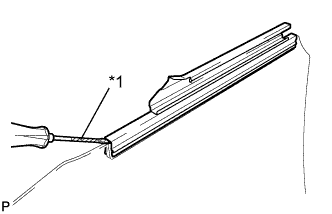 |
Using a screwdriver, remove the rear door glass channel sub-assembly.
| *1 | Protective Tape |
| 30. REMOVE REAR DOOR GLASS CHANNEL FILLER |
Remove the rear door glass channel filler.
| 31. REMOVE REAR DOOR CUSHION |
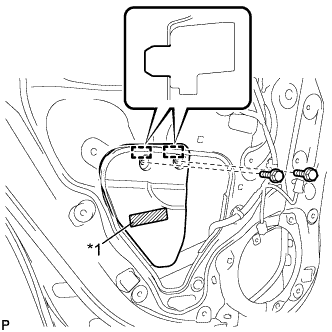 |
Remove the 2 bolts.
| *1 | Double-sided Tape |
Disengage the 2 guides and remove the rear door cushion.
| 32. REMOVE REAR DOOR WINDOW REGULATOR ASSEMBLY |
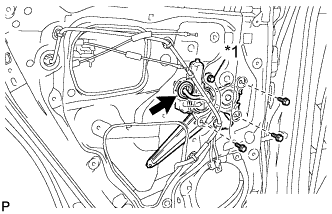 |
Disconnect the connector.
Loosen the temporary bolt.
| *1 | Temporary Bolt |
Remove the 3 bolts.
Remove the rear door window regulator assembly.
Remove the temporary bolt from the rear door window regulator assembly.
| 33. REMOVE REAR POWER WINDOW REGULATOR MOTOR ASSEMBLY |
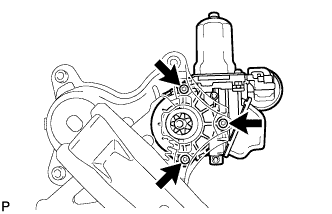 |
Using a T25 "TORX" socket wrench, remove the 3 screws and rear power window regulator motor assembly.
| 34. REMOVE REAR DOOR LOCK ASSEMBLY |
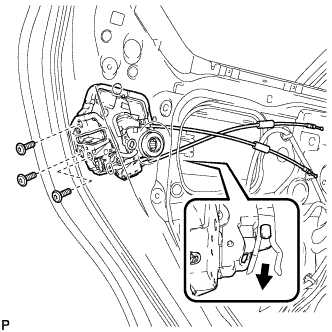 |
Using a T30 "TORX" socket wrench, remove the 3 screws.
Move the rear door lock assembly downward and pull the release plate out of the rear door outside handle frame.
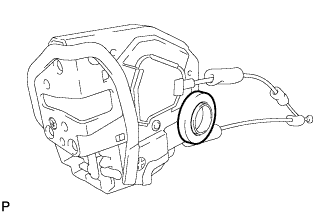 |
Remove the door lock wiring harness seal from the rear door lock assembly.
| 35. REMOVE REAR DOOR LOCK REMOTE CONTROL CABLE ASSEMBLY (w/o Double Locking System) |
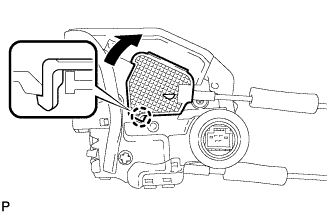 |
Using a screwdriver, disengage the claw.
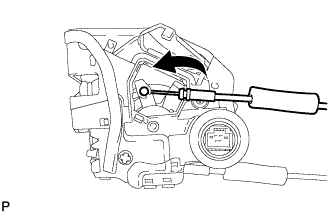 |
Remove the rear door lock remote control cable assembly.
| 36. REMOVE REAR DOOR LOCK REMOTE CONTROL CABLE ASSEMBLY (w/ Double Locking System) |
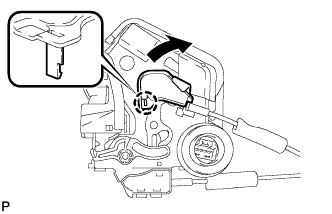 |
Using a screwdriver, disengage the claw.
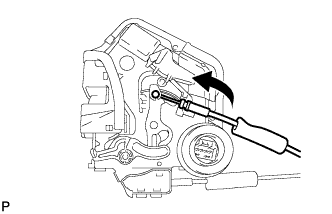 |
Remove the rear door lock remote control cable assembly.
| 37. REMOVE REAR DOOR INSIDE LOCKING CABLE ASSEMBLY (w/o Double Locking System) |
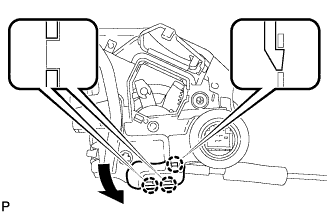 |
Using a screwdriver, disengage the 3 claws.
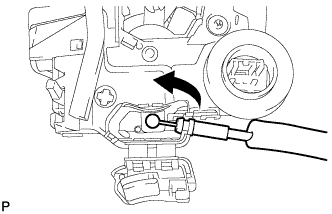 |
Remove the rear door inside locking cable assembly.
| 38. REMOVE REAR DOOR INSIDE LOCKING CABLE ASSEMBLY (w/ Double Locking System) |
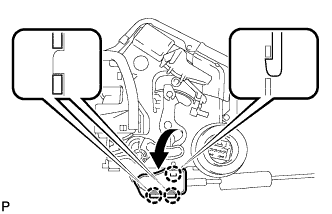 |
Using a screwdriver, disengage the 3 claws.
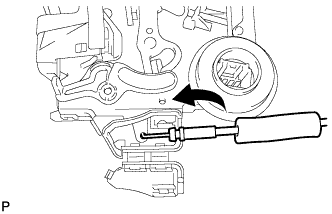 |
Remove the rear door inside locking cable assembly.
| 39. REMOVE REAR DOOR OUTSIDE HANDLE COVER |
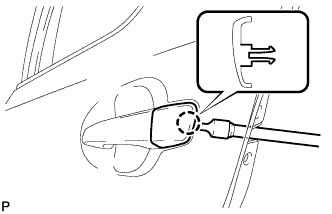 |
Using a T30 "TORX" socket wrench, loosen the screw.
Disengage the claw and remove the rear door outside handle cover.
| 40. REMOVE REAR DOOR OUTSIDE HANDLE ASSEMBLY |
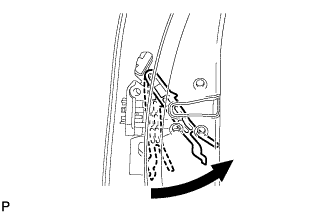 |
Pull and hold the release plate of the rear door outside handle frame sub-assembly as shown in the illustration.
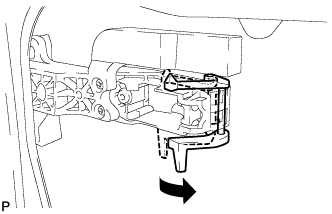 |
Move the lever in the direction indicated by the arrow in the illustration.
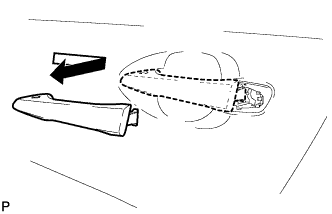 |
Remove the rear door outside handle assembly as shown in the illustration.
| 41. REMOVE REAR DOOR FRONT OUTSIDE HANDLE PAD |
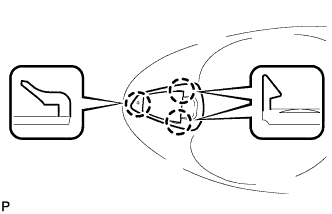 |
Disengage the 3 claws and remove the rear door front outside handle pad.
| 42. REMOVE REAR DOOR REAR OUTSIDE HANDLE PAD |
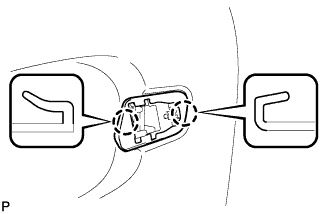 |
Disengage the 2 claws and remove the rear door rear outside handle pad.
| 43. REMOVE REAR DOOR OUTSIDE HANDLE FRAME SUB-ASSEMBLY |
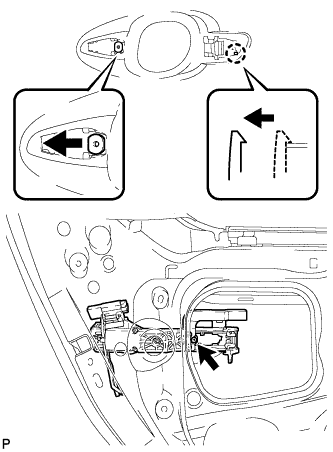 |
Using a T30 "TORX" socket wrench, loosen the screw.
Slide the rear door outside handle frame sub-assembly to disengage the door handle nut and claw of the rear door outside handle frame sub-assembly, and then remove it.
| 44. REMOVE NO. 2 REAR DOOR WEATHERSTRIP |
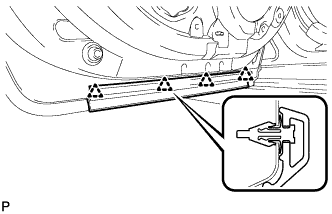 |
Using a clip remover, disengage the 4 clips and remove the No. 2 rear door weatherstrip.
| 45. REMOVE REAR DOOR PANEL CUSHION |
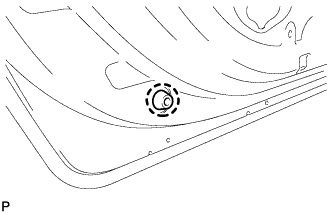 |
Using a clip remover, disengage the claw and remove the rear door panel cushion.
| 46. REMOVE REAR DOOR BELT MOULDING ASSEMBLY |
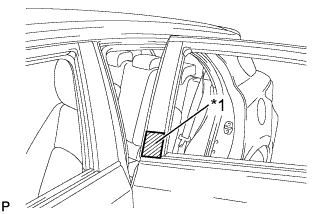 |
Put protective tape around the rear door belt moulding assembly.
| *1 | Protective Tape |
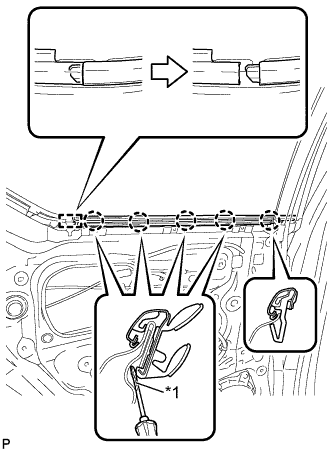 |
Using a screwdriver with the tip wrapped with protective tape, disengage the 5 claws and guide to remove the rear door belt moulding assembly as shown in the illustration.
| *1 | Protective Tape |
| 47. REMOVE NO. 3 REAR DOOR WEATHERSTRIP |
Using a heat light, heat the No. 3 rear door weatherstrip.
| Item | Temperature |
| Vehicle Body | 40 to 60°C (104 to 140°F) |
| No. 3 Rear Door Weatherstrip | 20 to 30°C (68 to 86°F) |
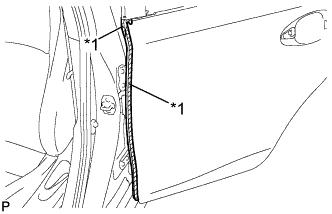 |
Remove the No. 3 rear door weatherstrip.
| *1 | Double-sided Tape |
| 48. REMOVE REAR DOOR FRONT WINDOW FRAME MOULDING |
| Item | Temperature |
| Vehicle Body | 40 to 60°C (104 to 140°F) |
| Moulding | 20 to 30°C (68 to 86°F) |
Using a heat light, heat the rear door front window frame moulding.
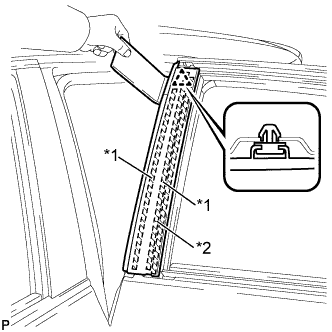 |
Using a moulding remover, disengage the clip and remove the rear door front window frame moulding.
| *1 | Double-sided Tape |
| *2 | Caulking Sponge |
| 49. REMOVE REAR DOOR WINDOW FRAME MOULDING SUB-ASSEMBLY |
Insert a 4.0 mm (0.157 in.) drill bit into a drill.
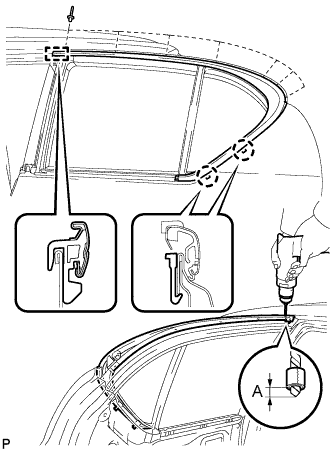 |
Tape a 4.0 mm (0.157 in.) drill bit 5.0 mm (0.197 in.) from the tip as shown in the illustration.
| Area | Dimension |
| A | 5.0 mm |
Lightly press the drill bit against the rivets to drill off the rivet flanges, and remove the 7 rivets.
Using a vacuum cleaner, remove the rivet fragments and shavings from the drilled areas.
Disengage the guide and 2 claws, remove the rear door window frame moulding sub-assembly from the door frame.
| 50. REMOVE REAR DOOR OUTSIDE STRIPE |
Using a heat light, heat the rear door outside stripe and vehicle body.
| Item | Temperature |
| Vehicle Body and Rear Door Outside stripe | 40 to 60°C (104 to 140°F) |
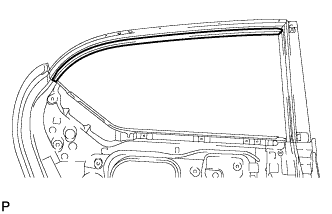 |
Pull back on one of the ends of the rear door outside stripe to remove it.
| 51. REMOVE REAR DOOR LOWER OUTSIDE STRIPE |
Using a heat light, heat the rear door lower outside stripe and vehicle body.
| Item | Temperature |
| Vehicle Body and Rear Door Lower Outside stripe | 40 to 60°C (104 to 140°F) |
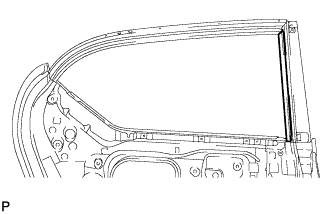 |
Pull back on one of the ends of the rear door lower outside stripe to remove it.
