REAR DOOR > REASSEMBLY |
| 1. REPAIR INSTRUCTION |
Clean the vehicle body surface.
Using a heat light, heat the vehicle body surface.
| Item | Temperature |
| Vehicle Body | 40 to 60°C (104 to 140°F) |
Wipe off any tape adhesive residue with cleaner.
Installation temperature
When the ambient temperature is below 15°C (59°F), perform the installation procedure after warming the vehicle body surface (installation surface of the door frame) and tape up to between 20 and 30°C (68 and 86°F) using a heat light. When the ambient temperature is above 35°C (95°F), cool the vehicle body surface (installation surface of the door frame) and tape down to between 20 and 30°C (68 and 86°F) prior to installation.
Before installation
Remove any coating roughness or dirt on and around the vehicle body surface where the tape will be installed (installation surface of the door frame). If any roughness or dirt remains when pressing the tape onto the surface, air will be trapped under the tape and result in a poor appearance.
Key points for handling the tape
The tape bends and rolls up easily. Store the tape between flat pieces of cardboard or other similar objects and keep it dry and flat.
Key points for installation of the tape (how to use a squeegee and installation procedure for flat surfaces)
To avoid air bubbles, slightly raise the part of the tape that is going to be applied so that its adhesive surface does not touch the vehicle body while applying the tape. Tilt the squeegee at 40 to 50° (pressing forward) or 30 to 45° (pulling) to the vehicle body surface and press the tape onto the vehicle body surface with a force of 20 to 30 N (2 to 3 kgf, 4.5 to 6.7 lbf) at a constant slow speed of 3 to 7 cm (1.18 to 2.76 in.) per second.
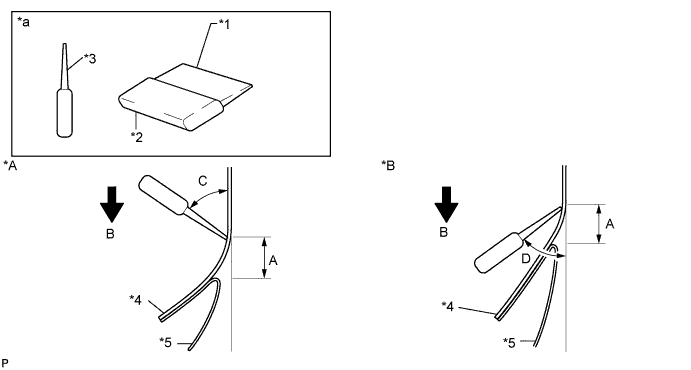
| *A | Pressing Forward | *B | Pulling |
| *1 | Non-padded Side | *2 | Padded Side |
| *3 | Squeegee | *4 | Black Out Tape |
| *5 | Release Paper | - | - |
| *a | Side View | - | - |
| Area | Measurement |
| A | 10 to 20 mm (0.393 to 0.787 in.) |
| B | 30 to 70 mm (1.18 to 2.76 in.) |
| C | 40 to 50° (for pressing forward) |
| D | 30 to 45° (for pulling) |
Key points for installation of the tape (how to use a squeegee and installation procedure for hemmed surfaces)
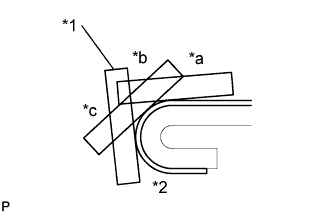 |
If it is difficult to apply the tape, install it in several steps as shown in the illustration. Use your fingers or the padded surface of a squeegee to slowly apply the tape to the hem of the vehicle, especially for a small hem.
| *1 | Squeegee |
| *2 | Hem |
| *a | First |
| *b | Second |
| *c | Third |
Key points for installation of the tape (how to use a squeegee and installation procedure for corners)
Remove the release paper and apply the tape carefully with your fingers.
Before applying the tape to each corner, heat the tape using a heat light and gradually apply it, avoiding wrinkles on the tape to achieve a neat finish.
Check after installation
After completing the application, check if the tape is applied neatly. If the tape is not applied neatly, reapply using new tape.
| 2. INSTALL REAR DOOR LOWER OUTSIDE STRIPE |
Refer to the illustration to position a new rear door lower outside stripe.
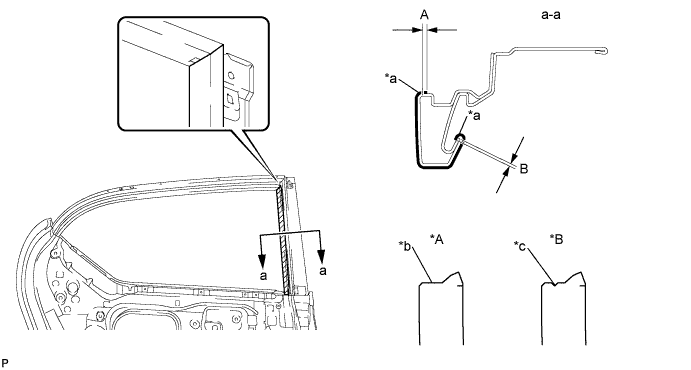
| *A | LH Side | *B | RH Side |
| *a | Edge of Curved Surface | *b | Straight |
| *c | Cutout | - | - |
| Dimension | Measurement |
| A | 1.5 mm (0.0591 in.) |
| B | 1.0 mm (0.0394 in.) |
Remove the release paper and apply the stripe.
| 3. INSTALL REAR DOOR OUTSIDE STRIPE |
Refer to the illustration to position a new rear door outside stripe.
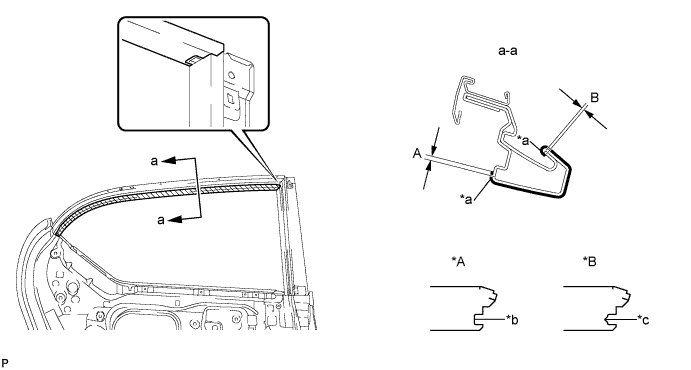
| *A | LH Side | *B | RH Side |
| *a | Edge of Curved Surface | *b | Straight |
| *c | Cutout | - | - |
| Dimension | Measurement |
| A | 1.5 mm (0.0591 in.) |
| B | 1.0 mm (0.0394 in.) |
Remove the release paper and apply the stripe.
| 4. INSTALL REAR DOOR WINDOW FRAME MOULDING SUB-ASSEMBLY |
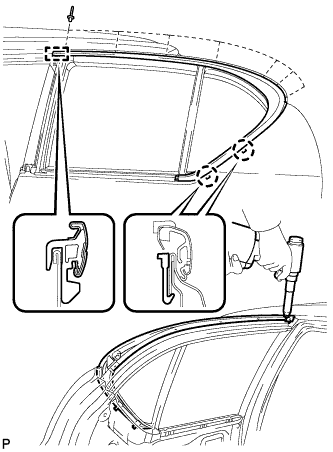 |
Engage the guide and 2 claws, and install the rear door window frame moulding sub-assembly to the door frame.
Using an air riveter or hand riveter with a nose piece, install the rear door upper window frame moulding with 7 new rivets.
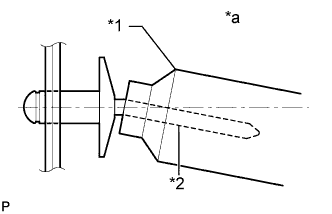 |
| *1 | Riveter |
| *2 | Mandrel |
| *a | Incorrect |
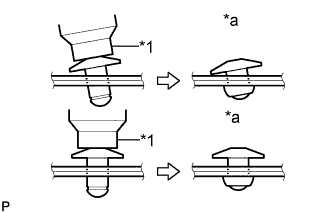 |
| *1 | Riveter |
| *a | Incorrect |
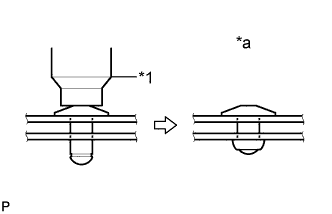 |
| *1 | Riveter |
| *a | Incorrect |
| 5. INSTALL REAR DOOR FRONT WINDOW FRAME MOULDING |
| Item | Temperature |
| Vehicle Body | 40 to 60°C (104 to 140°F) |
| Moulding | 20 to 30°C (68 to 86°F) |
Clean the vehicle body surface.
Using a heat light, heat the vehicle body surface.
Remove the double-sided tape from the vehicle body.
Wipe off any tape adhesive residue with cleaner.
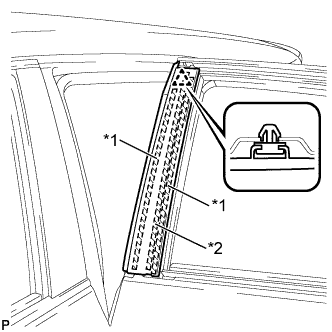 |
Install a new rear door front window frame moulding.
| *1 | Double-sided Tape |
| *2 | Caulking Sponge |
Using a heat light, heat the vehicle body and rear door front window frame moulding.
Remove the release paper from the rear door front window frame moulding.
Install the rear door front window frame moulding with the clip.
| 6. INSTALL NO. 3 REAR DOOR WEATHERSTRIP |
Using a heat light, heat the vehicle body surface.
| Item | Temperature |
| Vehicle Body | 40 to 60°C (104 to 140°F) |
| No. 3 Rear Door Weatherstrip | 20 to 30°C (68 to 86°F) |
Remove the double-sided tape from the vehicle body.
Wipe off any tape adhesive residue with cleaner.
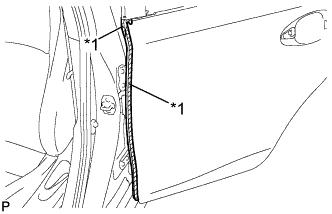 |
Install a new No. 3 rear door weatherstrip.
| *1 | Double-sided Tape |
| 7. INSTALL REAR DOOR BELT MOULDING ASSEMBLY |
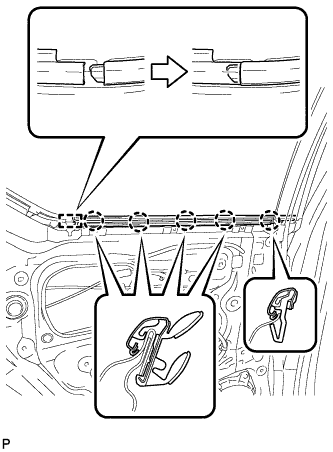 |
Engage the 5 claws and guide to install the rear door belt moulding assembly as shown in the illustration.
| 8. INSTALL REAR DOOR PANEL CUSHION |
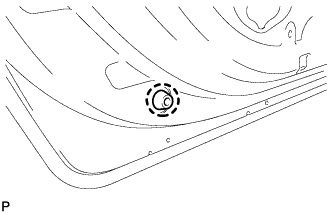 |
Engage the claw and install a new rear door panel cushion.
| 9. INSTALL NO. 2 REAR DOOR WEATHERSTRIP |
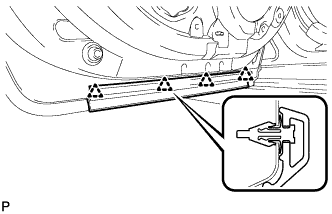 |
Engage the 4 clips to install the No. 2 rear door weatherstrip.
| 10. INSTALL REAR DOOR OUTSIDE HANDLE FRAME SUB-ASSEMBLY |
Apply MP grease to the sliding parts of the rear door outside handle frame sub-assembly.
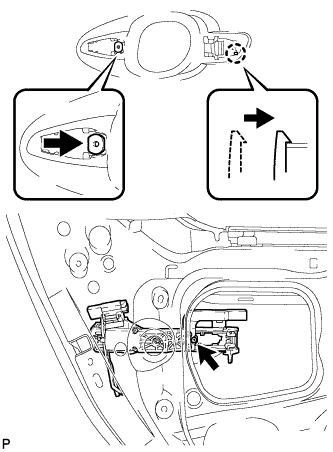 |
Engage the door handle nut and claw.
Using a T30 "TORX" socket wrench, install the rear door outside handle frame sub-assembly with the screw.
| 11. INSTALL REAR DOOR REAR OUTSIDE HANDLE PAD |
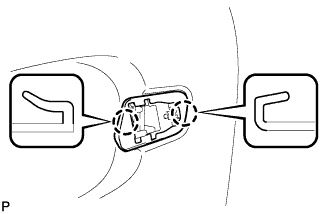 |
Engage the 2 claws and install the rear door rear outside handle pad.
| 12. INSTALL REAR DOOR FRONT OUTSIDE HANDLE PAD |
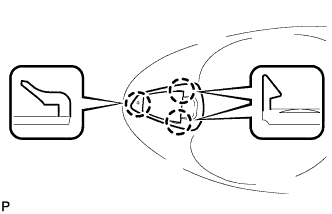 |
Engage the 3 claws to install the rear door front outside handle pad.
| 13. INSTALL REAR DOOR OUTSIDE HANDLE ASSEMBLY |
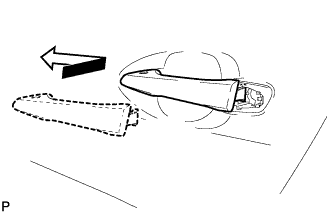 |
Insert the front end of the rear door outside handle assembly into the rear door outside handle frame.
Insert the rear end of the rear door outside handle assembly into the rear door outside handle frame. Next, slide the rear door outside handle assembly toward the front of the vehicle to install it.
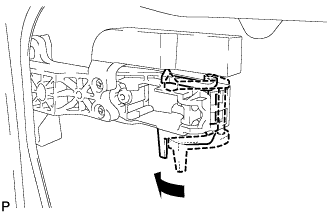 |
Move the lever back in the direction indicated by the arrow in the illustration to lock the door outside handle assembly.
| 14. INSTALL REAR DOOR OUTSIDE HANDLE COVER |
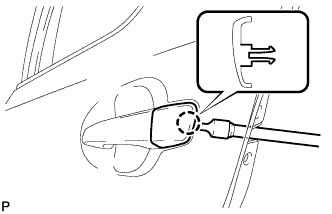 |
Engage the claw and install the rear door outside handle cover.
Using a T30 "TORX" socket wrench, install the rear door outside handle cover with the screw.
| 15. INSTALL REAR DOOR INSIDE LOCKING CABLE ASSEMBLY (w/o Double Locking System) |
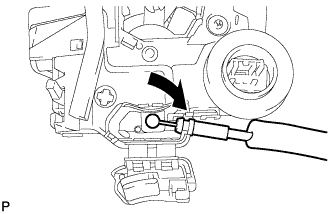 |
Install the rear door inside locking cable assembly.
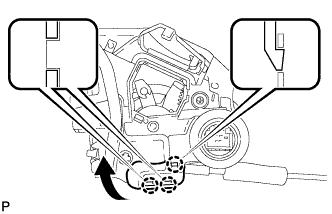 |
Engage the 3 claws.
| 16. INSTALL REAR DOOR INSIDE LOCKING CABLE ASSEMBLY (w/ Double Locking System) |
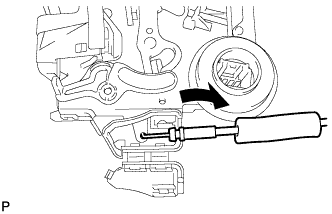 |
Install the rear door inside locking cable assembly.
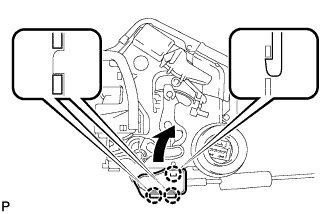 |
Engage the 3 claws.
| 17. INSTALL REAR DOOR LOCK REMOTE CONTROL CABLE ASSEMBLY (w/o Double Locking System) |
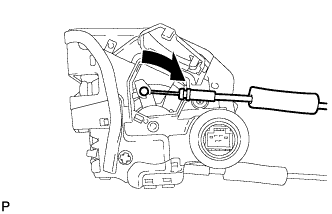 |
Install the rear door lock remote control cable assembly.
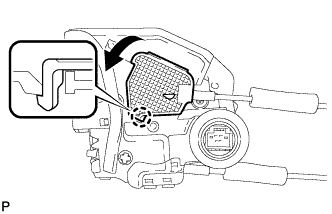 |
Engage the claw.
| 18. INSTALL REAR DOOR LOCK REMOTE CONTROL CABLE ASSEMBLY (w/ Double Locking System) |
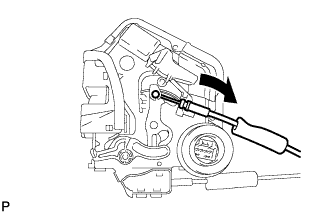 |
Install the rear door lock remote control cable assembly.
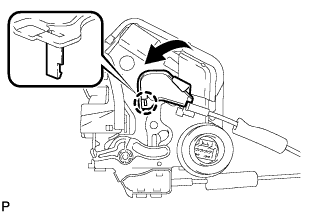 |
Engage the claw.
| 19. INSTALL REAR DOOR LOCK ASSEMBLY |
Apply MP grease to the sliding parts of the rear door lock assembly.
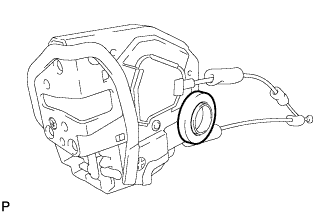 |
Install a new door lock wiring harness seal to the rear door lock assembly.
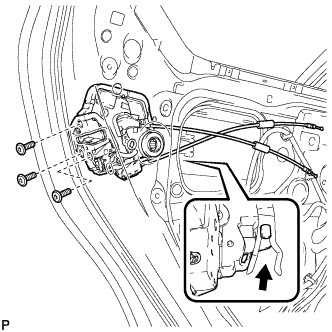 |
Insert the rear door lock assembly to the rear door outside handle release plate, and set it to the rear door panel.
Make sure that the rear door outside handle frame release plate is securely connected to the rear door lock assembly.
Using a T30 "TORX" socket wrench, install the rear door lock assembly with the 3 screws.
| 20. INSTALL REAR POWER WINDOW REGULATOR MOTOR ASSEMBLY |
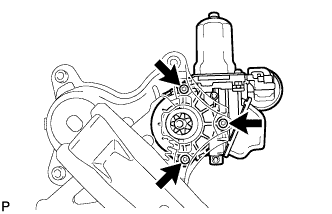 |
Using a T25 "TORX" socket wrench, install the rear power window regulator motor assembly with the 3 screws.
| 21. INSTALL REAR DOOR WINDOW REGULATOR ASSEMBLY |
Apply MP grease to the sliding parts of the rear door window regulator assembly.
Install the temporary bolt to the rear door window regulator assembly.
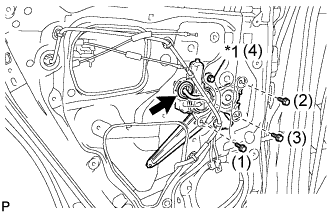 |
Temporarily install the rear door window regulator assembly.
| *1 | Temporary Bolt |
Tighten the temporary bolt and 3 bolts to install the rear door window regulator assembly.
| 22. INSTALL REAR DOOR CUSHION |
When reusing the rear door cushion:
Clean the rear door cushion.
Remove the double-sided tape from the rear door cushion.
Wipe off any tape adhesive residue with cleaner.
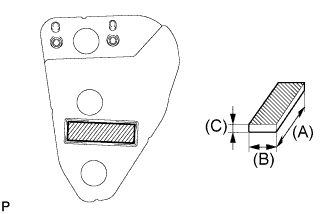 |
Apply new double-sided tape to the rear door cushion as shown in the illustration.
| Area | Dimension |
| (A) | 80.0 mm (3.150 in.) |
| (B) | 20.0 mm (0.787 in.) |
| (C) | 4.0 mm (0.157 in.) |
Clean the rear door panel sub-assembly.
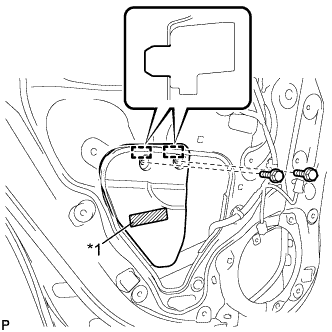 |
Engage the 2 guides.
| *1 | Double-sided Tape |
Install the rear door cushion with the 2 bolts.
| 23. INSTALL REAR DOOR GLASS CHANNEL FILLER |
Apply soapy water to a new rear door glass channel filler.
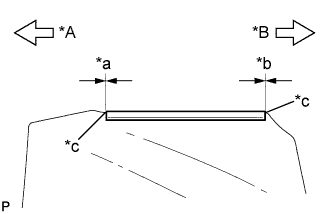 |
Install the rear door glass channel filler to the position shown in the illustration.
| *A | Front Side |
| *B | Rear Side |
| *a | 0 mm (0 in.) |
| *b | 0 mm (0 in.) |
| *c | Edge of curved surface |
| 24. INSTALL REAR DOOR GLASS CHANNEL SUB-ASSEMBLY |
Apply soapy water to the channel filler side of the rear door glass channel sub-assembly.
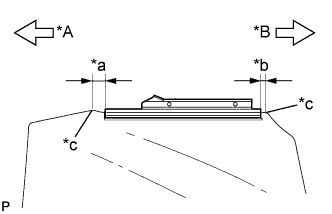 |
Using a plastic hammer, install the rear door glass channel sub-assembly to the position shown in the illustration.
| *A | Front Side |
| *B | Rear Side |
| *a | 14.0 mm (0.551 in.) |
| *b | 11.0 mm (0.433 in.) |
| *c | Edge of curved surface |
| 25. INSTALL REAR DOOR GLASS SUB-ASSEMBLY |
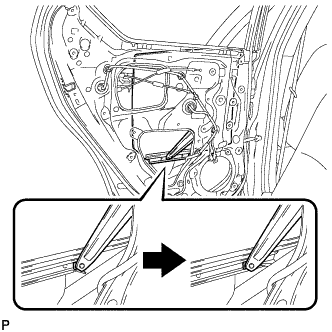 |
Slide the rear door glass sub-assembly to install it as shown in the illustration.
| 26. INSTALL NO. 2 REAR DOOR VENT SEAL |
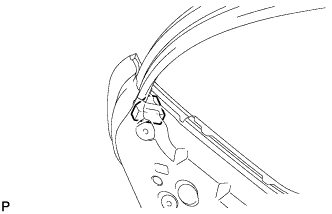 |
Install the No. 2 rear door vent seal.
| 27. INSTALL REAR DOOR QUARTER WINDOW GLASS |
Install the rear door quarter window glass to the rear door quarter window weatherstrip.
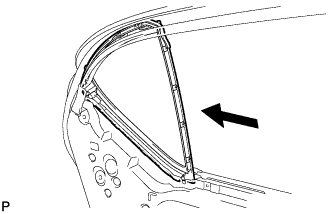 |
Install the rear door quarter window glass together with the rear door quarter window weatherstrip in the direction indicated by the arrow in the illustration.
| 28. INSTALL REAR DOOR WINDOW DIVISION BAR SUB-ASSEMBLY |
Install the temporary bolt to the rear door window division bar sub-assembly.
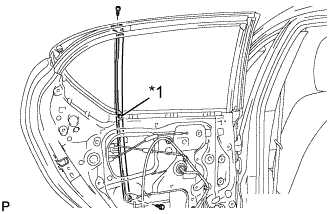 |
Temporarily install the rear door window division bar sub-assembly.
| *1 | Temporary Bolt |
Install the bolt and screw.
Tighten the temporary bolt to install the rear door window division bar sub-assembly.
| 29. INSTALL NO. 1 REAR DOOR VENT SEAL |
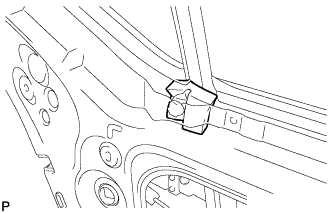 |
Install the No. 1 rear door vent seal.
| 30. INSTALL REAR DOOR GLASS RUN |
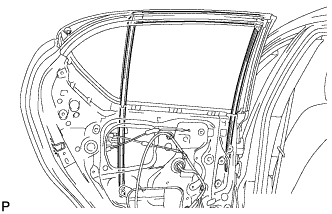 |
Install the rear door glass run.
| 31. INSTALL REAR DOOR WEATHERSTRIP |
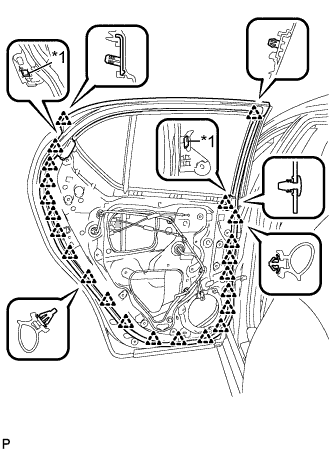 |
Engage the 23 clips to install a new rear door weatherstrip.
| *1 | Double-sided Tape |
| 32. INSTALL REAR DOOR CHECK ASSEMBLY |
Apply MP grease to the sliding parts of the rear door check assembly.
Apply adhesive to the threads of the bolt (A).
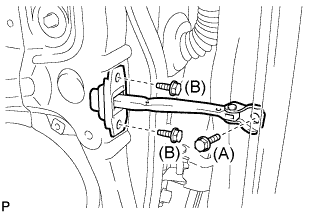 |
Install the rear door check assembly with the 3 bolts.
| 33. INSTALL REAR DOOR SERVICE HOLE COVER |
Apply butyl tape to the rear door panel.
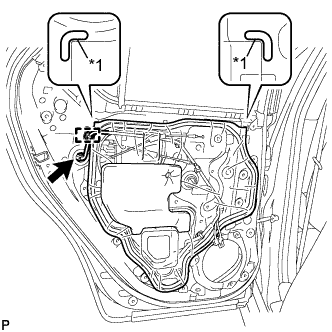 |
Pass the rear door lock remote control cable assembly, rear door inside locking cable assembly and each connector through a new rear door service hole cover.
Attach the rear door service hole cover according to the reference points on the rear door panel.
| *1 | Reference Point |
Connect the connector.
Engage the clamp.
| 34. INSTALL REAR DOOR TRIM BRACKET |
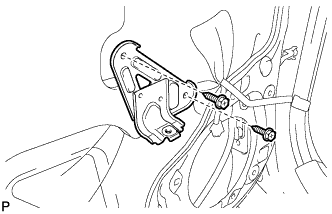 |
Install the rear door trim bracket with the 2 screws.
| 35. INSTALL REAR DOOR FRAME GARNISH |
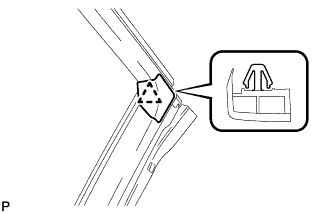 |
Engage the clip to install a new rear door frame garnish.
| 36. INSTALL REAR DOOR SPEAKER COVER (w/o Rear Speaker) |
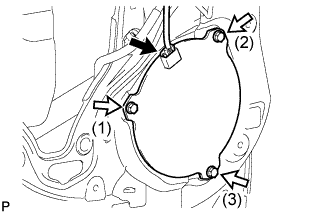 |
Install the rear door speaker cover with the 3 bolts.
Connect the connector.
| 37. INSTALL REAR SPEAKER ASSEMBLY (w/ Rear Speaker) |
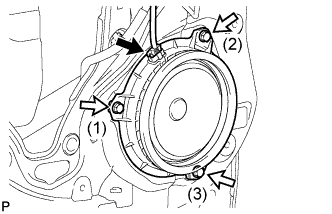 |
Install the rear speaker assembly with the 3 bolts.
Connect the connector.
| 38. INSTALL REAR DOOR TRIM SEAL |
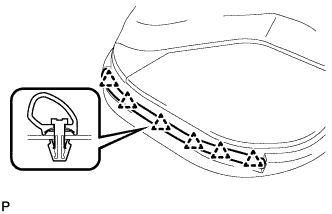 |
Engage the 6 clips of the rear door trim seal.
| 39. INSTALL REAR DOOR INNER GLASS WEATHERSTRIP |
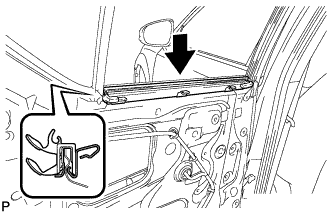 |
Engage the 3 claws and install the rear door inner glass weatherstrip as shown in the illustration.
| 40. INSTALL REAR DOOR INSIDE HANDLE SUB-ASSEMBLY |
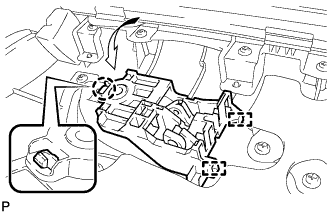 |
Engage the claw and 2 guides, and install the rear door inside handle sub-assembly to the rear door trim board sub-assembly as shown in the illustration.
| 41. INSTALL REAR DOOR TRIM BOARD SUB-ASSEMBLY |
Install a new rear door trim board clip (blue) to the rear door trim board.
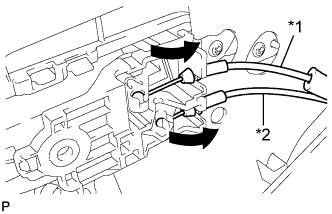 |
Connect the rear door lock remote control cable assembly and rear door inside locking cable assembly.
| *1 | Rear Door Inside Locking Cable Assembly |
| *2 | Rear Door Lock Remote Control Cable Assembly |
Connect the connector.
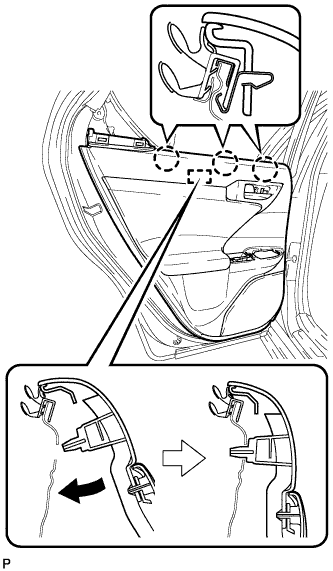 |
Engage the rear door trim board sub-assembly with the 3 claws to the rear door inner glass weatherstrip as shown in the illustration.
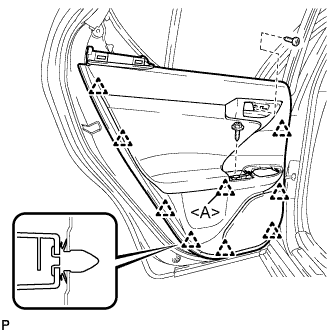 |
Engage the 8 clips and temporarily install the rear door trim board sub-assembly.
Engage the clip <A> and install the rear door trim board sub-assembly.
Install the 2 screws.
Remove the protective tape.
| 42. INSTALL REAR DOOR ARMREST COVER |
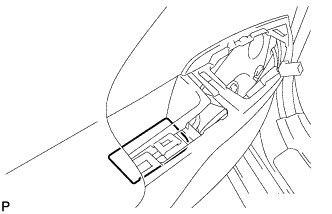 |
Install the rear door armrest cover.
| 43. INSTALL REAR POWER WINDOW REGULATOR SWITCH ASSEMBLY WITH REAR DOOR ARMREST BASE PANEL |
Connect the connector.
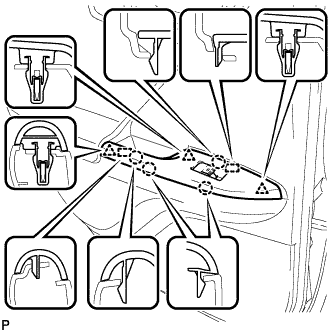 |
Engage the 2 guides, 3 clips and 4 claws, and install the rear power window regulator switch assembly with rear door armrest base panel.
| 44. INSTALL REAR DOOR REAR FRAME BRACKET |
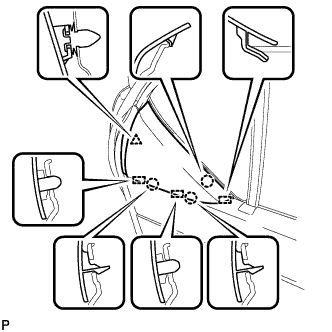 |
Engage the 3 guides, clip and 3 claws, and install the rear door rear frame bracket.
| 45. INSTALL REAR DOOR INSIDE HANDLE BEZEL PLUG |
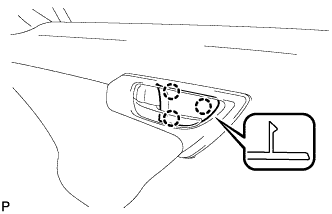 |
Engage the 3 claws and install the rear door inside handle bezel plug.
| 46. CONNECT CABLE TO NEGATIVE BATTERY TERMINAL |
| 47. INSTALL REAR FLOOR BOARD UPPER NO. 3 PLATE |
Engage the 4 claws and 2 guides to install the rear floor board upper No. 3 plate.
| 48. INSTALL DECK FLOOR BOX RH |
Engage the 6 guides.
Install the deck floor box RH with the clip.
| 49. INSTALL REAR NO. 3 FLOOR BOARD |
Install the rear No. 3 floor board.
| 50. INSTALL REAR DECK FLOOR BOX |
Install the rear deck floor box.
| 51. INSTALL REAR NO. 2 FLOOR BOARD |
Install the rear No. 2 floor board.
| 52. INITIALIZE POWER WINDOW CONTROL SYSTEM |
