DTC B241A Rear Height Control Sensor |
| DTC No. | DTC Detecting Condition | Trouble Area |
| B241A |
|
|
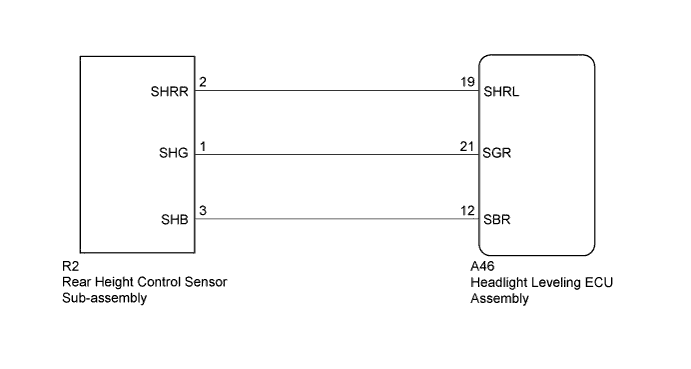
| 1.CHECK FOR DTC |
Clear the DTCs (Click here).
Check for DTCs (Click here).
|
| ||||
| OK | ||
 | ||
| ||
| 2.READ VALUE USING INTELLIGENT TESTER |
Connect the intelligent tester to the DLC3.
Turn the power switch on (IG).
Turn the intelligent tester on.
Enter the following menus: Body / HL Auto Leveling / Data List.
Read the display on the intelligent tester.
| Tester Display | Measurement Item/Range | Normal Condition | Diagnostic Note |
| Height Sens Pw Supply Val | Height control sensor power supply value/0 to 6.25 V | Approx. 5 V | - |
| Rr Height Sens Signal Val | Rear height control sensor signal value/0 to 5 V | Approx. 2.5 V (When vehicle is level) | Value changes according to vehicle height |
| Result | Proceed to |
| NG | A |
| OK (for LHD) | B |
| OK (for RHD) | C |
|
| ||||
|
| ||||
| A | |
 |
| 3.INSPECT REAR HEIGHT CONTROL SENSOR SUB-ASSEMBLY |
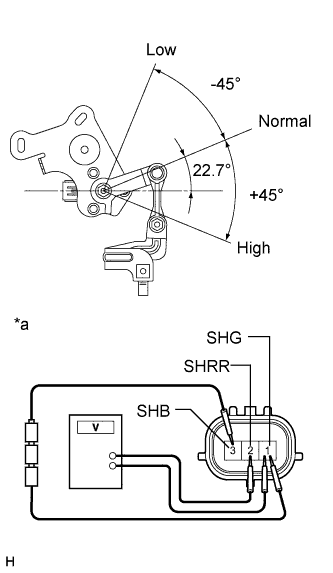 |
Connect 3 dry cell batteries (1.5 V) in series.
Remove the rear height control sensor sub-assembly (Click here).
Connect the positive (+) lead from the batteries to terminal 3 (SHB) and the negative (-) lead from the batteries to terminal 1 (SHG).
Measure the voltage between terminals 2 (SHRR) and 1 (SHG) while slowly moving the link up and down.
| Tester Connection | Condition | Specified Condition |
| 2 (SHRR) - 1 (SHG) | +45° (High) | 4.05 V |
| 0° (Normal) | 2.25 V | |
| -45° (Low) | 0.45 V |
| *a | Component without harness connected (Rear Height Control Sensor Sub-assembly) |
|
| ||||
| OK | |
|
| 4.CHECK HARNESS AND CONNECTOR (HEADLIGHT LEVELING ECU ASSEMBLY - HEIGHT CONTROL SENSOR) |
Disconnect the A46 headlight leveling ECU assembly connector.
Disconnect the R2 rear height control sensor sub-assembly connector.
Measure the resistance according to the value(s) in the table below.
| Tester Connection | Condition | Specified Condition |
| A46-19 (SHRL) - R2-2 (SHRR) | Always | Below 1 Ω |
| A46-19 (SHRL) - Body ground | Always | 10 kΩ or higher |
| Result | Proceed to |
| NG | A |
| OK (for LHD) | B |
| OK (for RHD) | C |
|
| ||||
|
| ||||
| A | ||
| ||
| ||


