FRONT SEAT OUTER BELT ASSEMBLY > INSTALLATION |
| 1. INSTALL FRONT SHOULDER BELT ANCHOR ADJUSTER ASSEMBLY |
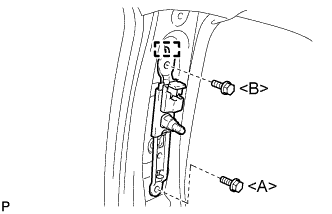 |
Engage the guide to temporarily install the front shoulder belt anchor adjuster assembly with the 2 bolts.
Fully tighten the bolt <A> first, then the bolt <B> to install the front shoulder belt anchor adjuster assembly.
| 2. INSTALL FRONT SEAT OUTER BELT ASSEMBLY |
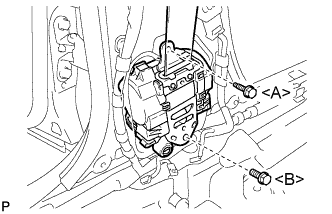 |
Temporarily install the front seat outer belt assembly with the 2 bolts.
Fully tighten the bolt <A> first, then the bolt <B> to install the front seat outer belt assembly.
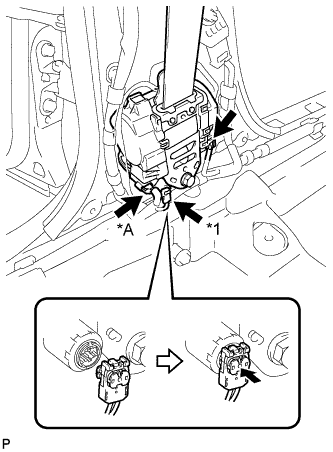 |
Connect the pretensioner connector and lock the locking button as shown in the illustration.
| *A | w/ Pre-crash Safety System |
| *1 | Pretensioner Connector |
Connect the connector.
w/ Pre-crash Safety System:
Connect the connector.
Connect the shoulder anchor of the front seat outer belt assembly with the nut.
| 3. INSTALL CENTER PILLAR UPPER GARNISH |
Pass the floor anchor of the front seat outer belt assembly LH through the center pillar upper garnish LH.
Engage the 2 clips.
Install the center pillar upper garnish LH with the screw.
| 4. INSTALL CENTER PILLAR LOWER GARNISH |
Engage the 4 claws and 2 clips to install the center pillar lower garnish LH.
| 5. CONNECT FRONT SEAT OUTER BELT ASSEMBLY |
Install the floor end of the front seat outer belt assembly with the bolt.
Check if the ELR locks.
With the belt assembly installed, check that the belt locks when it is pulled out quickly.
| 6. INSTALL LAP BELT OUTER ANCHOR COVER |
Engage the 3 claws to install the lap belt outer anchor cover.
| 7. INSTALL REAR DOOR OPENING TRIM WEATHERSTRIP |
| 8. INSTALL REAR DOOR SCUFF PLATE |
Engage the 4 claws, 2 guides and 2 clips to install the rear door scuff plate LH.
| 9. INSTALL FRONT DOOR OPENING TRIM WEATHERSTRIP |
| 10. INSTALL COWL SIDE TRIM SUB-ASSEMBLY |
Engage the claw and clip.
Install the cowl side trim sub-assembly LH with the clip.
| 11. INSTALL NO. 2 INSTRUMENT PANEL UNDER COVER SUB-ASSEMBLY (for RHD) |
Connect the connector.
Engage the clamp.
Engage the 2 guides, claw and 2 clips to install the No. 2 instrument panel under cover sub-assembly.
| 12. INSTALL FRONT DOOR SCUFF PLATE |
Engage the 4 claws, 2 guides and 4 clips to install the front door scuff plate LH.
| 13. CONNECT CABLE TO NEGATIVE BATTERY TERMINAL |
| 14. INSTALL REAR FLOOR BOARD UPPER NO. 3 PLATE |
Engage the 4 claws and 2 guides to install the rear floor board upper No. 3 plate.
| 15. INSTALL DECK FLOOR BOX RH |
Engage the 6 guides.
Install the deck floor box RH with the clip.
| 16. INSTALL REAR NO. 3 FLOOR BOARD |
Install the rear No. 3 floor board.
| 17. INSTALL REAR DECK FLOOR BOX |
Install the rear deck floor box.
| 18. INSTALL REAR NO. 2 FLOOR BOARD |
Install the rear No. 2 floor board.
| 19. INSPECT SRS WARNING LIGHT |
