SLIDING ROOF HOUSING > INSTALLATION |
| 1. INSTALL SLIDING ROOF HOUSING ASSEMBLY |
Install the sliding roof housing sub-assembly with the 8 bolts and 8 nuts.
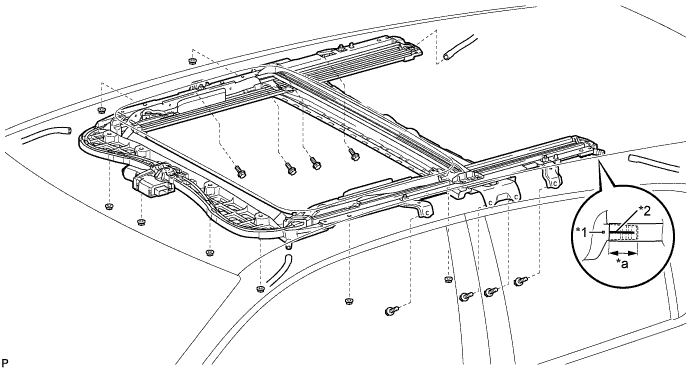
| *1 | Mark | *2 | Marking |
| *a | Installation depth | - | - |
Connect the 4 sliding roof drain hoses to the sliding roof housing sub-assembly.
| 2. INSTALL REAR NO. 2 SIDE RAIL SPACER LH |
Engage the 2 claws to install the rear No. 2 side rail spacer LH.
| 3. INSTALL REAR NO. 2 SIDE RAIL SPACER RH |
| 4. INSTALL CURTAIN SHIELD AIRBAG ASSEMBLY LH |
Check that the power switch is off.
Check that the cable is disconnected from the negative (-) auxiliary battery terminal.
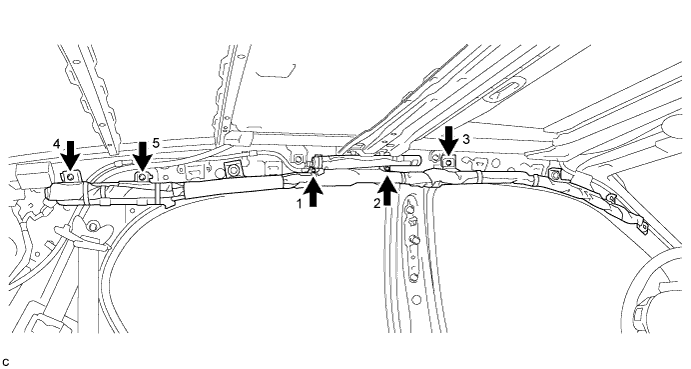
Temporarily install the curtain shield airbag assembly with the 5 hooks.
Install 5 new bolts in the order shown in the illustration.
Install the curtain shield airbag assembly to the body panel with 4 new clips and 4 new spacers in the order shown in the illustration
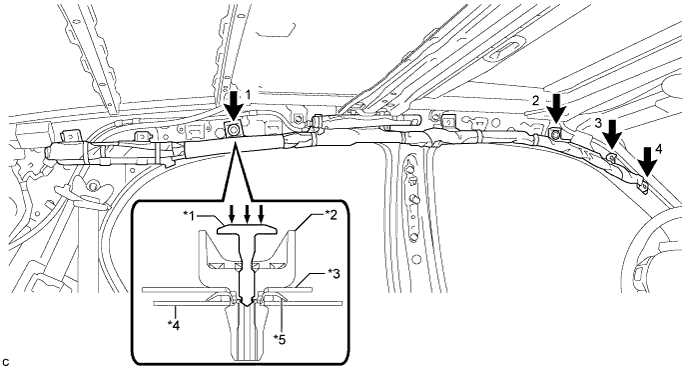
| *1 | Pin | *2 | Clip |
| *3 | Airbag | *4 | Body |
| *5 | Spacer | - | - |
Install the 4 pins.
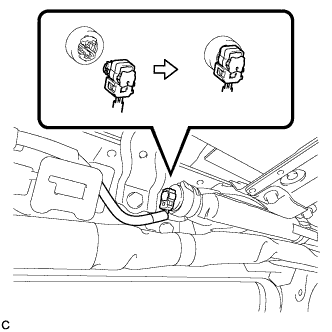 |
Connect the curtain shield airbag connector.
Push in the lock to install the airbag connector.
| 5. INSTALL CURTAIN SHIELD AIRBAG ASSEMBLY RH |
| 6. INSTALL SLIDING ROOF WEATHERSTRIP |
Install the sliding roof weatherstrip as follows:
Position the joint of the weatherstrip at the rear center.
Align the alignment mark (brown) on the weatherstrip with the alignment mark (green) at the corners of the sliding roof panel sub-assembly and install the weatherstrip.
Install the lip of the weatherstrip firmly.
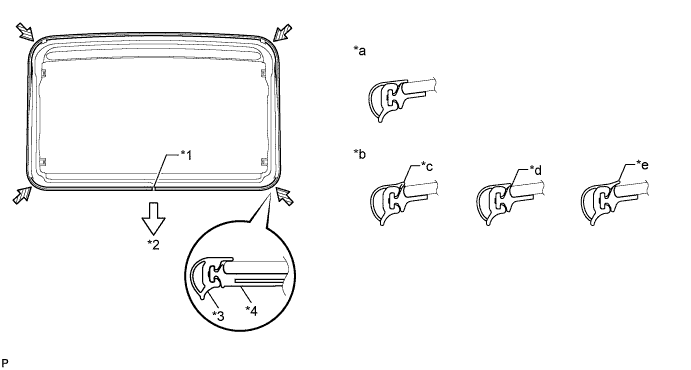
| *1 | Joint | *2 | Rear |
| *3 | Alignment Mark (Brown) | *4 | Alignment Mark (Green) |
| *a | Normal | *b | Abnormal |
| *c | Pinched | *d | Exposed |
| *e | Gap (raised, wavy, etc.) | - | - |
| 7. INSTALL SLIDING ROOF GLASS SUB-ASSEMBLY |
Using a T25 "TORX" socket wrench, temporarily install the sliding roof glass sub-assembly with the 4 screws.
Perform a level check.
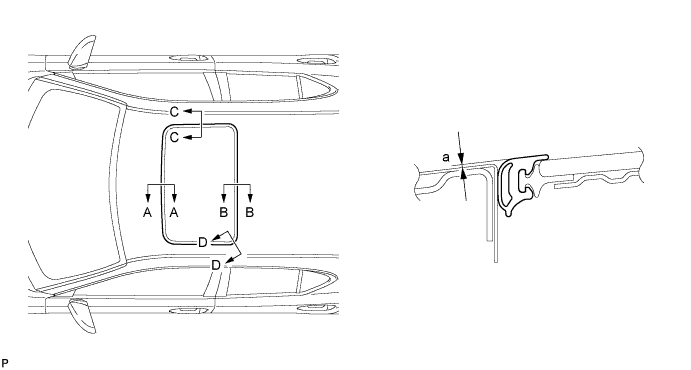
Check the difference in level for "a" between the roof panel and the upper surface of the weather strip when the sliding roof glass is fully closed.
| Area | Measurement |
| A - A | 0 + 1.0 mm (0 + 0.0394 in.) 0 - 2.0 mm (0 - 0.0787 in.) |
| B - B | 0 + 2.0 mm (0 + 0.0787 in.) 0 - 1.0 mm (0 - 0.0394 in.) |
| C - C | 0 + 1.5 mm (0 + 0.0591 in.) 0 - 1.5 mm (0 - 0.0591 in.) |
| D - D | 0 + 1.5 mm (0 + 0.0591 in.) 0 - 1.0 mm (0 - 0.0394 in.) |
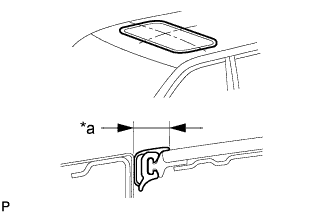 |
Perform a gap check.
| *a | Even |
Check the gap between the roof panel and roof glass.
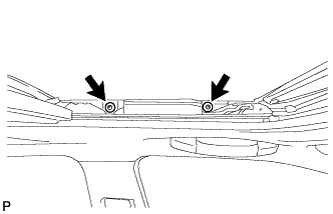 |
After adjusting the sliding roof glass, using a T25 "TORX" socket wrench, install the sliding roof glass sub-assembly with the 4 screws.
| 8. CHECK FOR WATER LEAK |
After adjusting the sliding roof glass sub-assembly, check for water leaks.
If there are any leaks, readjust the sliding roof glass sub-assembly.
| 9. INSTALL ROOF HEADLINING ASSEMBLY |
| 10. INSTALL NO. 1 SLIDING ROOF SIDE GARNISH LH |
Press the TILT UP switch to tilt the roof glass up until it is fully tilted upward.
Engage the 2 claws to install the No. 1 sliding roof side garnish LH.
| 11. INSTALL NO. 1 SLIDING ROOF SIDE GARNISH RH |
| 12. INSTALL NO. 2 SLIDING ROOF SIDE GARNISH LH |
Press the TILT UP switch to tilt the roof glass up until it is fully tilted upward.
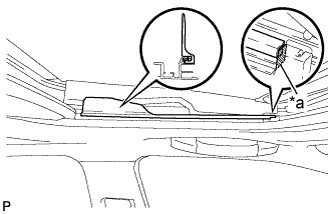 |
Align the front end of the garnish with the shaded portion, and then install the No. 2 sliding roof side garnish LH.
| *a | Shaded Portion |
| 13. INSTALL NO. 2 SLIDING ROOF SIDE GARNISH RH |
| 14. RESET SLIDING ROOF DRIVE GEAR ASSEMBLY |
| 15. CHECK SLIDING ROOF SYSTEM |
| 16. INSPECT FOR WATER LEAK |
Press the TILT UP switch to tilt the roof glass down until it is fully tilted upward.
After adjusting the sliding roof glass sub-assembly, inspect for water leaks.
If there are any leaks, readjust the sliding roof glass sub-assembly.
