FRONT DRIVE SHAFT ASSEMBLY > DISASSEMBLY |
| 1. SEPARATE FRONT NO. 2 AXLE INBOARD JOINT BOOT CLAMP |
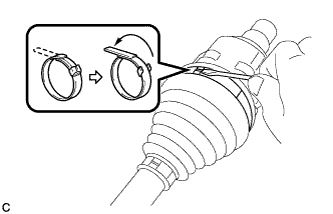 |
Using a screwdriver, release the staked part of the front No. 2 axle inboard joint boot clamp and separate the front No. 2 axle inboard joint boot clamp as shown in the illustration.
| 2. SEPARATE FRONT AXLE INBOARD JOINT BOOT CLAMP |
| 3. SEPARATE INBOARD JOINT BOOT |
Separate the inboard joint boot from the front drive inboard joint assembly.
| 4. REMOVE FRONT DRIVE INBOARD JOINT ASSEMBLY |
Remove the old grease from the front drive inboard joint assembly.
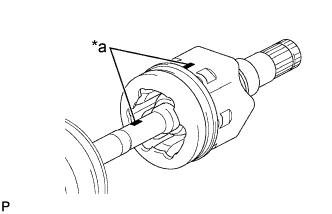 |
Put matchmarks on the front drive inboard joint assembly and front axle outboard joint shaft assembly.
| *a | Matchmark |
Remove the front drive inboard joint assembly from the front axle outboard joint shaft assembly.
Secure the front axle outboard joint shaft assembly in a vise using aluminum plates.
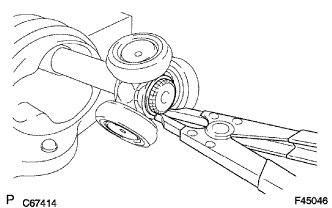 |
Using a snap ring expander, remove the shaft snap ring from the front axle outboard joint shaft assembly.
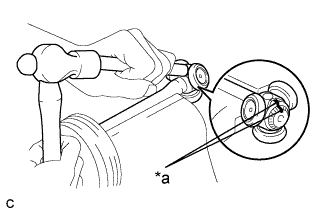 |
Put matchmarks on the front axle outboard joint shaft assembly and tripod joint.
| *a | Matchmark |
Using a brass bar and a hammer, tap out the tripod joint from the front axle outboard joint shaft assembly.
Remove the front No. 2 axle inboard joint boot clamp, inboard joint boot and front axle inboard joint boot clamp.
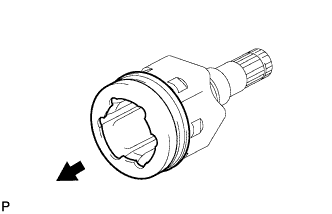 |
Remove the front axle inboard joint grommet from the front drive inboard joint assembly.
| 5. SEPARATE FRONT DRIVE SHAFT DAMPER CLAMP (for LH Side) |
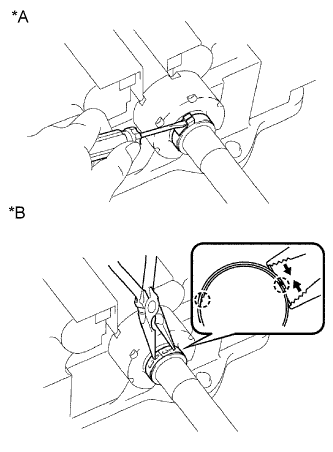 |
for one touch type:
Using a screwdriver, release the staked part of the front drive shaft damper clamp and separate the front drive shaft damper clamp as shown in the illustration.
| *A | for One Touch Type |
| *B | for Claw Engagement Type |
for claw engagement type:
Using needle-nose pliers, disengage the 2 claws and remove the front drive shaft damper clamp as shown in the illustration.
| 6. SEPARATE FRONT DRIVE SHAFT DAMPER CLAMP (for RH Side) |
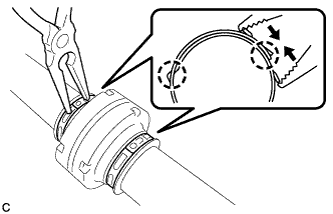 |
Using needle-nose pliers, disengage the 2 claws on each front drive shaft damper clamp, and then remove each clamp as shown in the illustration.
| 7. REMOVE FRONT DRIVE SHAFT DAMPER |
Remove the front drive shaft damper from the front axle outboard joint shaft assembly.
| 8. SEPARATE FRONT NO. 2 AXLE OUTBOARD JOINT BOOT CLAMP (for LH Side) |
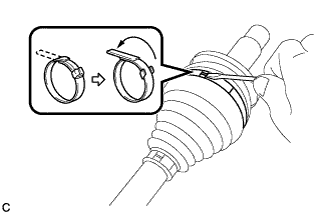 |
Using a screwdriver, release the staked part of the front No. 2 axle outboard joint boot clamp and separate the front No. 2 axle outboard joint boot clamp as shown in the illustration.
| 9. SEPARATE FRONT AXLE OUTBOARD JOINT BOOT CLAMP (for LH Side) |
| 10. REMOVE OUTBOARD JOINT BOOT (for LH Side) |
Remove the front axle outboard joint boot clamp, outboard joint boot and front No. 2 axle outboard joint boot clamp from the front axle outboard joint shaft assembly.
Remove the old grease from the outboard joint.
| 11. REMOVE FRONT DRIVE SHAFT DUST COVER |
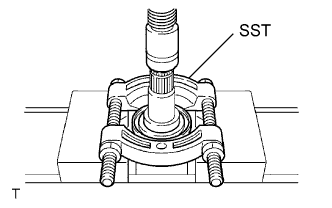 |
Using SST and a press, remove the front drive shaft dust cover from the front drive inboard joint assembly.
