LIGHTING SYSTEM > Door Mirror Foot Light Circuit |
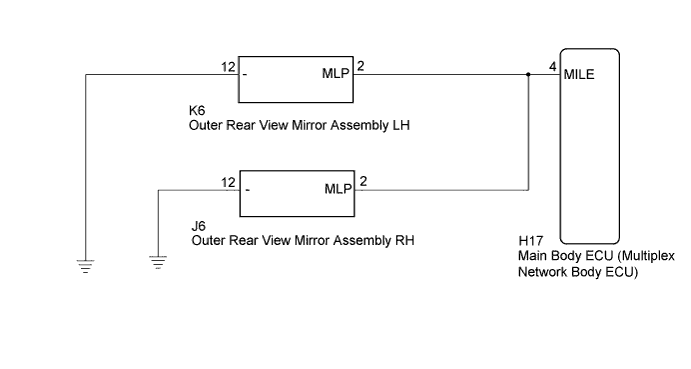
| w/o Seat Position Memory: |
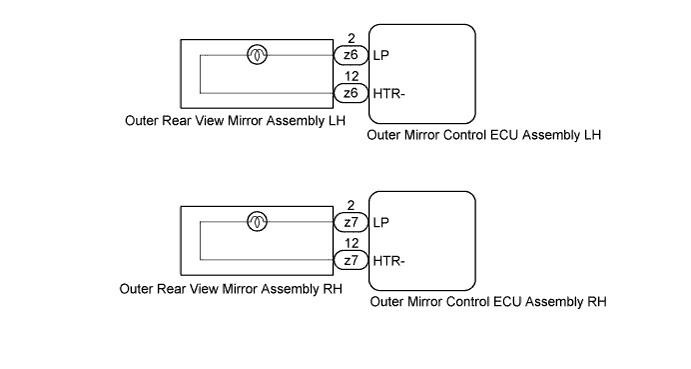
| w/ Seat Position Memory: |
| 1.CHECK VEHICLE CONDITION |
Check the vehicle condition.
| Result | Proceed to |
| w/o Seat Position Memory | A |
| w/ Seat Position Memory | B |
|
| ||||
| A | |
 |
| 2.PERFORM ACTIVE TEST USING INTELLIGENT TESTER |
Connect the intelligent tester to the DLC3.
Turn the power switch on (IG).
Turn the intelligent tester on.
Enter the following menus: Body / Main Body / Active Test.
Check that the door mirror foot lights operate.
| Tester Display | Test Part | Control Range | Diagnostic Note |
| Side Mirror Foot Light | Door mirror foot lights | ON/OFF | - |
|
| ||||
| OK | ||
 | ||
| ||
| 3.CHECK OUTER REAR VIEW MIRROR ASSEMBLY |
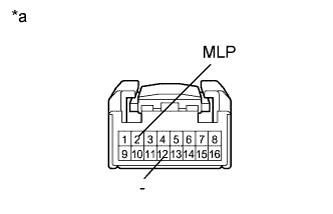 |
Remove the outer rear view mirror assembly that does not illuminate (Click here).
Connect a positive (+) lead from the auxiliary battery to terminal 2 (MLP) and a negative (-) lead to terminal 12 (-).
Check that the outer mirror foot light comes on.
| Result | Proceed to |
| OK | A |
| NG (Door mirror foot light LH does not come on) | B |
| NG (Door mirror foot light RH does not come on) | C |
| *a | Component without harness connected (Outer Rear View Mirror Assembly LH) (Outer Rear View Mirror Assembly RH) |
|
| ||||
|
| ||||
| A | |
|
| 4.CHECK HARNESS AND CONNECTOR (MAIN BODY ECU - OUTER REAR VIEW MIRROR ASSEMBLY) |
Disconnect the H17 main body ECU (multiplex network body ECU) connector.
Disconnect the K6 or J6 outer rear view mirror assembly connector.
Measure the resistance according to the value(s) in the table below.
| Tester Connection | Condition | Specified Condition |
| K6-2 (MLP) - H17-4 (MILE) | Always | Below 1 Ω |
| J6-2 (MLP) - H17-4 (MILE) | Always | Below 1 Ω |
| H17-4 (MILE) - Body ground | Always | 10 kΩ or higher |
|
| ||||
| OK | ||
| ||
| ||
| 5.PERFORM ACTIVE TEST USING INTELLIGENT TESTER |
Connect the intelligent tester on the DLC3.
Turn the power switch on (IG).
Turn the intelligent tester on.
Enter the following menus: Body / Mirror L or Mirror R / Active Test.
Check that the door mirror foot lights operate.
| Tester Display | Test Part | Control Range | Diagnostic Note |
| Foot Light | Door mirror foot light LH | ON/OFF | - |
| Tester Display | Test Part | Control Range | Diagnostic Note |
| Foot Light | Door mirror foot light RH | ON/OFF | - |
| Result | Proceed to |
| OK | A |
| NG (Door mirror foot light LH does not come on) | B |
| NG (Door mirror foot light RH does not come on) | C |
|
| ||||
|
| ||||
| A | ||
| ||
| ||
| 6.INSPECT OUTER REAR VIEW MIRROR ASSEMBLY LH |
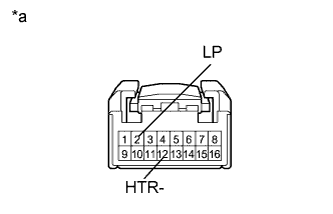 |
Remove the outer rear view mirror assembly LH (Click here).
Connect a positive (+) lead from the auxiliary battery to terminal 2 (LP) and a negative (-) lead to terminal 12 (HTR-).
Check that the outer mirror foot light comes on.
| *a | Component without harness connected (Outer Rear View Mirror Assembly LH) |
|
| ||||
| OK | ||
| ||
| ||
| 7.INSPECT OUTER REAR VIEW MIRROR ASSEMBLY RH |
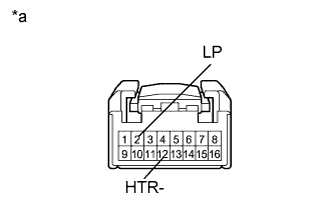 |
Remove the outer rear view mirror assembly RH (Click here).
Connect a positive (+) lead from the auxiliary battery to terminal 2 (LP) and a negative (-) lead to terminal 12 (HTR-).
Check that the outer mirror foot light comes on.
| *a | Component without harness connected (Outer Rear View Mirror Assembly RH) |
|
| ||||
| OK | ||
| ||
| ||


