FRONT WHEEL ALIGNMENT > ADJUSTMENT |
| 1. INSPECT TIRES |
Check the tires for wear and proper inflation pressure.
| Area | Tire Size | For driving under 160 km/h (100 mph) | For driving at over 160 km/h (100 mph) | ||
| Front kPa (kgf/cm2, psi) | Rear kPa (kgf/cm2, psi) | Front kPa (kgf/cm2, psi) | Rear kPa (kgf/cm2, psi) | ||
| Europe (Countries that use WVTA) | 195/65R15 91H | 230 (2.3, 33)*1 270 (2.7 ,39)*2 | 250 (2.5, 36) | ||
| 205/55R16 91V | 220 (2.2, 32) | 240 (2.4, 35) | |||
| 215/45R17 87W | 230 (2.3, 33) | 220 (2.2, 32) | 230 (2.3, 33) | 220 (2.2, 32) | |
| Europe (Countries that do not use WVTA) | 195/65R15 91H | 230 (2.3, 33) | 250 (2.5, 36) | ||
| 205/55R16 91V | 220 (2.2, 32) | 240 (2.4, 35) | |||
| 215/45R17 87W | 230 (2.3, 33) | 220 (2.2, 32) | 230 (2.3, 33) | 220 (2.2, 32) | |
| GCC | 205/55R16 91V | 220 (2.2, 32) | 240 (2.4, 35) | ||
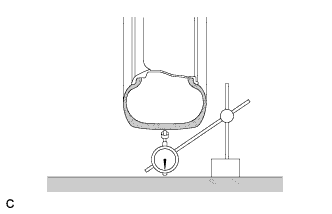 |
Using a dial indicator, check the runout of the tires.
| 2. MEASURE VEHICLE HEIGHT |
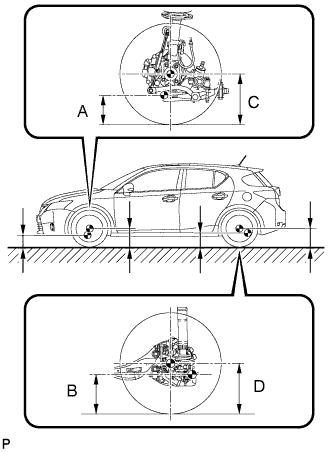 |
Bounce the vehicle up and down at the corners to stabilize the suspension.
Measure the vehicle height.
| Tire Size | Front C - A | Rear D - B |
| 195/65R15 | 112 mm (4.41 in.) | 61 mm (2.40 in.) |
| 205/55R16 215/45R17 (except sport) | 104 mm (4.09 in.) | 64 mm (2.52 in.) |
| 205/55R16 215/45R17 (sport) | 106 mm (4.17 in.) | 59 mm (2.32 in.) |
| 3. INSPECT CAMBER, CASTER AND STEERING AXIS INCLINATION |
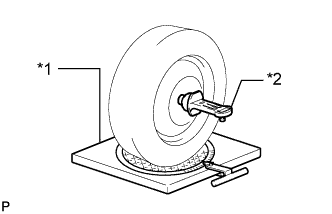 |
Install a camber-caster-kingpin gauge and place the front wheels on the center of a turning radius gauge.
| *1 | Turning Radius Gauge |
| *2 | Camber-caster-kingpin Gauge |
Inspect the camber, caster and steering axis inclination.
| Tire Size | Camber Inclination | Right-left Difference |
| 195/65R15 | -0°15' +/- 0°45' (-0.25° +/- 0.75°) | 0°45' (0.75°) or less |
| 205/55R16 215/45R17 (except sport) | -0°13' +/- 0°45' (-0.22° +/- 0.75°) | |
| 205/55R16 215/45R17 (sport) | -0°14' +/- 0°45' (-0.23° +/- 0.75°) |
| Tire Size | Caster Inclination | Right-left Difference |
| 195/65R15 | 5°48' +/- 0°45' (5.80° +/- 0.75°) | 0°45' (0.75°) or less |
| 205/55R16 215/45R17 (except sport) | 5°56' +/- 0°45' (5.93° +/- 0.75°) | |
| 205/55R16 215/45R17 (sport) | 5°48' +/- 0°45' (5.80° +/- 0.75°) |
| Tire Size | Steering Axis Inclination Reference |
| 195/65R15 | 12°22' (12.37°) |
| 205/55R16 215/45R17 (except sport) | 12°11' (12.18°) |
| 205/55R16 215/45R17 (sport) | 12°14' (12.23°) |
| 4. ADJUST CAMBER |
Remove the front wheel.
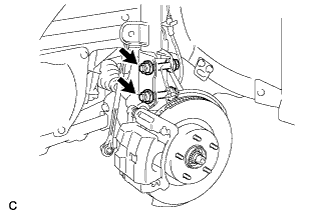 |
Remove the 2 nuts on the lower side of the front shock absorber.
Remove the top and bottom bolts one at a time and confirm that the steering knuckle can move freely in the shock absorber.
Temporarily install the 2 nuts. (Step A)
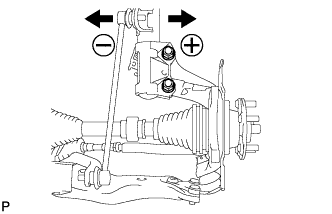 |
Fully push or pull the front axle hub in the direction of the required adjustment. (Step B)
|
Tighten the 2 nuts.
Install the front wheel.
 |
Check the camber.
If the measured value is not within the specification, calculate the required adjustment amount using the formula below.
Camber adjustment amount = center of the specified range - measured value
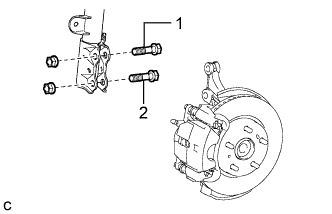
Check the combination of the installed bolts. Select appropriate bolts from the tables below to adjust the camber to the specified values.
| To move the axle hub toward (+) in step B | To move the axle hub toward (-) in step B |
| Refer to table (1) (To move the axle hub toward the positive side) | Refer to table (2) (To move the axle hub toward the negative side) |
Table (1) (To move the axle hub toward the positive side)
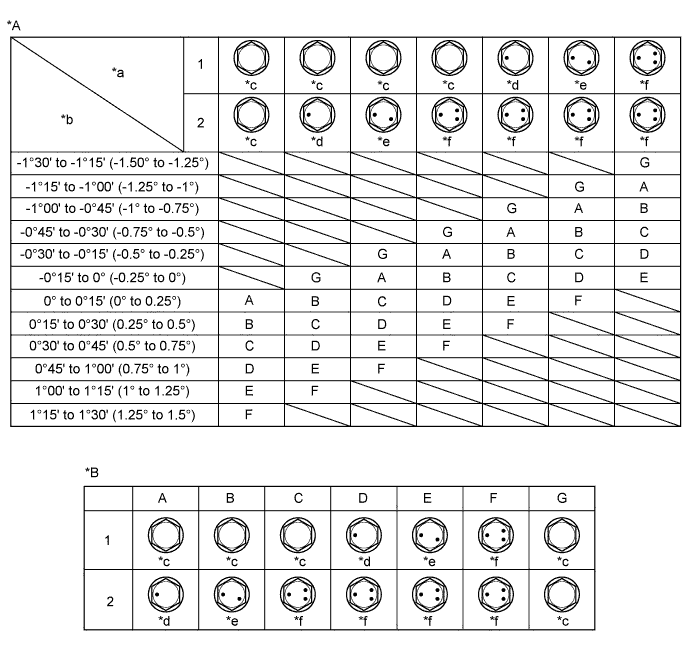
| *A | Table (1) (To move the axle hub toward the positive side) | *B | Selected Bolt Combination |
| *a | Installed Bolt | *b | Adjusting Value |
| *c | 90105-17019 | *d | 90105-17016 |
| *e | 90105-17017 | *f | 90105-17018 |
Table (2) (To move the axle hub toward the negative side)
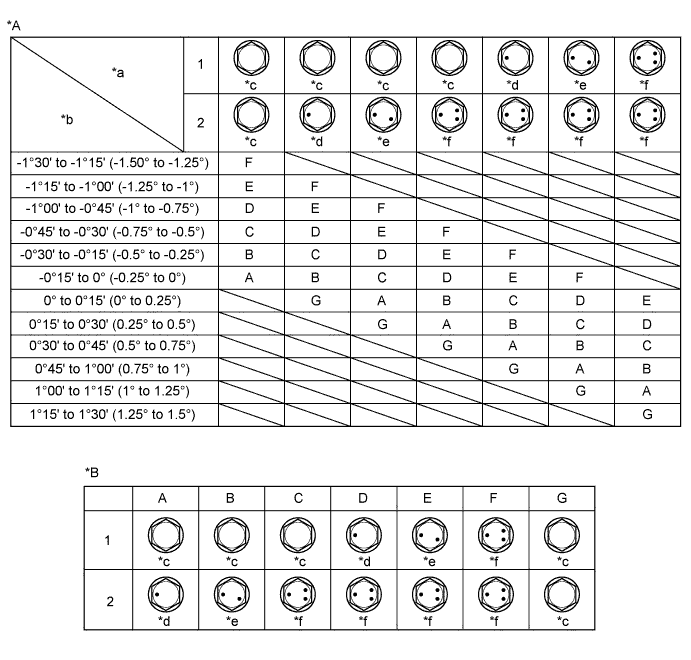
| *A | Table (2) (To move the axle hub toward the negative side) | *B | Selected Bolt Combination |
| *a | Installed Bolt | *b | Adjusting Value |
| *c | 90105-17019 | *d | 90105-17016 |
| *e | 90105-17017 | *f | 90105-17018 |
If the camber was out of adjustment in the previous step, perform the adjust camber steps mentioned above. In step (A), replace the existing bolts with the selected bolts.
| 5. INSPECT TOE-IN |
Bounce the vehicle up and down at the corners to stabilize the suspension.
Release the parking brake and move the shift lever to N.
Push the vehicle straight ahead approximately 5 m (16.4 ft.). (Step C)
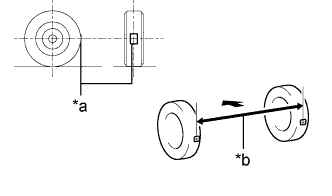 |
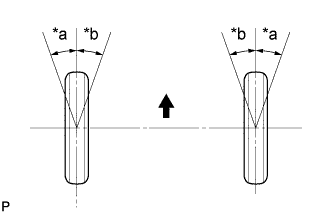
Put tread center marks on the rearmost points of the front wheels and measure the distance between the marks (dimension B).
| *a | Tread Center Mark |
| *b | Dimension B |
Slowly push the vehicle straight ahead to cause the front wheels to rotate 180° using the front tire valve as a reference point.
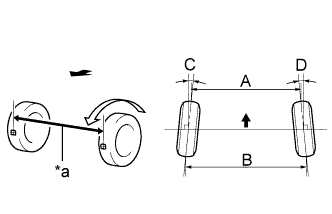 |
Measure the distance between the tread center marks on the front side of the wheels (dimension A).
| *a | Dimension A |
 | Front of the Vehicle |
| Specified Condition |
| C + D: 0°12' +/- 0°12' (0.20° +/- 0.20°) |
| B - A: 2.0 +/- 2.0 mm (0.0787 +/- 0.0787 in.) |
| 6. ADJUST TOE-IN |
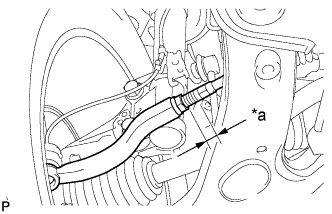 |
Make sure that the thread length of the right and left rack ends are approximately the same.
| *a | Thread Length |
Remove the boot clips.
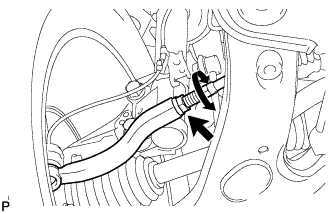 |
Loosen the tie rod end lock nuts.
Adjust the rack ends if the difference in thread length between the right and left rack ends is not within the specified range.
Extend the shorter rack end if the measured toe-in deviates toward the outer-side.
Shorten the longer rack end if the measured toe-in deviates toward the inner-side.
Turn the right and left rack ends by an equal amount to adjust the toe-in.
Make sure that the thread lengths of the right and left rack ends are the same.
Tighten the tie rod end lock nuts.
Place the boots on the seats and install the clips.
| 7. INSPECT WHEEL ANGLE |
 |
Put tread center marks on the rearmost points of a turning radius gauge.
| *a | Inside |
| *b | Outside |
| Front of the Vehicle |
Turn the steering wheel fully to the left and right and measure the turning angle.
| Tire Size | Inside Wheel | Outside Wheel Reference |
| 195/65R15 | 39°05' +/- 2° (39.08° +/- 2°) | 32°45' (32.75°) |
| 205/55R16 215/45R17 (except sport) | 39°20' +/- 2° (39.33° +/- 2°) | 32°56' (32.93°) |
| 205/55R16 215/45R17 (sport) | 39°15' +/- 2° (39.25° +/- 2°) | 32°53' (32.88°) |
| 8. PLACE FRONT WHEELS FACING STRAIGHT AHEAD |
| 9. PERFORM YAW RATE AND ACCELERATION SENSOR CALIBRATION |
| 10. PERFORM INITIALIZATION (w/ Height Control Sensor) |
