REAR LIGHT ASSEMBLY > ON-VEHICLE INSPECTION |
| 1. REMOVE REAR LIGHT ASSEMBLY LH |
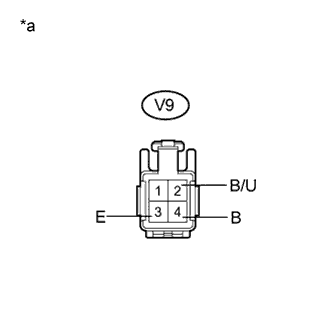 |
Disconnect the connector from the rear light assembly LH.
Measure the voltage according to the value(s) in the table below.
| Tester Connection | Condition | Specified Condition |
| V9-2 (B/U)- V9-3 (E)*1 | Power switch on (READY) and reverse (R) not selected | Below 1 V |
| Power switch on (READY) and reverse (R) selected | 11 to 14 V | |
| V9-4 (B) - V9-3 (E)*2 | Power switch on (READY), light control switch in tail position and rear fog light switch off | Below 1 V |
| Power switch on (READY), light control switch in tail position and rear fog light switch on | 11 to 14 V |
| *a | Front view of wire harness connector (to Rear Light Assembly LH) |
| 2. REMOVE REAR LIGHT ASSEMBLY RH |
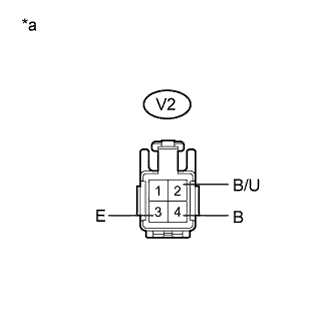 |
Disconnect the connector from the rear light assembly RH.
Measure the voltage according to the value(s) in the table below.
| Tester Connection | Condition | Specified Condition |
| V2-2 (B/U)- V2-3 (E)*1 | Power switch on (READY) and reverse (R) not selected | Below 1 V |
| Power switch on (READY) and reverse (R) selected | 11 to 14 V | |
| V2-4 (B)- V2-3 (E)*2 | Power switch on (READY), light control switch in tail position and rear fog light switch off | Below 1 V |
| Power switch on (READY), light control switch in tail position and rear fog light switch on | 11 to 14 V |
| *a | Front view of wire harness connector (to Rear Light Assembly RH) |
