ENTRY AND START SYSTEM (for Entry Function) > Back Door Entry Lock and Unlock Functions do not Operate

for Preparation Click here


DESCRIPTION

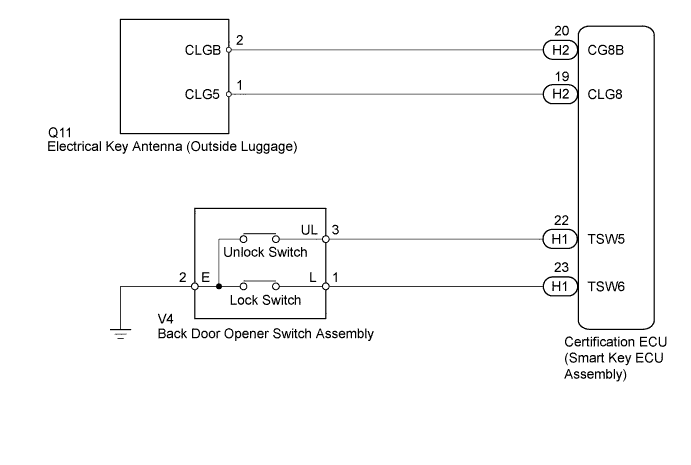
If the entry lock and unlock functions do not operate for the back door only, the request code may not be being transmitted from the back door. If the entry functions for other doors operate properly, communication between the key and door control receiver is normal. In this case, there may be a problem with request code transmission (communication between the certification ECU (smart key ECU assembly) and electrical key antenna [outside luggage]), or there may be electric wave interference.

WIRING DIAGRAM


B265896E03


INSPECTION PROCEDURE

NOTICE:
  1. The entry and start system (for Entry Function) uses a multiplex communication system (LIN communication system) and the CAN communication system. Inspect the communication function by following How to Proceed with Troubleshooting (Click here). Troubleshoot the entry and start system (for Entry Function) after confirming that the communication systems are functioning properly.
  2. When using the intelligent tester with the power switch off to troubleshoot:
    Connect the intelligent tester to the DLC3 and turn a courtesy light switch on and off at 1.5-second intervals until communication between the intelligent tester and vehicle begins.
  3. Check that there are no electrical key transmitters in the vehicle.
  4. Before replacing the certification ECU (smart key ECU assembly), refer to the entry and start system (for Entry Function) (Click here).

1.CHECK POWER DOOR LOCK OPERATION
  1. When the door control switch on the multiplex network master switch assembly is operated, check that the doors unlock and lock according to the switch operation (Click here).

    OK:
    Door locks operate normally.


NG
GO TO POWER DOOR LOCK CONTROL SYSTEM (Click here)
OK


2.READ VALUE USING INTELLIGENT TESTER (BACK DOOR OPENER SWITCH)
  1. Connect the intelligent tester to the DLC3.

  1. Turn the power switch on (IG).

  1. Turn the intelligent tester on.

  1. Enter the following menus: Body / Main Body / Data List.

  1. Read the Data List according to the display on the intelligent tester.

    Entry & Start 
    Tester Display
    Measurement Item/Range
    Normal Condition
    Diagnostic Note
    Tr/B-Door Lock SW
    Back door opener switch (lock switch) / ON or OFF
    ON: Back door opener switch (lock switch) pushed
    OFF: Back door opener switch assembly (lock switch) not pushed
    1. Displays whether the back door opener switch (lock switch) is on or off.
    2. Use this Data List item to help determine if there is a switch malfunction when the back door lock function does not operate.
    Tr/B-Door Unlock SW
    Back door opener switch (opener switch) / ON or OFF
    ON: Back door opener switch (opener switch) pushed
    OFF: Back door opener switch assembly (opener switch) not pushed
    1. Displays whether the back door opener switch (unlock switch) is on or off.
    2. Use this Data List item to help determine if there is a switch malfunction when the back door unlock function does not operate.

    OK:
    On the intelligent tester screen, the display changes between ON and OFF as shown in the chart above.


NG
Go to step 7
OK


3.CHECK WAVE ENVIRONMENT


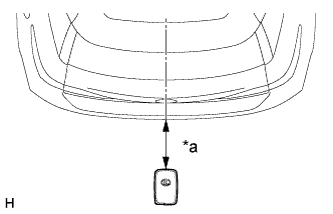
    B265867E01
  1. Bring the electrical key transmitter approximately 0.3 m (0.98 ft.) from the electrical key antenna (outside luggage) and perform an entry back door unlock function check (Click here).
    Text in Illustration 
    *a
    Approximately 0.3 m (0.98 ft.)

    NOTICE:
    If the key is brought within 0.2 m (0.66 ft.) of the rear bumper, communication may not possible.

    HINT:
    If the inspection result is that the problem only occurs in certain locations or at certain times of day, the possibility of electric wave interference is high. Also, added vehicle components may cause electric wave interference. If installed, remove them and perform the operation check.

    OK:
    Entry function operates normally.


NG
Go to step 4
OK

AFFECTED BY WAVE INTERFERENCE 

4.CHECK ELECTRICAL KEY ANTENNA IN KEY DIAGNOSTIC MODE


  1. Check the following antenna in the key diagnostic mode (Click here).


      B265867E01
    1. Check the electrical key antenna (outside luggage).
      Text in Illustration 
      *a
      0.7 to 1 m (2.30 to 3.28 ft.)
      When the electrical key transmitter is brought within 0.7 to 1 m (2.30 to 3.28 ft.) of the electrical key antenna (outside luggage), check that the wireless door lock buzzer sounds.

      OK:
      Wireless door lock buzzer sounds.


NG
Go to step 5
OK

REPLACE CERTIFICATION ECU (SMART KEY ECU ASSEMBLY) 

5.CHECK HARNESS AND CONNECTOR (ELECTRICAL KEY ANTENNA - CERTIFICATION ECU)
  1. Disconnect the Q11 electrical key antenna (outside luggage) connector.

  1. Disconnect the H2 certification ECU (smart key ECU assembly) connector.

  1. Measure the resistance according to the value(s) in the table below.

    Standard Resistance:
    Tester Connection
    Condition
    Specified Condition
    Q11-1 (CLG5) - H2-19 (CLG8)
    Always
    Below 1 Ω
    Q11-2 (CLGB) - H2-20 (CG8B)
    Always
    Below 1 Ω
    Q11-1 (CLG5) or H2-19 (CLG8) - Body ground
    Always
    10 kΩ or higher
    Q11-2 (CLGB) or H2-20 (CG8B) - Body ground
    Always
    10 kΩ or higher


NG
REPAIR OR REPLACE HARNESS OR CONNECTOR
OK


6.INSPECT ELECTRICAL KEY ANTENNA (OUTSIDE LUGGAGE)


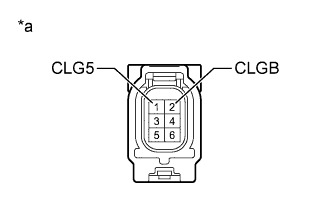
    B226391E08
  1. Remove the electrical key antenna (outside luggage) (Click here).

  1. Measure the resistance according to the value(s) in the table below.

    Standard Resistance:
    Tester Connection
    Condition
    Specified Condition
    1 (CLG5) - 2 (CLGB)
    Always
    Below 1 Ω

    Text in Illustration 
    *a
    Component without harness connected
    (Electrical Key Antenna (Outside Luggage))


NG
REPLACE ELECTRICAL KEY ANTENNA (OUTSIDE LUGGAGE) (Click here)
OK

REPLACE CERTIFICATION ECU (SMART KEY ECU ASSEMBLY) 

7.CHECK HARNESS AND CONNECTOR (BACK DOOR OPENER SWITCH - BODY GROUND)


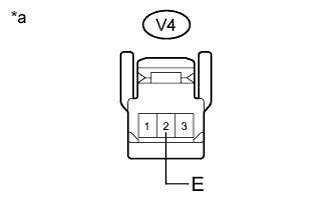
    B203524E05
  1. Disconnect the back door opener switch assembly connector.

  1. Measure the resistance according to the value(s) in the table below.

Standard Resistance:
Tester Connection
Condition
Specified Condition
V4-2 (E) - Body ground
Always
Below 1 Ω

Text in Illustration 
*a
Front view of wire harness connector
(to Back Door Opener Switch Assembly)


NG
REPAIR OR REPLACE HARNESS OR CONNECTOR
OK

REPLACE BACK DOOR OPENER SWITCH ASSEMBLY