DTC B1622/81 Lost communication with Side Airbag Sensor RH |
DTC B1623/81 Side Airbag Sensor Assembly RH Initialization Incomplete |
DTC B1632/81 Lost Communication with Rear Airbag Sensor RH |
DTC B1633/81 Rear Airbag Sensor Assembly RH Initialization Incomplete |
DTC B1642/81 Lost Communication with Side Satellite Sensor Bus RH |
| DTC No. | DTC Detection Condition | Trouble Area |
| B1622/81 B1623/81 B1632/81 B1633/81 B1642/81 |
|
|
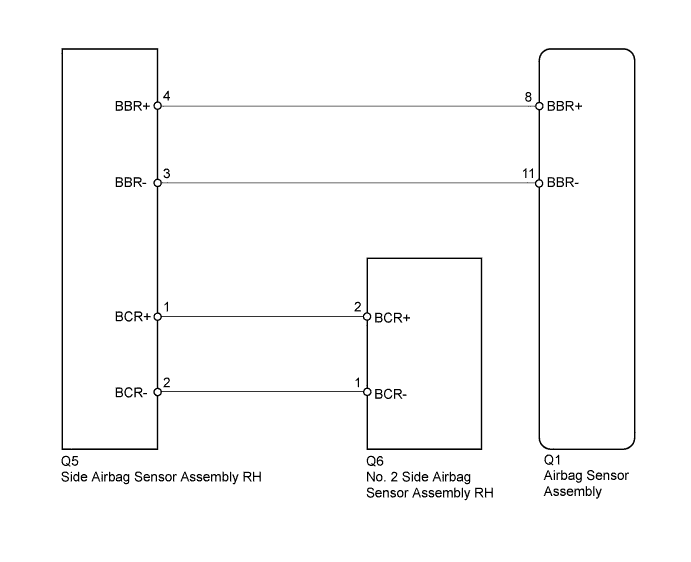
| 1.CHECK CURRENT DTC |
Turn the power switch on (IG), and wait for at least 60 seconds.
Check for current DTCs (Click here).
| Result | Proceed to |
| Current DTC B1623 is output. | A |
| Current DTC B1642 or 81 is output. | B |
| Current DTC B1632 or B1633 is output. | C |
| Current DTC B1622 is output. | D |
| Current DTCs B1622, B1623, B1632, B1633, B1642 and 81 are not output. | E |
|
| ||||
|
| ||||
|
| ||||
|
| ||||
| A | |
 |
| 2.CHECK HISTORY DTC |
Turn the power switch on (IG), and wait for at least 60 seconds.
Check for history DTCs (Click here).
| Result | Proceed to |
| History DTC B1622 is not output. | A |
| History DTC B1622 is output. | B |
|
| ||||
| A | |
|
| 3.CHECK CONNECTORS |
Turn the power switch off.
Disconnect the cable from the negative (-) auxiliary battery terminal.
Check that the connectors are properly connected to the airbag sensor assembly, side airbag sensor assembly RH and No. 2 side airbag sensor assembly RH.
Disconnect the connectors from the airbag sensor assembly, side airbag sensor assembly RH and No. 2 side airbag sensor assembly RH.
Check that the terminals of the connectors are not damaged.
|
| ||||
| OK | |
|
| 4.CHECK NO. 2 FLOOR WIRE (OPEN) |
Using SST, connect terminals 8 (BBR+) and 11 (BBR-) of connector B.
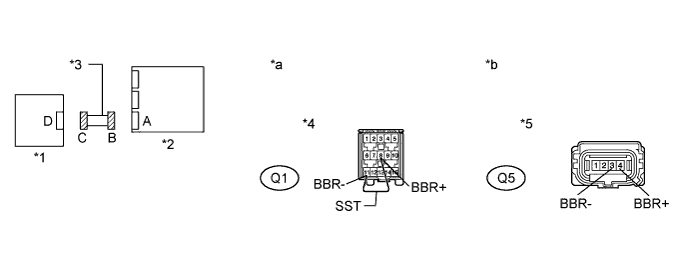
Measure the resistance according to the value(s) in the table below.
| Tester Connection | Condition | Specified Condition |
| Q5-4 (BBR+) - Q5-3 (BBR-) | Always | Below 1 Ω |
| *1 | Side Airbag Sensor Assembly RH | *2 | Airbag Sensor Assembly |
| *3 | No. 2 Floor Wire | *4 | Connector B |
| *5 | Connector C | - | - |
| *a | Front view of wire harness connector (to Airbag Sensor Assembly) | *b | Front view of wire harness connector (to Side Airbag Sensor Assembly RH) |
|
| ||||
| OK | |
|
| 5.CHECK NO. 2 FLOOR WIRE (SHORT) |
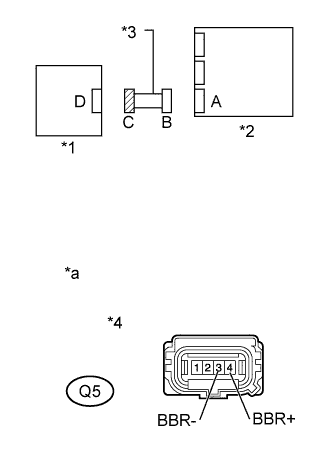 |
Disconnect SST from connector B.
Measure the resistance according to the value(s) in the table below.
| Tester Connection | Condition | Specified Condition |
| Q5-4 (BBR+) - Q5-3 (BBR-) | Always | 1 MΩ or higher |
| *1 | Side Airbag Sensor Assembly RH |
| *2 | Airbag Sensor Assembly |
| *3 | No. 2 Floor Wire |
| *4 | Connector C |
| *a | Front view of wire harness connector (to Side Airbag Sensor Assembly RH) |
|
| ||||
| OK | |
|
| 6.CHECK NO. 2 FLOOR WIRE (SHORT TO B+) |
|
Connect the cable to the negative (-) auxiliary battery terminal.
Turn the power switch on (IG).
Measure the voltage according to the value(s) in the table below.
| Tester Connection | Switch Condition | Specified Condition |
| Q5-4 (BBR+) - Body ground | Power switch on (IG) | Below 1 V |
| Q5-3 (BBR-) - Body ground | Power switch on (IG) | Below 1 V |
| *1 | Side Airbag Sensor Assembly RH |
| *2 | Airbag Sensor Assembly |
| *3 | No. 2 Floor Wire |
| *4 | Connector C |
| *a | Front view of wire harness connector (to Side Airbag Sensor Assembly RH) |
|
| ||||
| OK | |
|
| 7.CHECK NO. 2 FLOOR WIRE (SHORT TO GROUND) |
|
Turn the power switch off.
Disconnect the cable from the negative (-) auxiliary battery terminal.
Measure the resistance according to the value(s) in the table below.
| Tester Connection | Condition | Specified Condition |
| Q5-4 (BBR+) - Body ground | Always | 1 MΩ or higher |
| Q5-3 (BBR-) - Body ground | Always | 1 MΩ or higher |
| *1 | Side Airbag Sensor Assembly RH |
| *2 | Airbag Sensor Assembly |
| *3 | No. 2 Floor Wire |
| *4 | Connector C |
| *a | Front view of wire harness connector (to Side Airbag Sensor Assembly RH) |
|
| ||||
| OK | |
|
| 8.CHECK NO. 2 FLOOR WIRE (OPEN) |
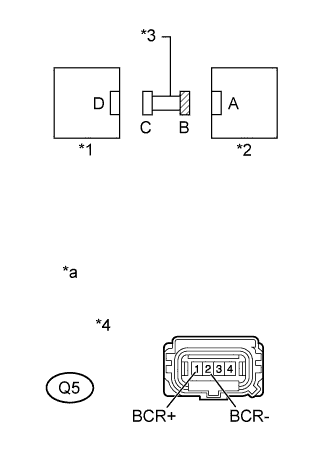
Using SST, connect terminals 2 (BCR+) and 1 (BCR-) of connector C.
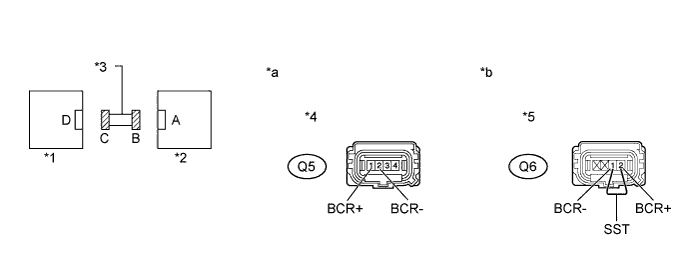
Measure the resistance according to the value(s) in the table below.
| Tester Connection | Condition | Specified Condition |
| Q5-1 (BCR+) - Q5-2 (BCR-) | Always | Below 1 Ω |
| *1 | No. 2 Side Airbag Sensor Assembly RH | *2 | Side Airbag Sensor Assembly RH |
| *3 | No. 2 Floor Wire | *4 | Connector B |
| *5 | Connector C | - | - |
| *a | Front view of wire harness connector (to Side Airbag Sensor Assembly RH) | *b | Front view of wire harness connector (to No. 2 Side Airbag Sensor Assembly RH) |
|
| ||||
| OK | |
|
| 9.CHECK NO. 2 FLOOR WIRE (SHORT) |
 |
Disconnect SST from connector C.
Measure the resistance according to the value(s) in the table below.
| Tester Connection | Condition | Specified Condition |
| Q5-1 (BCR+) - Q5-2 (BCR-) | Always | 1 MΩ or higher |
| *1 | No. 2 Side Airbag Sensor Assembly RH |
| *2 | Side Airbag Sensor Assembly RH |
| *3 | No. 2 Floor Wire |
| *4 | Connector B |
| *a | Front view of wire harness connector (to Side Airbag Sensor Assembly RH) |
|
| ||||
| OK | |
|
| 10.CHECK NO. 2 FLOOR WIRE (SHORT TO B+) |
|
Connect the cable to the negative (-) auxiliary battery terminal.
Turn the power switch on (IG).
Measure the voltage according to the value(s) in the table below.
| Tester Connection | Switch Condition | Specified Condition |
| Q5-1 (BCR+) - Body ground | Power switch on (IG) | Below 1 V |
| Q5-2 (BCR-) - Body ground | Power switch on (IG) | Below 1 V |
| *1 | No. 2 Side Airbag Sensor Assembly RH |
| *2 | Side Airbag Sensor Assembly RH |
| *3 | No. 2 Floor Wire |
| *4 | Connector B |
| *a | Front view of wire harness connector (to Side Airbag Sensor Assembly RH) |
|
| ||||
| OK | |
|
| 11.CHECK NO. 2 FLOOR WIRE (SHORT TO GROUND) |
|
Turn the power switch off.
Disconnect the cable from the negative (-) auxiliary battery terminal.
Measure the resistance according to the value(s) in the table below.
| Tester Connection | Condition | Specified Condition |
| Q5-1 (BCR+) - Body ground | Always | 1 MΩ or higher |
| Q5-2 (BCR-) - Body ground | Always | 1 MΩ or higher |
| *1 | No. 2 Side Airbag Sensor Assembly RH |
| *2 | Side Airbag Sensor Assembly RH |
| *3 | No. 2 Floor Wire |
| *4 | Connector B |
| *a | Front view of wire harness connector (to Side Airbag Sensor Assembly RH) |
|
| ||||
| OK | |
|
| 12.CHECK SIDE AIRBAG SENSOR ASSEMBLY RH |
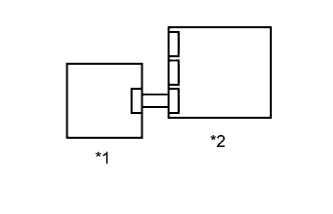 |
Connect the connectors to the No. 2 side airbag sensor assembly RH and airbag sensor assembly.
Interchange the side airbag sensor assembly RH with LH and connect the connectors.
Connect the cable to the negative (-) auxiliary battery terminal.
Turn the power switch on (IG), and wait for at least 60 seconds.
Clear the DTCs stored in memory (Click here).
Turn the power switch off.
Turn the power switch on (IG), and wait for at least 60 seconds.
Check for DTCs (Click here).
| Result | Proceed to |
| DTC B1623, B1642 or 81 is output. | A |
| DTC B1628, B1647 or 82 is output. | B |
| DTCs B1623, B1628, B1642, B1647, 81 and 82 are not output. | C |
| *1 | Side Airbag Sensor Assembly LH |
| *2 | Airbag Sensor Assembly |
|
| ||||
|
| ||||
| A | |
|
| 13.CHECK NO. 2 SIDE AIRBAG SENSOR ASSEMBLY RH |
 |
Turn the power switch off.
Disconnect the cable from the negative (-) auxiliary battery terminal.
Return the side airbag sensor assembly RH and LH to their original positions and connect the connectors.
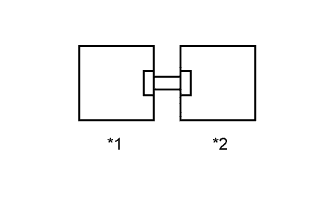
Interchange the No. 2 side airbag sensor assembly RH with LH and connect the connectors.
Connect the cable to the negative (-) auxiliary battery terminal.
Turn the power switch on (IG), and wait for at least 60 seconds.
Clear the DTCs stored in memory (Click here).
Turn the power switch off.
Turn the power switch on (IG), and wait for at least 60 seconds.
Check for DTCs (Click here).
| Result | Proceed to |
| DTCs B1623, B1628, B1642, B1647, 81 and 82 are not output. | A |
| DTC B1623, B1642 or 81 is output. | B |
| DTC B1628, B1647 or 82 is output. | C |
| *1 | No. 2 Side Airbag Sensor Assembly LH |
| *2 | Side Airbag Sensor Assembly RH |
|
| ||||
|
| ||||
| A | ||
 | ||
| ||
| 14.CHECK CONNECTORS |
Turn the power switch off.
Disconnect the cable from the negative (-) auxiliary battery terminal.
Check that the connectors are properly connected to the side airbag sensor assembly RH and No. 2 side airbag sensor assembly RH.
Disconnect the connectors from the side airbag sensor assembly RH and No. 2 side airbag sensor assembly RH.
Check that the terminals of the connectors are not damaged.
|
| ||||
| OK | |
|
| 15.CHECK NO. 2 FLOOR WIRE (OPEN) |
Using SST, connect terminals 2 (BCR+) and 1 (BCR-) of connector C.
Measure the resistance according to the value(s) in the table below.
| Tester Connection | Condition | Specified Condition |
| Q5-1 (BCR+) - Q5-2 (BCR-) | Always | Below 1 Ω |
| *1 | No. 2 Side Airbag Sensor Assembly RH | *2 | Side Airbag Sensor Assembly RH |
| *3 | No. 2 Floor Wire | *4 | Connector B |
| *5 | Connector C | - | - |
| *a | Front view of wire harness connector (to Side Airbag Sensor Assembly RH) | *b | Front view of wire harness connector (to No. 2 Side Airbag Sensor Assembly RH) |
|
| ||||
| OK | |
|
| 16.CHECK NO. 2 FLOOR WIRE (SHORT) |
|
Disconnect SST from connector C.
Measure the resistance according to the value(s) in the table below.
| Tester Connection | Condition | Specified Condition |
| Q5-1 (BCR+) - Q5-2 (BCR-) | Always | 1 MΩ or higher |
| *1 | No. 2 Side Airbag Sensor Assembly RH |
| *2 | Side Airbag Sensor Assembly RH |
| *3 | No. 2 Floor Wire |
| *4 | Connector B |
| *a | Front view of wire harness connector (to Side Airbag Sensor Assembly RH) |
|
| ||||
| OK | |
|
| 17.CHECK NO. 2 FLOOR WIRE (SHORT TO B+) |
|
Connect the cable to the negative (-) auxiliary battery terminal.
Turn the power switch on (IG).
Measure the voltage according to the value(s) in the table below.
| Tester Connection | Switch Condition | Specified Condition |
| Q5-1 (BCR+) - Body ground | Power switch on (IG) | Below 1 V |
| Q5-2 (BCR-) - Body ground | Power switch on (IG) | Below 1 V |
| *1 | No. 2 Side Airbag Sensor Assembly RH |
| *2 | Side Airbag Sensor Assembly RH |
| *3 | No. 2 Floor Wire |
| *4 | Connector B |
| *a | Front view of wire harness connector (to Side Airbag Sensor Assembly RH) |
|
| ||||
| OK | |
|
| 18.CHECK NO. 2 FLOOR WIRE (SHORT TO GROUND) |
|
Turn the power switch off.
Disconnect the cable from the negative (-) auxiliary battery terminal.
Measure the resistance according to the value(s) in the table below.
| Tester Connection | Condition | Specified Condition |
| Q5-1 (BCR+) - Body ground | Always | 1 MΩ or higher |
| Q5-2 (BCR-) - Body ground | Always | 1 MΩ or higher |
| *1 | No. 2 Side Airbag Sensor Assembly RH |
| *2 | Side Airbag Sensor Assembly RH |
| *3 | No. 2 Floor Wire |
| *4 | Connector B |
| *a | Front view of wire harness connector (to Side Airbag Sensor Assembly RH) |
|
| ||||
| OK | |
|
| 19.CHECK SIDE AIRBAG SENSOR ASSEMBLY RH |
|
Connect the connector to the No. 2 side airbag sensor assembly RH.
Interchange the side airbag sensor assembly RH with LH and connect the connectors.
Connect the cable to the negative (-) auxiliary battery terminal.
Turn the power switch on (IG), and wait for at least 60 seconds.
Clear the DTCs stored in memory (Click here).
Turn the power switch off.
Turn the power switch on (IG), and wait for at least 60 seconds.
Check for DTCs (Click here).
| Result | Proceed to |
| DTC B1632 or B1633 is output. | A |
| DTC B1637 or B1638 is output. | B |
| DTCs B1632, B1633, B1637 and B1638 are not output. | C |
| *1 | Side Airbag Sensor Assembly LH |
| *2 | Airbag Sensor Assembly |
|
| ||||
|
| ||||
| A | |
|
| 20.CHECK NO. 2 SIDE AIRBAG SENSOR ASSEMBLY RH |
|
Turn the power switch off.
Disconnect the cable from the negative (-) auxiliary battery terminal.
Return the side airbag sensor assembly RH and LH to their original positions and connect the connectors.
Interchange the No. 2 side airbag sensor assembly RH with LH and connect the connectors.
Connect the cable to the negative (-) auxiliary battery terminal.
Turn the power switch on (IG), and wait for at least 60 seconds.
Clear the DTCs stored in memory (Click here).
Turn the power switch off.
Turn the power switch on (IG), and wait for at least 60 seconds.
Check for DTCs (Click here).
| Result | Proceed to |
| DTCs B1632, B1633, B1637 and B1638 are not output. | A |
| DTC B1632 or B1633 is output. | B |
| DTC B1637 or B1638 is output. | C |
| *1 | No. 2 Side Airbag Sensor Assembly LH |
| *2 | Side Airbag Sensor Assembly RH |
|
| ||||
|
| ||||
| A | ||
| ||
| ||
| 21.CHECK SIDE AIRBAG SENSOR ASSEMBLY RH |
|
Turn the power switch off.
Disconnect the cable from the negative (-) auxiliary battery terminal.
Interchange the side airbag sensor assembly RH with LH and connect the connectors.
Connect the cable to the negative (-) auxiliary battery terminal.
Turn the power switch on (IG), and wait for at least 60 seconds.
Clear the DTCs stored in memory (Click here).
Turn the power switch off.
Turn the power switch on (IG), and wait for at least 60 seconds.
Check for DTCs (Click here).
| Result | Proceed to |
| DTCs B1622 and B1627 are not output. | A |
| DTC B1622 is output. | B |
| DTC B1627 is output. | C |
| *1 | Side Airbag Sensor Assembly LH |
| *2 | Airbag Sensor Assembly |
|
| ||||
|
| ||||
| A | ||
| ||
| ||


