POWER WINDOW REGULATOR MOTOR (for Rear Door) > INSPECTION

for Preparation Click here


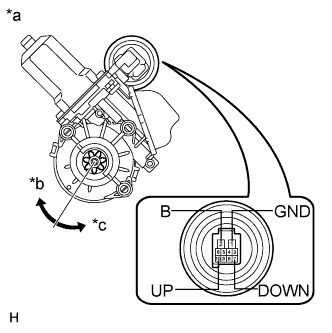
1. INSPECT POWER WINDOW REGULATOR MOTOR ASSEMBLY LH


    B203474E14
  1. Apply positive (+) battery voltage to connector terminal 2 (B).

    NOTICE:
    Do not apply positive (+) battery voltage to any terminals other than terminal 2 (B) to avoid damaging the pulse sensor inside the motor.

  1. Connect a ground lead to connector terminals 1 (GND) and 7 (DOWN) or 10 (UP).

  1. Check that the motor gear rotates smoothly as follows:

    OK:

    Measurement Condition
    Specified Condition
    1. Connect a positive (+) battery lead to terminal 2 (B), connect a negative (-) battery lead to terminal 1 (GND), and keep them connected for 3 seconds or more.
    2. With terminals 2 (B) and 1 (GND) connected, connect a negative (-) battery lead to terminal 10 (UP).
    3. Disconnect and reconnect the negative (-) battery lead for terminal 10 (UP) within 1 second.
    Motor gear rotates clockwise
    1. Connect a positive (+) battery lead to terminal 2 (B), connect the negative (-) battery lead to terminal 1 (GND), and keep them connected for 3 seconds or more.
    2. With terminals 2 (B) and 1 (GND) connected, connect a negative (-) battery lead to terminal 7 (DOWN).
    3. Disconnect and reconnect the negative (-) battery lead for terminal 7 (DOWN) within 1 second.
    Motor gear rotates counterclockwise

    Text in Illustration 
    *a
    Component without harness connected
    (Power Window Regulator Motor Assembly RH)
    *b
    Clockwise
    *c
    Counterclockwise
    1. If the result is not as specified, replace the power window regulator motor assembly RH.

    CAUTION:
    Reset the power window regulator motor (initialize the pulse sensor) after installing the power window regulator motor and regulator assembly onto the door.


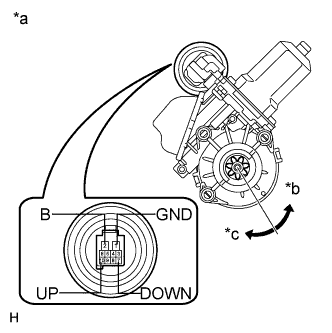
2. INSPECT POWER WINDOW REGULATOR MOTOR ASSEMBLY RH


    B203475E16
  1. Apply positive (+) battery voltage to connector terminal 2 (B).

    NOTICE:
    Do not apply positive (+) battery voltage to any terminals other than terminal 2 (B) to avoid damaging the pulse sensor inside the motor.

  1. Connect a ground lead to connector terminals 1 (GND) and 7 (DOWN) or 10 (UP).

  1. Check that the motor gear rotates smoothly as follows:

    OK:

    Measurement Condition
    Specified Condition
    1. Connect a positive (+) battery lead to terminal 2 (B), connect a negative (-) battery lead to terminal 1 (GND), and keep them connected for 3 seconds or more.
    2. With terminals 2 (B) and 1 (GND) connected, connect a negative (-) battery lead to terminal 10 (UP).
    3. Disconnect and reconnect the negative (-) battery lead for terminal 10 (UP) within 1 second.
    Motor gear rotates counterclockwise
    1. Connect a positive (+) battery lead to terminal 2 (B), connect a negative (-) battery lead to terminal 1 (GND), and keep them connected for 3 seconds or more.
    2. With terminals 2 (B) and 1 (GND) connected, connect a negative (-) battery lead to terminal 7 (DOWN).
    3. Disconnect and reconnect the negative (-) battery lead for terminal 7 (DOWN) within 1 second.
    Motor gear rotates clockwise

    Text in Illustration 
    *a
    Component without harness connected
    (Power Window Regulator Motor Assembly LH)
    *b
    Counterclockwise
    *c
    Clockwise
    1. If the result is not as specified, replace the power window regulator motor assembly LH.

    CAUTION:
    Reset the power window regulator motor (initialize the pulse sensor) after installing the power window regulator motor and regulator assembly onto the door.