ENGINE ASSEMBLY > INSTALLATION |
| 1. INSTALL FLYWHEEL SUB-ASSEMBLY |
Gently place the engine assembly onto wood blocks or equivalent.
Install the flywheel sub-assembly (Click here).
| 2. INSTALL TRANSMISSION INPUT DAMPER ASSEMBLY |
Gently place the engine assembly onto wood blocks or equivalent.
Install the transmission input damper assembly (Click here).
| 3. INSTALL HYBRID VEHICLE TRANSAXLE ASSEMBLY |
Install the hybrid vehicle transaxle assembly (Click here).
| 4. INSTALL ENGINE WIRE |
| 5. INSTALL STARTER HOLE INSULATOR |
Install the starter hole insulator with the 2 bolts.
| 6. INSTALL FLYWHEEL HOUSING SIDE COVER |
Install the flywheel housing side cover.
| 7. INSTALL RADIATOR PIPE |
Install the radiator pipe with the 2 bolts.
Install the No. 3 radiator hose with the clamp.
| 8. INSTALL ENGINE MOUNTING INSULATOR SUB-ASSEMBLY RH |
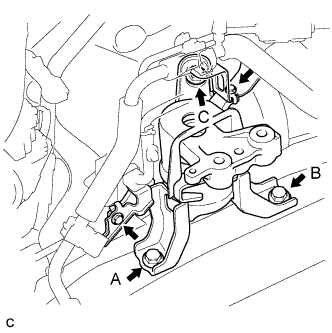 |
Position the engine mounting insulator sub-assembly RH as shown in the illustration.
Temporarily install bolt A to the engine mounting insulator sub-assembly RH.
Tighten the 3 bolts to the engine mounting insulator sub-assembly RH in the order bolt B, bolt C and bolt A.
Install the 2 cooler brackets with the 2 bolts.
| 9. INSTALL RADIATOR RESERVOIR TANK ASSEMBLY |
Install the radiator reservoir tank assembly with the 2 bolts.
| 10. INSTALL ENGINE MOUNTING INSULATOR LH |
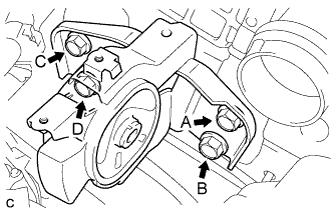 |
Temporarily install bolt A to the engine mounting insulator LH.
Tighten the 4 bolts to the engine mounting insulator LH in the order bolt C, bolt B, bolt D and bolt A.
| 11. INSTALL REAR ENGINE MOUNTING INSULATOR |
Install the rear engine mounting insulator to the engine mounting bracket with the through bolt.
| 12. INSTALL FRONT ENGINE MOUNTING INSULATOR |
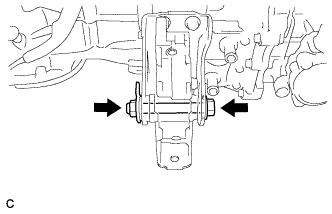 |
Temporarily install the front engine mounting insulator with the bolt and nut.
| 13. INSTALL ENGINE ASSEMBLY WITH TRANSAXLE |
Set the engine assembly with transaxle on the engine lifter.
Remove the 2 bolts and 2 engine hangers.
Set the engine assembly with transaxle and front suspension crossmember on an engine lifter.
Operate the engine lifter to lift the engine assembly with transaxle and front suspension crossmember to the position where the engine mounting insulators RH and LH can be installed.
Install the front crossmember with the 4 bolts.
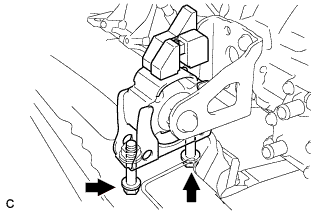 |
Install the front engine mounting insulator to the front crossmember with the 2 bolts.
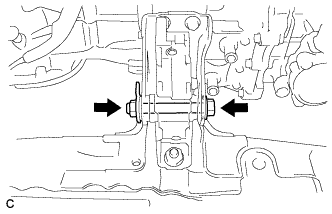
Install the engine mounting insulator LH with the through bolt and nut.
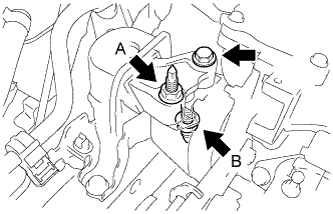 |
Install the engine mounting insulator RH with the bolt and 2 nuts.
 |
Tighten the front engine mounting insulator with the bolt and nut.
| 14. INSTALL FRONT SUSPENSION CROSSMEMBER SUB-ASSEMBLY |
Support the front suspension crossmember sub-assembly with an engine lifter using 4 attachments or equivalent tools.
Tighten the bolts on the left and right sides while alternately inserting SST into the left and right side reference holes in the front suspension crossmember sub-assembly.
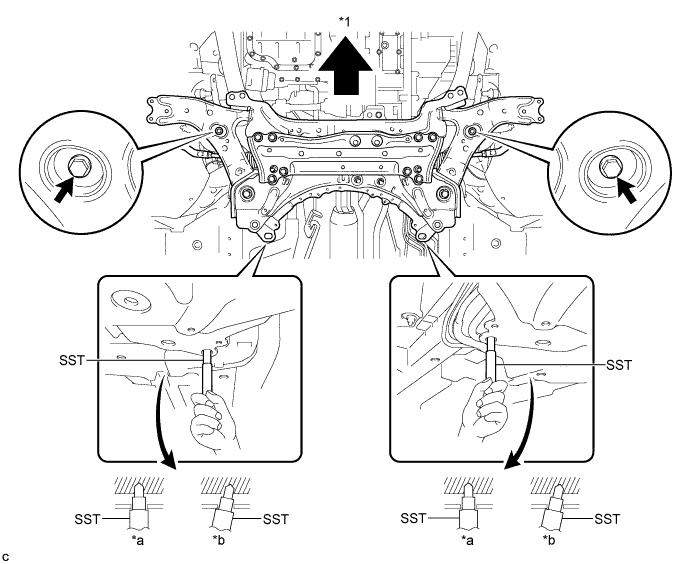
| *1 | Front | - | - |
| *a | OK | *b | NG |
Lower the engine lifter.
Install the rear engine mounting insulator with bolts A and B, and nuts C and D by tightening them in several steps.
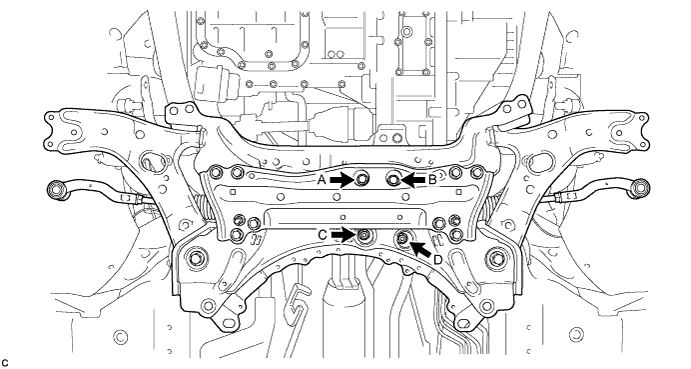
Install the 2 wiring harness clamp brackets with the 2 bolts.
| 15. INSTALL FRONT SUSPENSION MEMBER REAR BRACE LH |
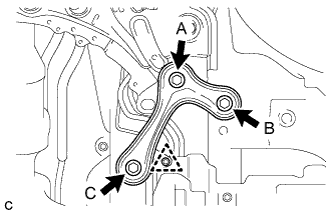 |
Install the front suspension member rear brace LH with the 3 bolts and clip.
| 16. INSTALL FRONT SUSPENSION MEMBER REAR BRACE RH |
| 17. INSTALL REAR SIDE RAIL REINFORCEMENT SUB-ASSEMBLY LH |
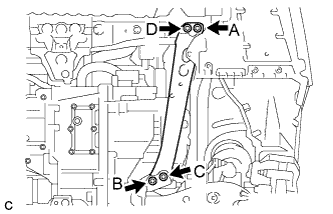 |
Install the rear side rail reinforcement sub-assembly LH with the 4 bolts.
| 18. INSTALL REAR SIDE RAIL REINFORCEMENT SUB-ASSEMBLY RH |
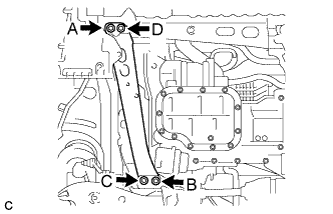 |
Install the rear side rail reinforcement sub-assembly RH with the 4 bolts.
| 19. INSTALL FRONT LOWER ENGINE MOUNTING BRACKET REINFORCEMENT |
Install the front engine mounting bracket lower reinforcement with the 2 bolts.
| 20. INSTALL FRONT DRIVE SHAFT HOLE SNAP RING LH |
Install a new front drive shaft hole snap ring to the front drive inboard joint assembly.
| 21. INSTALL FRONT DRIVE SHAFT HOLE SNAP RING RH |
| 22. INSTALL FRONT DRIVE SHAFT ASSEMBLY LH |
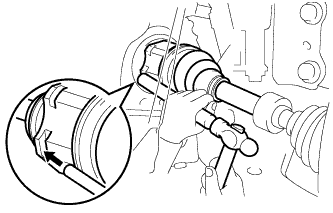 |
Align the inboard joint splines, and using a brass bar and a hammer, install the front drive shaft assembly.
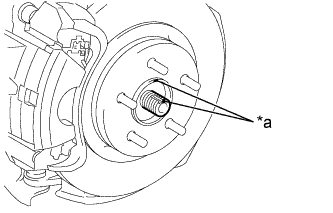 |
Align the matchmarks and install the front drive shaft assembly to the front axle hub sub-assembly.
| *a | Matchmark |
| 23. INSTALL FRONT DRIVE SHAFT ASSEMBLY RH |
| 24. CONNECT FRONT LOWER NO. 1 SUSPENSION ARM SUB-ASSEMBLY LH |
Install the front lower No. 1 suspension arm sub-assembly to the front lower ball joint assembly with the bolt and 2 nuts.
| 25. CONNECT FRONT LOWER NO. 1 SUSPENSION ARM SUB-ASSEMBLY RH |
| 26. INSTALL FRONT STABILIZER LINK ASSEMBLY LH |
Install the front stabilizer link assembly to the front shock absorber with coil spring with the nut.
| 27. INSTALL FRONT STABILIZER LINK ASSEMBLY RH |
| 28. CONNECT TIE ROD END SUB-ASSEMBLY LH |
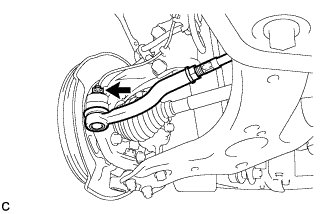 |
Connect the tie rod end sub-assembly LH to the steering knuckle with the nut.
Install a new clip.
| 29. CONNECT TIE ROD END SUB-ASSEMBLY RH |
| 30. INSTALL FRONT SPEED SENSOR LH |
Install the front speed sensor and front flexible hose to the front shock absorber with the bolt and clamp.
Install the front speed sensor to the steering knuckle with the bolt.
| 31. INSTALL FRONT SPEED SENSOR RH |
| 32. INSTALL FRONT AXLE SHAFT NUT LH |
Clean the threaded parts on the front drive shaft assembly and a new front axle shaft nut using a non-residue solvent.
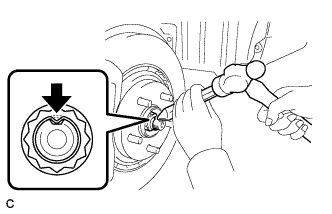 |
Using a socket wrench (30 mm), install the axle shaft nut.
Using a chisel and hammer, stake the front axle shaft nut.
| 33. INSTALL FRONT AXLE SHAFT NUT RH |
| 34. INSTALL FRONT EXHAUST PIPE ASSEMBLY (w/ Exhaust Heat Recirculation System) |
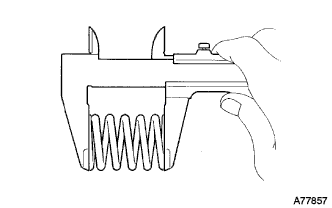 |
Using a vernier caliper, measure the free length of the compression springs.
| Minimum (front) | 41.5 mm (1.64 in.) |
| Minimum (rear) | 38.5 mm (1.52 in.) |
Fully insert 2 new gaskets to the exhaust manifold and front exhaust pipe assembly.
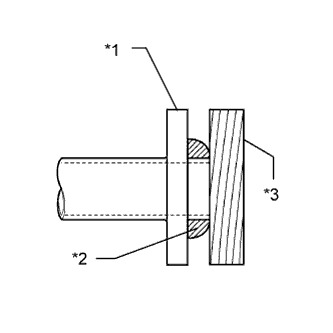 |
Using a plastic hammer and wooden block, tap in each new gasket until its surface is flush with the exhaust manifold and front exhaust pipe assembly.
| *1 | Exhaust Manifold and Front Exhaust Pipe Assembly |
| *2 | Gasket |
| *3 | Wooden Block |
Connect the front exhaust pipe assembly to the 2 exhaust pipe supports.
Install the front exhaust pipe assembly with the 4 bolts and 4 compression springs.
Connect the 2 heater water hoses.
Connect the 3 clamps and oxygen sensor connector.
| 35. INSTALL FRONT EXHAUST PIPE ASSEMBLY (w/o Exhaust Heat Recirculation System) |
|
Using a vernier caliper, measure the free length of the compression springs.
| Minimum (front) | 41.5 mm (1.64 in.) |
| Minimum (rear) | 38.5 mm (1.52 in.) |
Fully insert 2 new gaskets to the exhaust manifold and front exhaust pipe assembly.
|
Using a plastic hammer and wooden block, tap in each new gasket until its surface is flush with the exhaust manifold and front exhaust pipe assembly.
| *1 | Exhaust Manifold and Front Exhaust Pipe Assembly |
| *2 | Gasket |
| *3 | Wooden Block |
Connect the front exhaust pipe assembly to the 2 exhaust pipe supports.
Install the front exhaust pipe assembly with the 4 bolts and 4 compression springs.
Connect the 3 clamps and oxygen sensor connector.
| 36. INSTALL FRONT CENTER FLOOR BRACE |
Install the front center floor brace with the 4 bolts.
| 37. INSTALL FRONT NO. 3 ENGINE UNDER COVER |
Install the front No. 3 engine under cover with the 4 clips.
| 38. CONNECT NO. 1 STEERING COLUMN HOLE COVER SUB-ASSEMBLY |
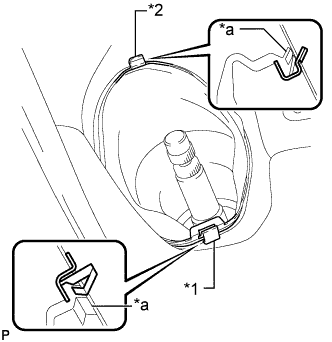 |
Place clip A as shown in the illustration and engage clip B to the body to connect the No. 1 steering column hole cover sub-assembly.
| *1 | Clip A |
| *2 | Clip B |
| *a | Lip |
| 39. CONNECT NO. 2 STEERING INTERMEDIATE SHAFT ASSEMBLY |
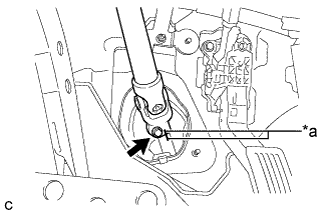 |
Align the matchmarks on the No. 2 steering intermediate shaft assembly and steering intermediate shaft to connect the No. 2 steering intermediate shaft assembly to the steering intermediate shaft.
| *a | Matchmark |
Install the bolt.
| 40. INSTALL COLUMN HOLE COVER SILENCER SHEET |
Install the column hole cover silencer sheet with the 2 clips.
Install the floor carpet.
| 41. INSTALL WIRE HARNESS |
Connect the wire harness with the 2 clamps.
Install the wire harness with the bolt.
Connect the wire harness with the 2 clamps.
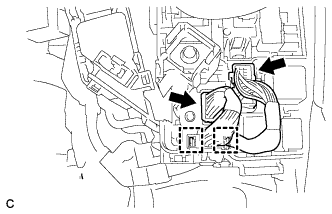 |
Connect the wire harness to the engine room junction block.
Connect the 2 connectors to the engine room junction block.
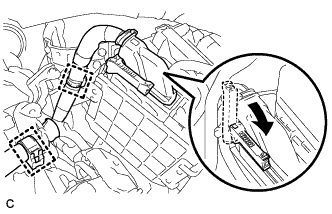 |
Connect the connector to the ECM with the 2 clamps and lock lever.
| 42. INSTALL ELECTRIC INVERTER COMPRESSOR |
Using an E8 "TORX" socket wrench, install the 2 stud bolts.
Temporarily install the electric inverter compressor with the bolt and 2 nuts.
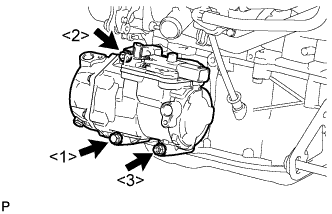 |
Install the electric inverter compressor with the bolt and 2 nuts.
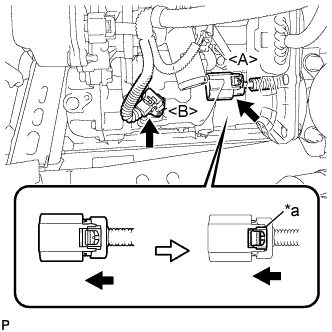 |
Connect the connector <A> and lock the green-colored lock as shown in the illustration.
| *a | Green-colored Lock |
Connect the connector <B>.
| 43. CONNECT FUEL TUBE SUB-ASSEMBLY |
Connect the fuel tube connector and fuel pipe.
Engage the claw and install the No. 1 fuel pipe clamp.
| 44. CONNECT NO. 1 FUEL VAPOR FEED HOSE |
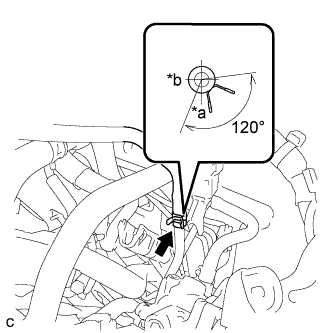 |
Connect the No. 1 fuel vapor feed hose with the clamp.
| *a | FR |
| *b | RH |
| 45. CONNECT HEATER HOSE |
Connect the heater hose with the clamp.
| 46. CONNECT INLET HEATER WATER HOSE |
Connect the inlet heater water hose with the clamp.
| 47. CONNECT OUTLET HEATER WATER HOSE |
Connect the outlet heater water hose with the clamp.
| 48. CONNECT NO. 5 INVERTER COOLING HOSE |
Connect the No. 5 inverter cooling hose with the clamp.
| 49. CONNECT NO. 3 INVERTER COOLING HOSE |
Connect the No. 3 inverter cooling hose with the clamp.
| 50. CONNECT NO. 4 WATER BY-PASS HOSE |
Connect the No. 4 water by-pass hose with the clamp.
| 51. CONNECT NO. 2 RADIATOR HOSE |
Connect the No. 2 radiator hose with the clamp.
| 52. CONNECT NO. 1 RADIATOR HOSE |
Connect the No. 1 radiator hose with the clamp.
| 53. INSTALL INVERTER TRAY BRACKET |
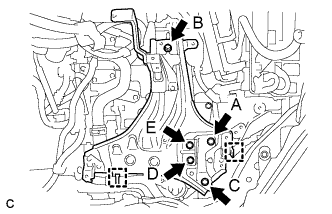 |
Position the inverter tray bracket as shown in the illustration.
Temporarily install bolt B to the inverter tray bracket.
Tighten the 5 bolts to the inverter tray bracket in the order bolt A, bolt C, bolt D, bolt E and bolt B.
Connect the 2 clamps to the inverter tray bracket.
| 54. INSTALL INVERTER RESERVE TANK ASSEMBLY |
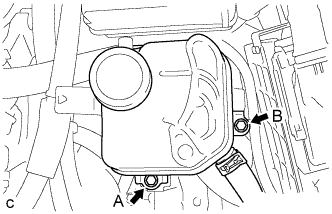 |
Temporarily install bolt A to the inverter reserve tank assembly.
Tighten the 2 bolts to the inverter reserve tank assembly in the order bolt B and bolt A.
| 55. INSTALL INVERTER WITH CONVERTER ASSEMBLY |
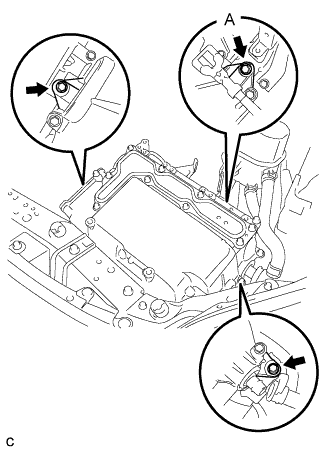 |
Temporarily install the inverter with converter assembly with the 3 bolts.
Tighten bolt A.
Tighten the 2 bolts.
| 56. CONNECT WATER HOSE |
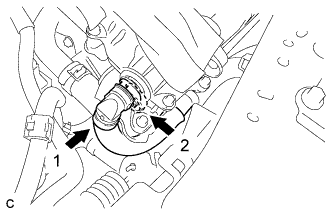 |
Connect the water hose to the inverter with converter assembly and lock the hose with the retainer.
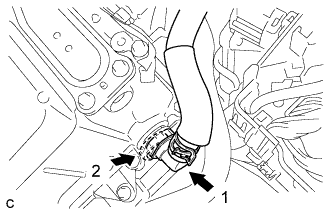 |
Connect the water hose to the inverter with converter assembly and lock the hose with the retainer.
| 57. CONNECT NO. 2 ENGINE ROOM WIRE |
Disconnect the No. 2 engine room wire from the protector.
Connect the No. 2 engine room wire with the bolt and 2 claws.
Install the No. 1 relay block cover and 2 clamps.
Install the relay block cover.
| 58. REMOVE INVERTER COVER |
Remove the 9 bolts and inverter cover.
| 59. CONNECT NO. 2 ENGINE WIRE |
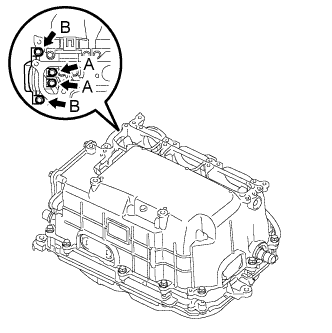 |
Temporarily install the No. 2 engine wire (high voltage cables of the air conditioning) and 4 bolts to the inverter assembly by hand.
Fully tighten the 4 bolts.
Connect the harness clamp.
| 60. CONNECT MOTOR CABLE |
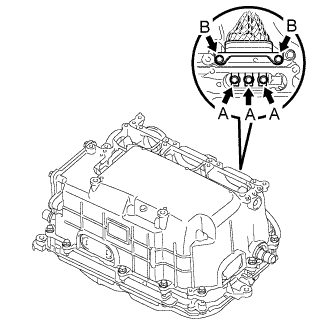 |
Temporarily install the high voltage cable of the motor (MG2) and 5 bolts to the inverter assembly by hand.
Fully tighten the 5 bolts.
Connect the harness clamp.
| 61. CONNECT GENERATOR CABLE |
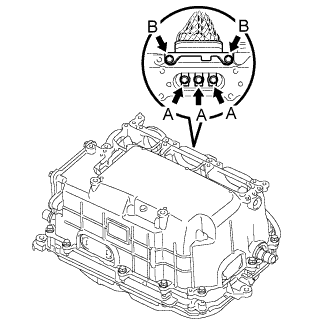 |
Temporarily install the high voltage cable of the generator cable (MG1) and 5 bolts to the inverter assembly by hand.
Fully tighten the 5 bolts.
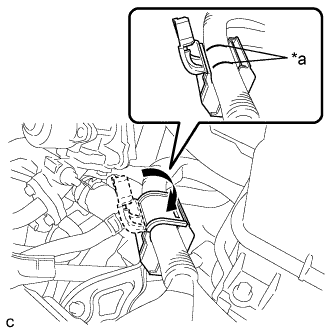 |
Install the generator cable and cover.
| *a | Align Mark |
| 62. CONNECT FRAME WIRE |
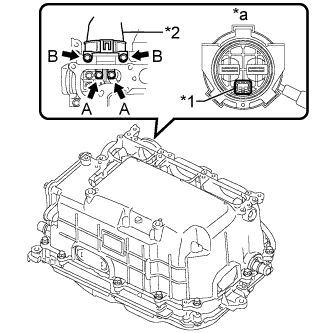 |
Temporarily install the frame wire (high voltage cables of the hybrid battery) and 4 bolts to the inverter assembly by hand.
| *1 | Interlock |
| *2 | High voltage cables of the hybrid battery |
| *a | Front view of frame wire connector |
Fully tighten the 4 bolts.
Connect the 2 harness clamps.
| 63. CHECK HIGH VOLTAGE CABLE CONNECTION |
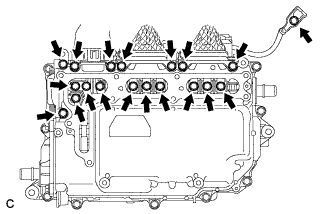 |
Check that each connector and terminal is firmly installed.
| 64. INSTALL INVERTER COVER |
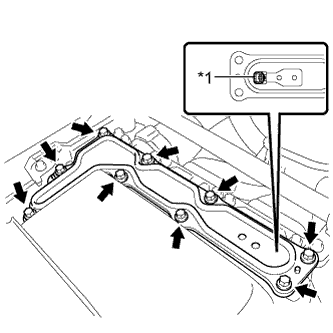 |
Install the inverter cover with the 9 bolts to the inverter with converter assembly.
| *1 | Interlock |
| 65. CONNECT ENGINE ROOM MAIN WIRE |
Install the bolt, clamp and clip, and connect the engine room main wire.
Install the bolt.
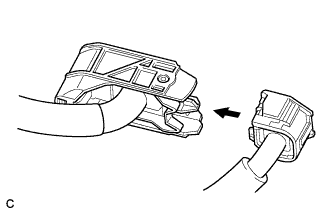 |
Connect the engine wire to the engine room main wire.
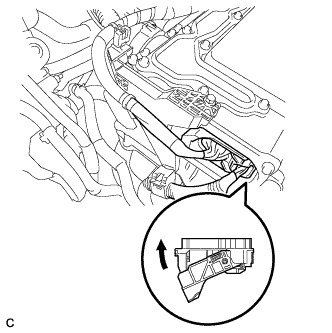 |
Connect the connector to the inverter with converter assembly and lock the connector with the lock lever.
| 66. INSTALL NO. 1 INVERTER BRACKET |
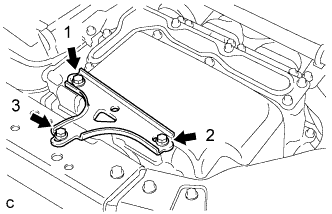 |
Temporarily install the No. 1 inverter bracket with the 3 bolts.
Tighten the 3 bolts in the order shown in the illustration.
| 67. INSTALL AIR CLEANER HOSE ASSEMBLY |
Install the air cleaner hose assembly and lock the hose clamp.
Connect the ventilation hose.
| 68. INSTALL AIR CLEANER CASE |
Install the air cleaner case with the 2 bolts.
Connect the wire harness clamp to the air cleaner case.
Connect the No. 4 water by-pass hose to the air cleaner case with the clamp.
Install the air cleaner filter element sub-assembly.
| 69. INSTALL INLET AIR CLEANER |
Install the inlet air cleaner with the 2 bolts and 2 clips.
Connect the wire harness clamp to the inlet air cleaner.
Connect the No. 4 water by-pass hose to the inlet air cleaner with the clamp.
| 70. INSTALL AIR CLEANER CAP SUB-ASSEMBLY |
Install the air cleaner cap sub-assembly with the 2 clamps and hose band.
Connect the No. 4 water by-pass hose to the air cleaner cap sub-assembly with the clamp.
Connect the air flow meter connector.
| 71. INSTALL SERVICE PLUG GRIP |
Wear insulated gloves and install the service plug grip in the order shown in the illustration.
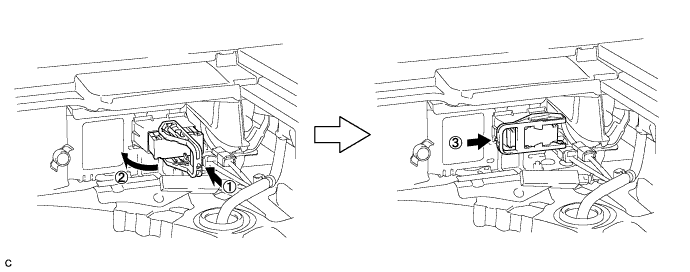
Rotate the handle of the service plug grip 90° toward the battery and slide it in the direction shown by the arrow until a click sound is heard.
| 72. CONNECT CABLE TO NEGATIVE AUXILIARY BATTERY TERMINAL |
| 73. INSTALL REAR FLOOR BOARD UPPER NO. 3 PLATE |
Engage the 4 claws and 2 guides to install the rear floor board upper No. 3 plate.
| 74. INSTALL DECK FLOOR BOX RH |
Engage the 6 guides.
Install the deck floor box RH with the clip.
| 75. INSTALL REAR NO. 3 FLOOR BOARD |
Install the rear No. 3 floor board.
| 76. INSTALL REAR DECK FLOOR BOX |
Install the rear deck floor box.
| 77. INSTALL REAR NO. 2 FLOOR BOARD |
Install the rear No. 2 floor board.
| 78. ADD HYBRID TRANSAXLE FLUID |
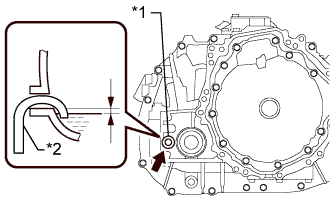 |
Add transaxle fluid until the fluid level is between 0 to 10 mm (0 to 0.394 in.) from the bottom lip of the filler plug opening.
| *1 | Filler Plug |
| *2 | Filler Nozzle |
After adding fluid, leave it for 30 seconds so that the fluid surface can become still again, and then check that the fluid level is between 0 to 10 mm (0 to 0.394 in.) from the bottom lip of the filler plug opening. (If the fluid level is too low, return to the Add Hybrid Transaxle Fluid procedure.)
| 79. INSPECT HYBRID TRANSAXLE FLUID |
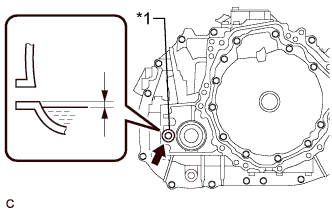 |
Using a 10 mm hexagon socket wrench, remove the filler plug and gasket.
| *1 | Filler Plug |
Check that the fluid level is between 0 to 10 mm (0 to 0.394 in.) from the bottom lip of the filler plug opening. (If the fluid level is too low, return to the Add Hybrid Transaxle Fluid procedure.)
Check for leaks if the quantity of transaxle fluid is low.
Using a 10 mm hexagon socket wrench, install the filler plug with a new gasket.
| 80. ADD COOLANT (for Engine) |
Tighten the radiator drain cock plug.
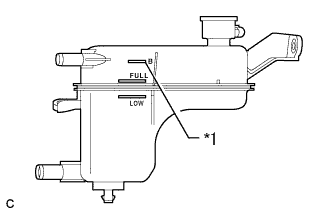 |
Add coolant to B line of the reserve tank.
| *1 | B Line |
| Item | Capacity |
| Engine coolant | w/ Exhaust Heat Recirculation System: 6.9 liters (7.3 US qts, 6.1 lmp. qts) |
| w/o Exhaust Heat Recirculation System: 6.5 liters (6.9 US qts, 5.7 lmp. qts) |
Squeeze the radiator hoses several times by hand, and then check the level of the coolant.
If the coolant level is low, add coolant.
Put the engine in inspection mode (Click here).
Install the reserve tank cap.
Bleed air from the cooling system.
Warm up the engine until the thermostat opens. While the thermostat is open, allow the coolant to circulate for several minutes. (●1)
Stop the engine and wait until the coolant cools down. Then if the coolant level is below the low line, add coolant so that the level will be between the full and low lines. (●2)
Repeat the steps from (●1) to (●2) until the coolant level of the reserve tank remains above the low line.
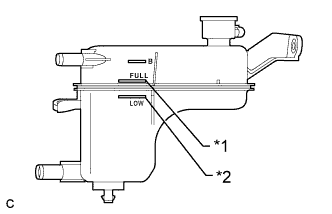 |
After the engine has cooled down, check that the coolant level is between the full and low lines.
| *1 | Full Line |
| *2 | Low Line |
| 81. ADD COOLANT (for Inverter) |
| DTC No. | Detection Item |
| P0A01-726 | Motor Electronics Coolant Temperature Sensor Circuit Range / Performance |
| P0A04-725 | Motor Electronics Coolant Temperature Sensor Circuit Intermittent |
| P0A08-264 | DC / DC Converter Status Circuit |
| P0A78-284 | Drive Motor "A" Inverter Performance |
| P0A78-286 | Drive Motor "A" Inverter Performance |
| P0A7A-322 | Generator Inverter Performance |
| P0A7A-324 | Generator Inverter Performance |
| P0A93-346 | Inverter Cooling System Performance |
| P0A94-553 | DC / DC Converter Performance |
| P0A94-557 | DC / DC Converter Performance |
| P0AEE-277 | Motor Inverter Temperature Sensor "A" Circuit Range / Performance |
| P0AF1-276 | Drive Motor Inverter Temperature Sensor "A" Circuit Intermittent / Erratic |
| P0BCD-315 | Generator Inverter Temperature Sensor Circuit Range / Performance |
| P0BD0-314 | Generator Inverter Temperature Sensor Circuit Intermittent / Erratic |
| P0C39-626 | DC / DC Converter Temperature Sensor "A" Range / Performance |
| P0C3C-625 | DC / DC Converter Temperature Sensor "A" Intermittent / Erratic |
| P0C3E-628 | DC / DC Converter Temperature Sensor "B" Range / Performance |
| P0C41-627 | DC / DC Converter Temperature Sensor "B" Intermittent / Erratic |
| P0C73-776 | Motor Electronics Coolant Pump "A" Control Performance |
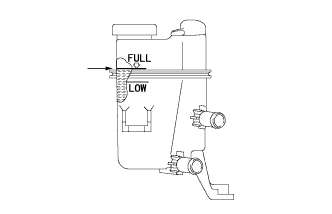 |
Slowly pour coolant into the reserve tank until it reaches the full line.
When using the intelligent tester:
Connect the intelligent tester to the DLC3.
Turn the power switch on (IG).
Enter the following menus: Powertrain / Hybrid Control / Active Test / Activate the Water Pump.
Keep the coolant at the full line in the reserve tank to compensate for the drop in coolant level when the air bleeds.
When not using the intelligent tester:
Turn the power switch on (READY). [*1]
Turn the power switch off and add coolant to the full line because the coolant level drops as the air bleeds. [*2]
Repeat steps [*1] and [*2] until air bleeding from the cooling system is completed.
After the air is completely bled from the cooling system, tighten the reserve tank cap.
|
Add coolant to the full line of the reserve tank.
| 82. ADD ENGINE OIL |
Add new engine oil and install the oil filler cap.
| Oil Grade | Oil Viscosity (SAE) |
| API grade SL "Energy-Conserving ", SM "Energy-Conserving" or ILSAC multigrade engine oil |
|
| API grade SL or SM multigrade engine oil |
|
| Item | Standard Condition |
| Drain and refill with oil filter change | 4.2 liters (4.4 US qts, 3.7 lmp. qts) |
| Drain and refill without oil filter change | 3.9 liters (4.1 US qts, 3.4 lmp. qts) |
| Dry fill | 4.7 liters (5.0 US qts, 4.1 lmp. qts) |
| 83. INSPECT ENGINE OIL LEVEL |
Put the engine in inspection mode (Click here).
Warm up and stop the engine, then wait for 5 minutes. The oil level should be between the low and full level marks on the engine oil level dipstick. If the engine oil level is low, check for leaks and add oil up to the full level mark.
| 84. INSPECT FOR FUEL LEAK |
Check fuel pump operation.
Connect the intelligent tester to the DLC3.
Turn the power switch on (IG).
Turn the intelligent tester on.
Enter the following menus: Powertrain / Engine and ECT / Active Test / Control the Fuel Pump / Speed.
Check for pressure in the fuel inlet tube from the fuel line. Check that sounds of fuel flowing from the fuel tank can be heard. If no sounds can be heard, check the integration relay, fuel pump, ECM and wiring connectors.
Inspect for fuel leaks.
Check that there are no fuel leaks after performing maintenance anywhere on the fuel system. If there are fuel leaks, repair or replace parts as necessary.
Turn the power switch off.
Disconnect the intelligent tester from the DLC3.
| 85. INSPECT FOR COOLANT LEAK (for Engine) |
Remove the reserve tank cap.
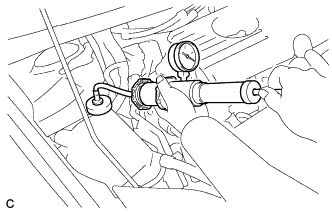 |
Fill the reserve tank with coolant, and then attach a radiator cap tester.
Put the engine in inspection mode (Click here).
Warm up the engine.
Using a radiator cap tester, increase the pressure inside the radiator to 108 kPa (1.1 kgf/cm2, 16 psi), and check that the pressure does not drop. If the pressure drops, check the hoses, radiator, front exhaust pipe assembly, the heater hose around the engine coolant temperature sensor and engine water pump assembly for leaks. If no external leaks are found, check the heater core, cylinder block and cylinder head.
Remove the radiator cap tester.
Install the reserve tank cap.
| 86. INSPECT FOR COOLANT LEAK (for Inverter) |
Remove the reserve tank cap.
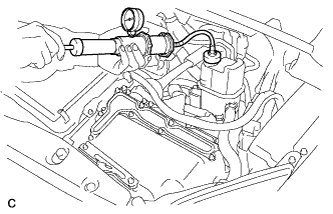 |
Install a radiator cap tester.
Pump the radiator cap tester to 122 kPa (1.2 kgf/ cm2, 18 psi), and then check that the pressure does not drop.
Reinstall the reserve tank cap.
| 87. INSPECT FOR OIL LEAK |
| 88. INSPECT FOR EXHAUST GAS LEAK |
| 89. INSTALL NO. 1 ENGINE UNDER COVER |
| 90. INSTALL FRONT LOWER BUMPER ABSORBER |
| 91. INSTALL REAR ENGINE UNDER COVER LH |
| 92. INSTALL REAR ENGINE UNDER COVER RH |
| 93. INSTALL FRONT WHEEL |
| 94. INSPECT IGNITION TIMING |
Put the engine in inspection mode (Click here).
Warm up and stop the engine.
When using the intelligent tester:
Check the ignition timing.
Connect the intelligent tester to the DLC3.
Put the engine in inspection mode (Click here).
Turn the intelligent tester on.
Enter the following menus: Powertrain / Engine and ECT / Data List / IGN Advance.
Check that the ignition timing advances immediately when the engine speed is increased.
Enter the following menus: Powertrain / Engine and ECT / Active Test / Connect the TC and TE1 / ON.
Monitor IGN Advance of the Data List.
Enter the following menus: Connect the TC and TE1 / OFF.
Turn the power switch off.
Turn the intelligent tester off.
Disconnect the intelligent tester from the DLC3.
When not using the intelligent tester:
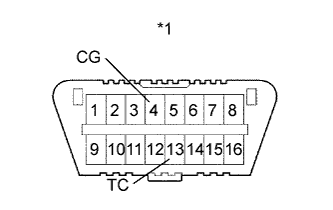 |
Using SST, connect terminals 13 (TC) and 4 (CG) of the DLC3.
| *1 | DLC3 |
Remove the No. 2 cylinder head cover (Click here).
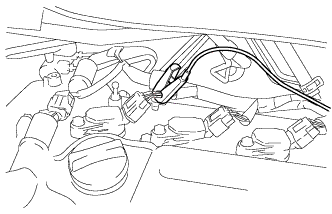 |
Pull out the wire harness shown in the illustration.
Connect the clip of the timing light to the wire harness.
Inspect the ignition timing at idle.
Disconnect terminals 13 (TC) and 4 (CG) of the DLC3.
Inspect the ignition timing at idle.
Confirm that the ignition timing advances when the engine rpm is increased.
Remove the timing light.
Install the No. 2 cylinder head cover (Click here).
| 95. INSPECT ENGINE IDLE SPEED |
Put the engine in inspection mode (Click here).
Warm up and stop the engine.
When using the intelligent tester:
Connect the intelligent tester to the DLC3.
Put the engine in inspection mode (Click here).
Turn the intelligent tester on.
Enter the following menus: Powertrain / Engine and ECT / Data List / Engine Speed.
Inspect the engine idle speed.
Turn the power switch off.
Turn the intelligent tester off.
Disconnect the intelligent tester from the DLC3.
When not using the intelligent tester:
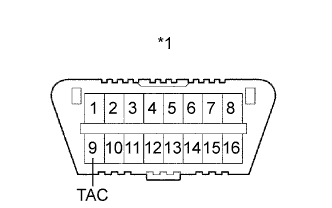 |
Using SST, connect a tachometer tester probe to terminal 9 (TAC) of the DLC3.
| *1 | DLC3 |
Put the engine in inspection mode (Click here).
Inspect the engine idle speed.
Disconnect terminal 9 (TAC) of the DLC3.
| 96. INSPECT CO/HC |
Put the engine in inspection mode (Click here).
Warm up the engine.
Run the engine at 2500 rpm for approximately 180 seconds.
Insert a CO/HC meter testing probe at least 40 cm (1.31 ft.) into the tailpipe while idling.
Check the CO/HC concentration while idling and when the engine is running at 2500 rpm.
Check the DTCs (Click here).
See the table below for possible causes, then inspect the applicable parts and repair them if necessary.
| CO | HC | Problem | Possible Cause |
| Normal | High | Rough idle |
|
| Low | High | Rough idle (Fluctuating HC reading) |
|
| High | High | Rough idle (Black smoke from exhaust) |
|
| 97. INSPECT AND ADJUST FRONT WHEEL ALIGNMENT |
| 98. INSTALL NO. 2 CYLINDER HEAD COVER |
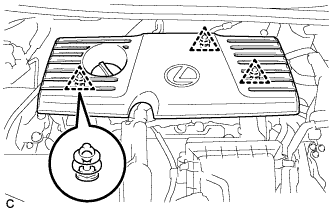 |
Engage the 3 clips to install the cover.
| 99. INSTALL INVERTER COVER ASSEMBLY LH (w/ Cover) |
Engage the claw and install the inverter cover assembly LH.
Install the 2 clips.
| 100. INSTALL RADIATOR SUPPORT OPENING COVER |
Install the radiator support opening cover with the 9 clips.
| 101. CHECK ABS SPEED SENSOR SIGNAL |
