 |
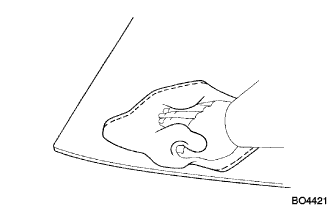
Clean the outer edges of the quarter window glass with a non-residue solvent.
- NOTICE:
- Do not touch the glass surface after cleaning it.
- Be careful not to damage the glass or clips.
QUARTER WINDOW GLASS > INSTALLATION |
| 1. CLEAN QUARTER WINDOW GLASS |
|
Clean the outer edges of the quarter window glass with a non-residue solvent.
| 2. INSTALL QUARTER WINDOW ASSEMBLY |
Using a brush or a sponge, apply Primer M to the exposed part of the vehicle body.
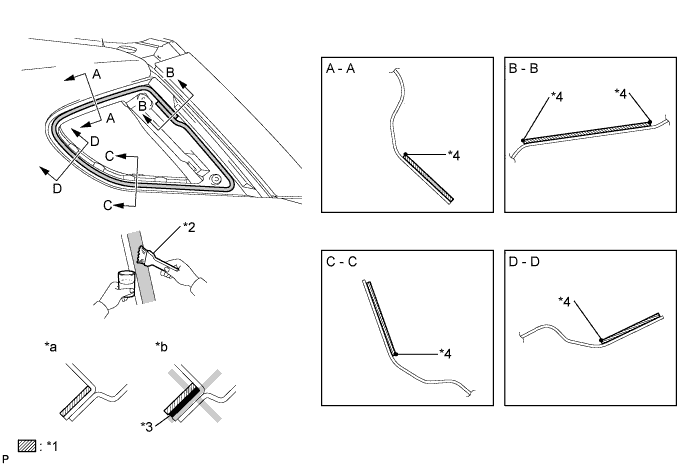
| *1 | Primer M | *2 | Brush |
| *3 | Adhesive | *4 | Edge of Curved Surface |
| *a | CORRECT | *b | WRONG |
Using a brush or a sponge, apply Primer G to the contact surface of the a new quarter window assembly.
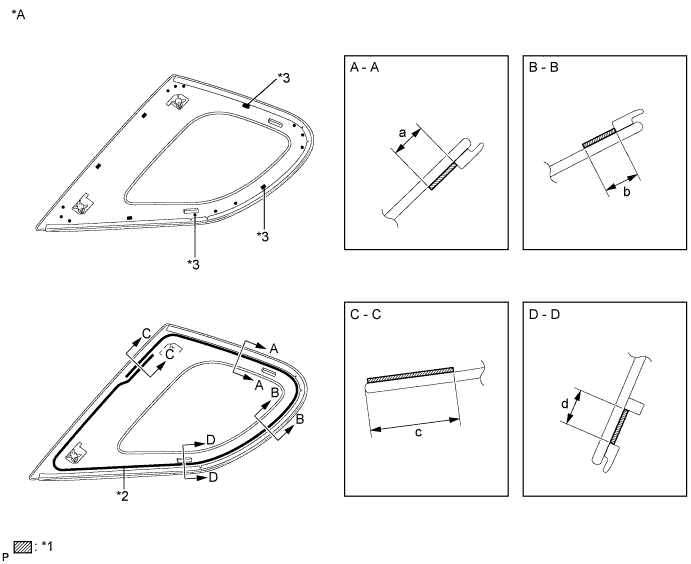
| *A | Back Side | - | - |
| *1 | Primer G | *2 | Adhesive Center |
| *3 | Ceramic Notch | - | - |
| Area | Dimension |
| a | 12.0 mm (0.472 in.) or more |
| b | 12.0 mm (0.472 in.) or more |
| c | 24.0 mm (0.945 in.) or more |
| d | 11.0 mm (0.433 in.) or more |
Apply adhesive to the quarter window assembly.
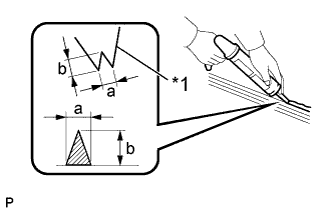 |
Cut off the tip of the cartridge nozzle as shown in the illustration.
| *1 | Nozzle |
| Area | Dimension |
| a | 8.0 mm (0.315 in.) or more |
| b | 12.0 mm (0.472 in.) or more |
Load the sealer gun with the cartridge.
Apply adhesive to the quarter window assembly as shown in the illustration.
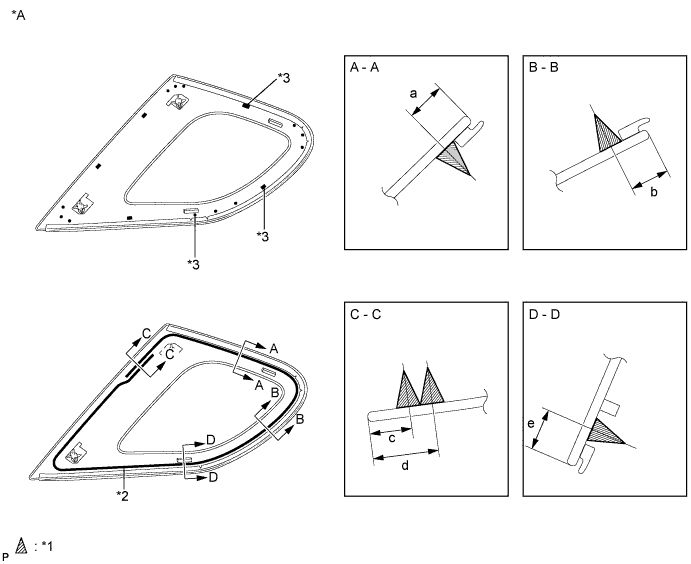
| *A | Back Side | - | - |
| *1 | Adhesive | *2 | Adhesive Center |
| *3 | Ceramic Notch | - | - |
| Area | Dimension |
| a | 13.0 mm (0.512 in.) |
| b | 13.0 mm (0.512 in.) |
| c | 13.0 mm (0.512 in.) |
| d | 21.0 mm (0.827 in.) |
| e | 13.0 mm (0.512 in.) |
Install a new quarter window assembly to the vehicle body.
Engage the 2 clips to install the quarter window assembly.
Hold the quarter window assembly in place securely with protective tape or equivalent until the adhesive hardens.
Lightly press the outer surface of the glass to ensure that the glass is securely fit to the vehicle body.
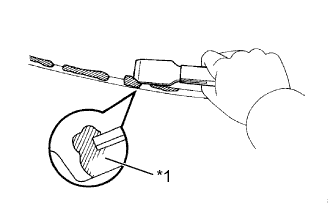 |
Using a scraper, remove any excess or protruding adhesive.
| *1 | Adhesive |
| Temperature | Minimum Time prior to Driving Vehicle |
| 35°C (95°F) | 1 hour and 30 minutes |
| 20°C (68°F) | 5 hours |
| 5°C (41°F) | 24 hours |
| 3. INSPECT FOR LEAK AND REPAIR |
After the adhesive has hardened, apply water from the outside of the vehicle. Check that no water leaks into the cabin.
If water leaks into the cabin, allow the water to dry and add adhesive.
Remove the protective tape.
| 4. INSTALL ROOF SIDE INNER GARNISH ASSEMBLY |
Pass the floor anchor of the rear seat outer belt assembly LH through the roof side inner garnish LH.
Engage the 8 clips to install the roof side inner garnish assembly LH.
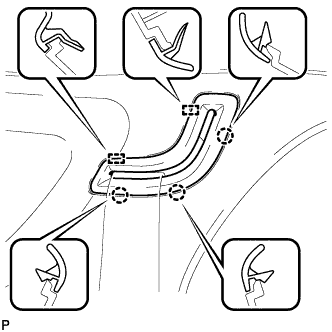 |
Engage the 2 guides.
Engage the 3 claws to connect the belt guide.
| 5. INSTALL DECK TRIM SIDE PANEL ASSEMBLY |
Engage the 4 claws and 3 clips.
Install the deck trim side panel assembly LH with the 3 screw.
| 6. CONNECT REAR SEAT OUTER BELT ASSEMBLY |
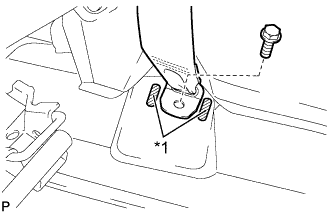 |
Connect the floor end of the rear seat outer belt assembly with the bolt.
| *1 | Protruding Part |
| 7. INSTALL NO. 2 ROOM LIGHT ASSEMBLY (for RH Side) |
Connect the connector.
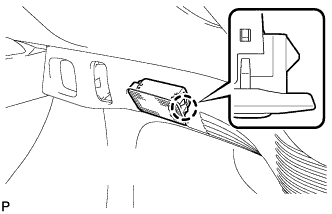 |
Engage the claw to install the No. 2 room light assembly.
| 8. INSTALL TONNEAU COVER HOLDER CAP |
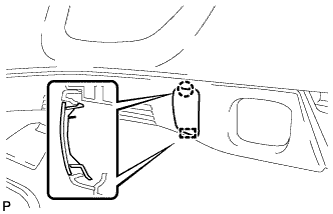 |
Engage the guide.
Engage the claw to install the tonneau cover holder cap.
| 9. INSTALL TONNEAU COVER HOOK |
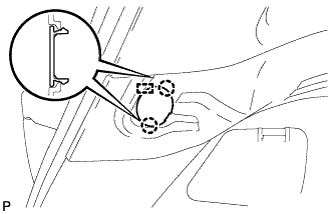 |
Engage the 2 claws and pin to install the tonneau cover hook.
| 10. INSTALL LUGGAGE HOLD BELT STRIKER ASSEMBLY |
Engage the guide.
Install the luggage hold belt striker assembly with the bolt.
| 11. INSTALL ROPE HOOK ASSEMBLY |
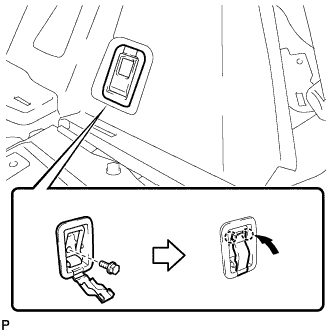 |
Install the rope hook assembly with the bolt.
Engage the 2 claws.
| 12. INSTALL REAR SEAT SIDE GARNISH |
Engage the 6 claws.
Install the rear seat side garnish LH with the clip.
| 13. INSTALL REAR SEAT SIDE COVER RH (for RH Side) |
Engage the 3 claws and 2 clips to install the rear seat side cover RH.
| 14. INSTALL REAR DECK TRIM COVER |
Engage the 4 clips to install the rear deck trim cover.
| 15. INSTALL DECK TRIM SERVICE HOLE COVER |
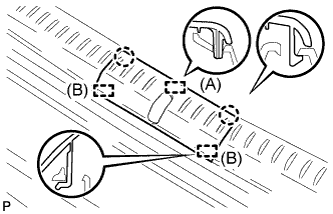 |
Engage the 2 guides (B).
Engage the 2 claws and guide (A) to install the deck trim service hole cover.
| 16. INSTALL REAR NO. 1 FLOOR BOARD |
Engage the 2 claws and 2 clips.
Install the rear No. 1 floor board with the bolt.
| 17. INSTALL REAR NO. 2 FLOOR BOARD SUB-ASSEMBLY |
Engage the claw and 2 clips to install the rear No. 2 floor board sub-assembly.
| 18. INSTALL REAR NO. 1 FLOOR BOARD SUB-ASSEMBLY |
Engage the 2 claws and 2 clips to install the rear No. 1 floor board sub-assembly.
| 19. INSTALL TONNEAU COVER ASSEMBLY (w/ Tonneau Cover) |
Install the tonneau cover assembly.
| 20. INSTALL DECK FLOOR BOX LH (w/o Woofer) |
Engage the 6 guides.
Install the deck floor box LH with the clip.
| 21. INSTALL REAR NO. 4 FLOOR BOARD (w/o Woofer) |
Install the rear No. 4 floor board.
| 22. INSTALL REAR NO. 4 FLOOR BOARD (w/ Woofer) |
Engage the 2 clips and 3 guides to install the rear No. 4 floor board.
| 23. INSTALL REAR FLOOR BOARD UPPER NO. 3 PLATE (for RH Side) |
Engage the 4 claws and 2 guides to install the rear floor board upper No. 3 plate.
| 24. INSTALL DECK FLOOR BOX RH |
Engage the 6 guides.
Install the deck floor box RH with the clip.
| 25. INSTALL REAR NO. 3 FLOOR BOARD |
Install the rear No. 3 floor board.
| 26. INSTALL REAR DECK FLOOR BOX |
Install the rear deck floor box.
| 27. INSTALL REAR NO. 2 FLOOR BOARD |
Install the rear No. 2 floor board.
| 28. INSTALL REAR SEATBACK ASSEMBLY LH (for LH Side) |
Place the rear seatback assembly LH in the cabin.
Install the rear seatback assembly LH with the 2 bolts.
Engage the fastener to connect the rear No. 2 floor board sub-assembly.
| 29. INSTALL REAR SEATBACK ASSEMBLY RH (for RH Side) |
Place the rear seatback assembly RH in the cabin.
Install the rear seatback assembly RH with the 2 bolts.
Engage the fastener to connect the rear No. 1 floor board sub-assembly.
| 30. INSTALL REAR SEAT CUSHION LOCK HOOK |
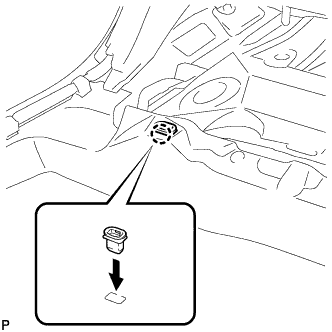 |
Engage the claw to install a new rear seat cushion lock hook.
| 31. INSTALL REAR SEAT CUSHION ASSEMBLY |
Place the rear seat cushion assembly in the cabin.
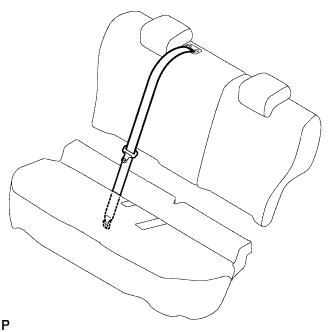 |
Pass the rear center seat outer belt assembly through the rear seat cushion assembly.
Install the rear center seat outer belt assembly with the bolt.
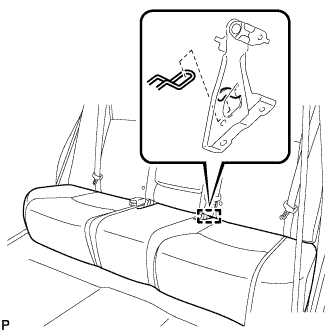 |
Engage the guide as shown in the illustration.
Pass the rear seat inner with center belt assembly LH and rear seat inner belt assembly through the rear seat cushion assembly as shown in the illustration.
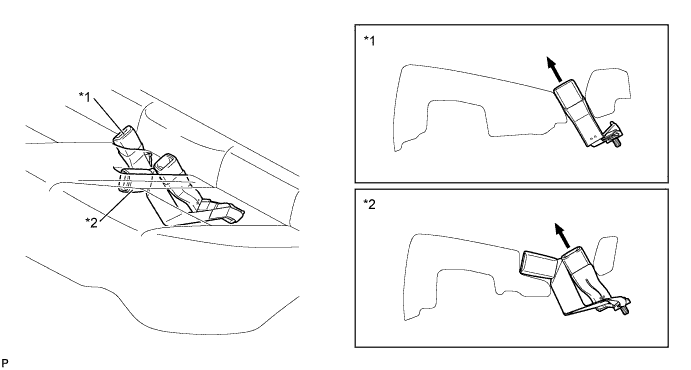
| *1 | Rear Seat Inner Belt Assembly | *2 | Rear Seat Inner with Center Belt Assembly LH |
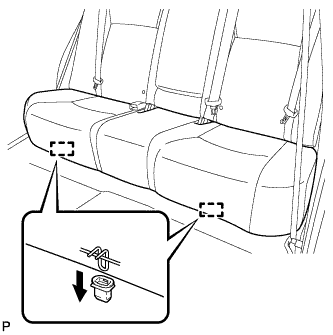 |
Engage the 2 hooks of the seat cushion to the vehicle body as shown in the illustration.
Confirm that the seat cushion is firmly installed.
| 32. INSTALL REAR DOOR OPENING TRIM WEATHERSTRIP |
| 33. INSTALL REAR DOOR SCUFF PLATE |
Engage the 4 claws, 2 guides and 2 clips to install the rear door scuff plate LH.