Home Vehicle Exterior EXTERIOR PANELS / TRIM NAME PLATE

NAME PLATE > INSTALLATION

for Preparation Click here


HINT:
When installing the name plates or emblem, heat the vehicle body and name plates or emblem using a heat light.

Heating Temperature 
Item
Temperature
Vehicle Body
40 to 60°C (104 to 140°F)
Name Plate or Emblem
20 to 30°C (68 to 86°F)

NOTICE:
Do not heat the vehicle body, name plates or emblem excessively.


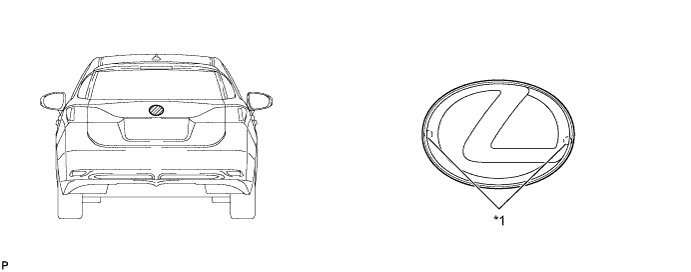
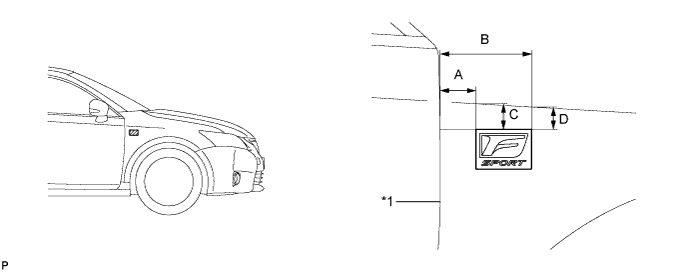
1. INSTALL SYMBOL EMBLEM
  1. Clean the vehicle body surface.

    1. Using a heat light, heat the vehicle body surface.

    2. Remove the double-sided tape from the vehicle body.

    3. Wipe off any tape adhesive residue with cleaner.

  1. Clean the symbol emblem. (If reusing the symbol emblem)

    1. Using a heat light, heat the symbol emblem.

    2. Remove the double-sided tape from the symbol emblem.

    3. Wipe off any tape adhesive residue with cleaner.

    4. Apply new double-sided tape to the symbol emblem.


  1. Install the symbol emblem.

    1. Using a heat light, heat the vehicle body and symbol emblem.

    2. Remove the release paper from the symbol emblem.

      HINT:
      After removing the release paper, keep the exposed adhesive free from foreign matter.


    3. Install the symbol emblem.


      B270372E01


      Text in Illustration 
      *1
      Location Pin
      -
      -
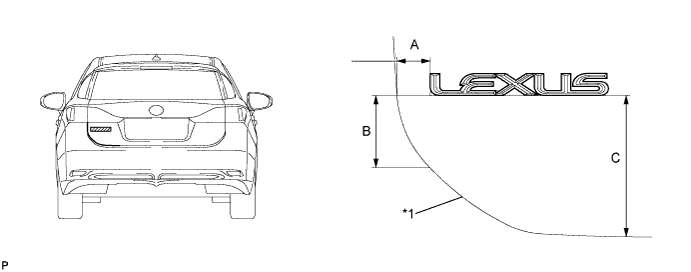


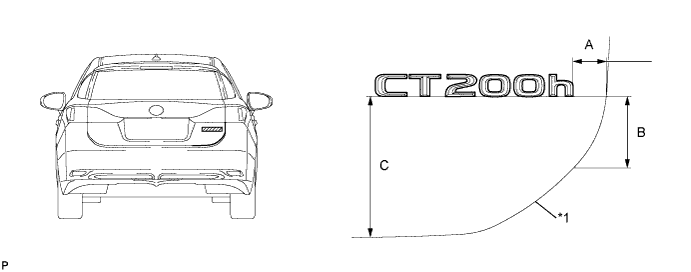
2. INSTALL NO. 1 BACK DOOR NAME PLATE
  1. Clean the vehicle body surface.

    1. Using a heat light, heat the vehicle body surface.

    2. Remove the double-sided tape from the vehicle body.

    3. Wipe off any tape adhesive residue with cleaner.

  1. Clean the No. 1 back door name plate. (If reusing the No. 1 back door name plate)

    1. Using a heat light, heat the No. 1 back door name plate.

    2. Remove the double-sided tape from the No. 1 back door name plate.

    3. Wipe off any tape adhesive residue with cleaner.

    4. Apply new double-sided tape to the No. 1 back door name plate.


  1. Install the No. 1 back door name plate.

    1. Using a heat light, heat the vehicle body and No. 1 back door name plate.

    2. Remove the release paper from the No. 1 back door name plate.

      HINT:
      After removing the release paper, keep the exposed adhesive free from foreign matter.


    3. Install the No. 1 back door name plate.


      B270370E01


      Text in Illustration 
      *1
      Profile of Back Door Panel
      -
      -

      Reference Measurement:
      Area
      Measurement
      A
      30.7 mm (1.21 in.)
      B
      66.9 mm (2.63 in.)
      C
      131.1 mm (5.16 in.)


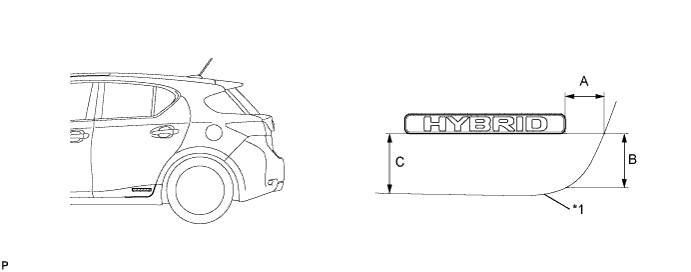
3. INSTALL NO. 2 BACK DOOR NAME PLATE
  1. Clean the vehicle body surface.

    1. Using a heat light, heat the vehicle body surface.

    2. Remove the double-sided tape from the vehicle body.

    3. Wipe off any tape adhesive residue with cleaner.

  1. Clean the No. 2 back door name plate. (If reusing the No. 2 back door name plate)

    1. Using a heat light, heat the No. 2 back door name plate.

    2. Remove the double-sided tape from the No. 2 back door name plate.

    3. Wipe off any tape adhesive residue with cleaner.

    4. Apply new double-sided tape to the No. 2 back door name plate.


  1. Install the No. 2 back door name plate.

    1. Using a heat light, heat the vehicle body and No. 2 back door name plate.

    2. Remove the release paper from the No. 2 back door name plate.

      HINT:
      After removing the release paper, keep the exposed adhesive free from foreign matter.


    3. Install the No. 2 back door name plate.


      B270371E01


      Text in Illustration 
      *1
      Profile of Back Door Panel
      -
      -

      Reference Measurement:
      Area
      Measurement
      A
      29.7 mm (1.17 in.)
      B
      65.0 mm (2.56 in.)
      C
      130.6 mm (5.14 in.)


4. INSTALL BODY SIDE NAME PLATE
  1. Clean the vehicle body surface.

    1. Using a heat light, heat the vehicle body surface.

    2. Remove the double-sided tape from the vehicle body.

    3. Wipe off any tape adhesive residue with cleaner.

  1. Clean the body side name plate. (If reusing the body side name plate)

    1. Using a heat light, heat the body side name plate.

    2. Remove the double-sided tape from the body side name plate.

    3. Wipe off any tape adhesive residue with cleaner.

    4. Apply new double-sided tape to the body side name plate.


  1. Install the body side name plates.

    1. Using a heat light, heat the vehicle body and body side name plate.

    2. Remove the release paper from the body side name plate.

      HINT:
      After removing the release paper, keep the exposed adhesive free from foreign matter.


    3. Install the body side name plate.


      B270375E01


      Text in Illustration 
      *1
      Profile of Rear Door Panel
      -
      -

      Reference Measurement:
      Area
      Measurement
      A
      34.2 mm (1.35 in.)
      B
      47.7 mm (1.88 in.)
      C
      52.6 mm (2.07 in.)

      HINT:
      Use the same procedure for the RH side and LH side.


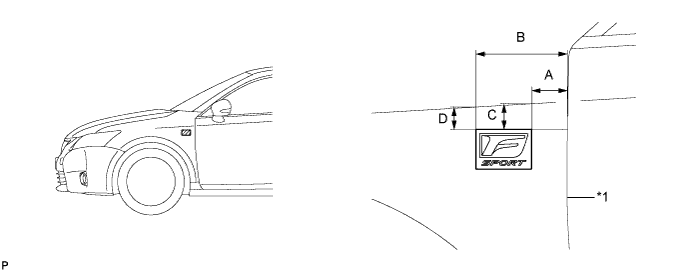
5. INSTALL NO. 2 FRONT FENDER NAME PLATE
  1. Clean the vehicle body surface.

    1. Using a heat light, heat the vehicle body surface.

    2. Remove the double-sided tape from the vehicle body.

    3. Wipe off any tape adhesive residue with cleaner.

  1. Clean the No. 2 front fender name plate. (If reusing the No. 2 front fender name plate)

    1. Using a heat light, heat the No. 2 front fender name plate.

    2. Remove the double-sided tape from the No. 2 front fender name plate.

    3. Wipe off any tape adhesive residue with cleaner.

    4. Apply new double-sided tape to the No. 2 front fender name plate.


  1. Install the No. 2 front fender name plate.

    1. Using a heat light, heat the vehicle body and No. 2 front fender name plate.

    2. Remove the release paper from the No. 2 front fender name plate.

      HINT:
      After removing the release paper, keep the exposed adhesive free from foreign matter.


    3. Install the No. 2 front fender name plate.


      B270373E01


      Text in Illustration 
      *1
      Profile of Front Fender Panel
      -
      -

      Reference Measurement:
      Area
      Measurement
      A
      47.2 mm (1.86 in.)
      B
      112.1 mm (4.41 in.)
      C
      55.8 mm (2.20 in.)
      D
      54 mm (2.13 in.)


6. INSTALL NO. 1 FRONT FENDER NAME PLATE
  1. Clean the vehicle body surface.

    1. Using a heat light, heat the vehicle body surface.

    2. Remove the double-sided tape from the vehicle body.

    3. Wipe off any tape adhesive residue with cleaner.

  1. Clean the No. 1 front fender name plate. (If reusing the No. 1 front fender name plate)

    1. Using a heat light, heat the No. 1 front fender name plate.

    2. Remove the double-sided tape from the No. 1 front fender name plate.

    3. Wipe off any tape adhesive residue with cleaner.

    4. Apply new double-sided tape to the No. 1 front fender name plate.


  1. Install the No. 1 front fender name plate.

    1. Using a heat light, heat the vehicle body and No. 1 front fender name plate.

    2. Remove the release paper from the No. 1 front fender name plate.

      HINT:
      After removing the release paper, keep the exposed adhesive free from foreign matter.


    3. Install the No. 1 front fender name plate.


      B270374E01


      Text in Illustration 
      *1
      Profile of Front Fender Panel
      -
      -

      Reference Measurement:
      Area
      Measurement
      A
      47.2 mm (1.86 in.)
      B
      112.1 mm (4.41 in.)
      C
      55.8 mm (2.20 in.)
      D
      54 mm (2.13 in.)