Home Audio/Visual/Telematics AUDIO / VIDEO PILLAR SPEAKER (for Front Side)

PILLAR SPEAKER (for Front Side) > INSTALLATION

for Preparation Click here


1. INSTALL FRONT NO. 3 SPEAKER ASSEMBLY
  1. Engage the 3 claws to install the front No. 3 speaker assembly.

    NOTICE:
    Do not touch the speaker cone.


2. INSTALL FRONT PILLAR GARNISH
  1. Remove the protective cover.


    B270527E01
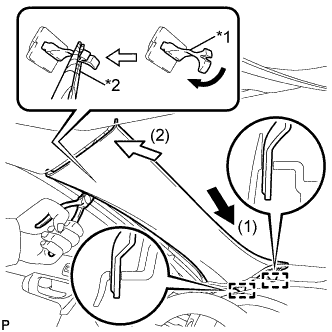
  1. Make sure that the front pillar garnish clip is not damaged.
    Text in Illustration 
    *1
    Front Pillar Garnish Clip
    *2
    Protective Tape

    NOTICE:
    1. If there is any damage, replace the garnish clip with a new one.
    2. When a garnish clip is being replaced, make sure to install it in the direction shown in the illustration.
  1. Engage the 2 guides by moving the garnish in the direction indicated by the arrow (1).

  1. Turn the end of the front pillar garnish clip 90° with needle-nosed pliers and install it to the front pillar garnish LH.

    HINT:
    Tape the tips of the needle-nosed pliers before use.


    B270523
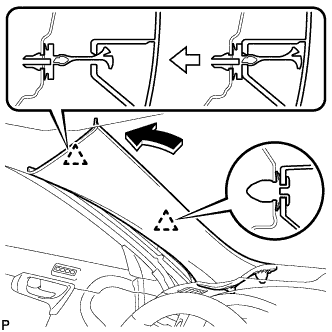
  1. Engage the 2 clips to install the front pillar garnish LH.