AUTOMATIC TRANSMISSION ASSEMBLY > REMOVAL |
| 1. DISCONNECT CABLE FROM NEGATIVE BATTERY TERMINAL |
| 2. REMOVE ENGINE UNDER COVER |
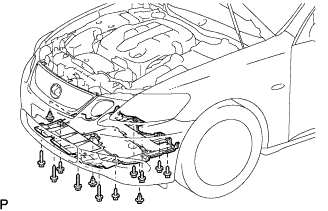 |
Using a clip remover, remove the 3 clips.
Remove the 10 screws and under cover.
| 3. REMOVE ENGINE UNDER COVER NO.2 |
Remove the 4 screws, 2 grommets, 2 spacers and under cover.
| 4. DRAIN COOLANT |
| 5. DRAIN AUTOMATIC TRANSMISSION FLUID |
Remove the drain plug and gasket, drain the ATF.
Install a new gasket and the drain plug.
| 6. REMOVE ENGINE UNDER COVER AIR GUIDE BRACKET |
 |
Remove the 2 bolts and engine under cover air guide bracket.
| 7. REMOVE FRONT EXHAUST PIPE ASSEMBLY |
| 8. REMOVE PROPELLER W/CENTER BEARING SHAFT ASSEMBLY |
| 9. REMOVE EXHAUST MANIFOLD SUB-ASSEMBLY LH |
| 10. REMOVE STARTER ASSEMBLY |
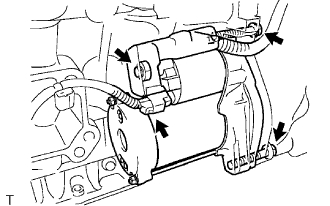 |
Disconnect the starter connector.
Detach the terminal cap.
Remove the nut and disconnect the starter cable.
Remove the 2 bolts and starter.
| 11. REMOVE DRIVE PLATE & TORQUE CONVERTER CLUTCH SETTING BOLT |
 |
Turn the crankshaft to gain access to each bolt.
Hold the crankshaft pulley nut with a wrench and remove the 6 torque converter clutch setting bolts.
| 12. REMOVE EXHAUST PIPE NO.1 SUPPORT BRACKET SUB-ASSEMBLY |
 |
Remove the 2 bolts and exhaust pipe No.1 support bracket sub-assembly from the automatic transmission assembly.
| 13. SEPARATE FLOOR SHIFT GEAR SHIFTING ROD SUB-ASSEMBLY |
Set the shift lever to the neutral position.
 |
Remove the nut, and separate the floor shift gear shifting rod sub-assembly.
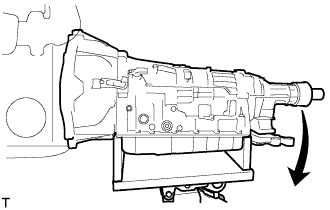
| 14. SUPPORT AUTOMATIC TRANSMISSION ASSEMBLY |
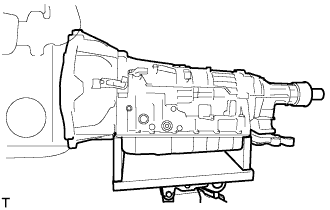 |
Support the automatic transmission assembly with a transmission jack.
| 15. REMOVE ENGINE REAR MOUNTING MEMBER |
 |
Remove the 4 bolts, and separate the engine rear mounting member from the body.
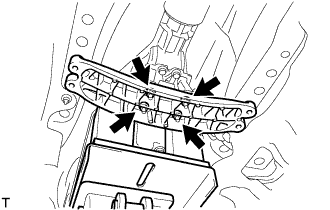 |
Remove the 4 nuts and engine rear mounting member from the automatic transmission assembly.
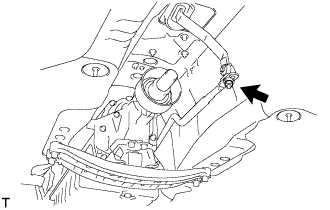
| 16. SEPARATE CONNECTOR |
 |
Tilt down the automatic transmission assembly.
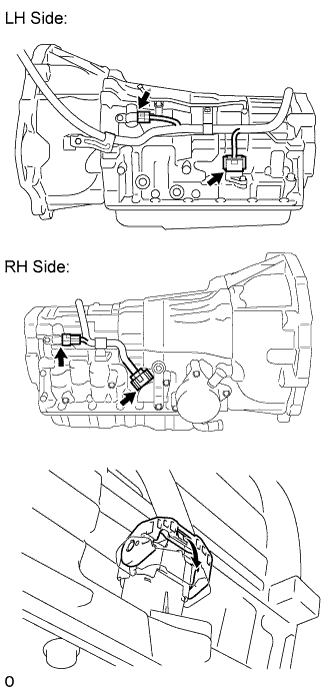 |
Disconnect the neutral start switch connector, transmission wire connector and 2 transmission revolution sensor connectors.
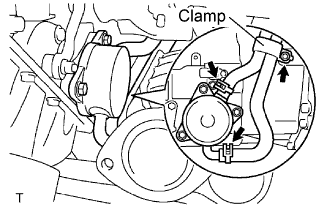
| 17. SEPARATE WIRE HARNESS |
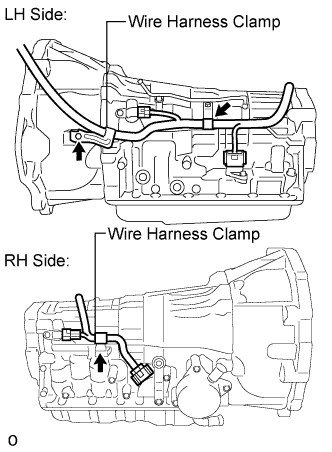 |
Remove the 2 bolts and separate the wire harness clamps from the automatic transmission assembly.
| 18. SEPARATE WATER BY-PASS HOSE |
 |
Remove the bolt and water by-pass hose clamp.
Separate the 2 water by-pass hoses from the transmission oil cooler.
| 19. REMOVE AUTOMATIC TRANSMISSION ASSEMBLY |
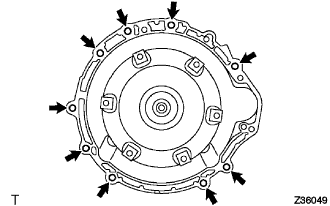 |
Remove the 9 bolts and automatic transmission assembly.
| 20. REMOVE ENGINE MOUNTING INSULATOR REAR NO.1 |
 |
Remove the 4 bolts and engine mounting insulator rear No.1 from the automatic transmission assembly.
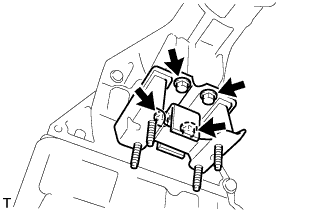
| 21. REMOVE TRANSMISSION CONTROL SHAFT LEVER RH |
 |
Remove the nut and transmission control shaft lever RH from the neutral start switch assembly.
| 22. REMOVE TRANSMISSION OIL COOLER |
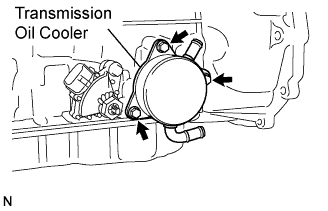 |
Remove the 3 bolts, transmission oil cooler from the automatic transmission assembly.
Remove the 2 O-ring.
| 23. REMOVE TORQUE CONVERTER CLUTCH ASSEMBLY |
 |
Put matchmarks on the torque converter and transmission case.
Remove the torque converter from the automatic transmission assembly.
| 24. INSPECT TORQUE CONVERTER CLUTCH ASSEMBLY |
 |
Inspect the one-way clutch.
Install SST so that it fits in a notch of the converter hub and a notch of the outer race of the one-way clutch.
Press on the serrations of the startor with a finger and rotate it.
Check that it rotates smoothly when turned clockwise and locks up when turned counterclockwise.
 |
Determine the condition of the torque converter clutch assembly.
If the inspection result of the torque converter clutch assembly meets the following item, replace the torque converter clutch.
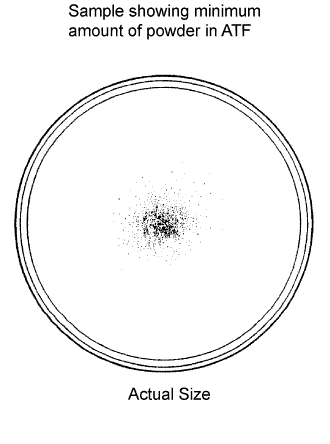
Replace the ATF in the torque converter clutch.
If the ATF is discolored and/or has a foul odor, completely stir the ATF in the torque converter clutch and drain it with the installation face up.
 |
Clean and check the oil cooler and oil pipe line.
If the torque converter clutch is inspected or the ATF is changed, clean the oil cooler and oil pipe line.
If the ATF is cloudy, inspect the oil cooler (radiator).
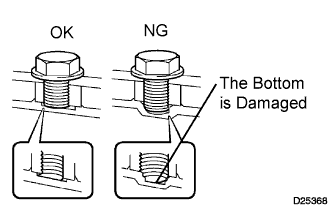 |
Prevent deformation of the torque converter clutch.
When there is any damage to the end of the bolt for the torque converter clutch and to the bottom of the bolt hole, replace the bolt and the torque converter clutch.
All of the bolts have to be of the same length.
