WINDSHIELD GLASS > REMOVAL |
| 1. DISCONNECT CABLE FROM NEGATIVE BATTERY TERMINAL |
| 2. REMOVE COOL AIR INTAKE DUCT SEAL |
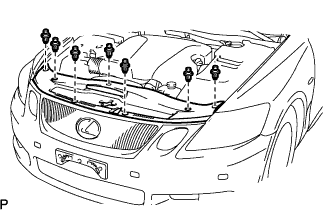 |
Using a clip remover, remove the 7 clips and duct seal.
| 3. REMOVE ENGINE ROOM SIDE COVER LH (for LHD) |
 |
Using a clip remover, remove the 3 clips and side cover.
| 4. REMOVE ENGINE ROOM SIDE COVER RH (for RHD) |
 |
Remove the cap nut.
Using a clip remover, remove the 3 clips and side cover.
| 5. REMOVE FRONT FENDER TO COWL SIDE SEAL LH |
 |
Pull the cowl side seal in the direction indicated by the arrow in the illustration to detach the 2 claws and remove the cowl side seal.
| 6. REMOVE FRONT FENDER TO COWL SIDE SEAL RH |
| 7. REMOVE FRONT WIPER ARM LH |
Remove the nut, wiper arm and blade.
| 8. REMOVE FRONT WIPER ARM RH |
Remove the nut, wiper arm and blade.
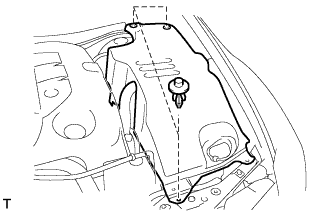
| 9. REMOVE COWL TOP VENTILATOR LOUVER SUB-ASSEMBLY |
 |
Remove the 2 clips and detach the 5 claws.
 |
Pull the ventilator louver in the direction indicated by the arrow in the illustration to detach the 10 claws and remove the ventilator louver.
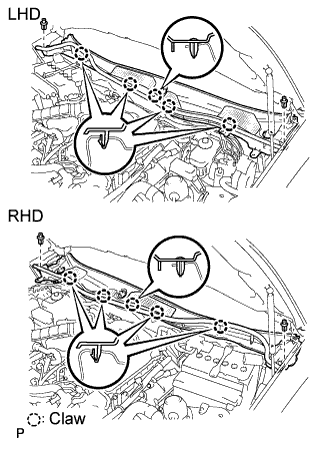
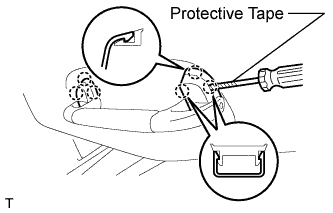
| 10. REMOVE ROOF DRIP SIDE FINISH MOULDING CENTER LH |
 |
Put protective tape around the moulding.
Using a moulding remover, detach the 16 clips and remove the moulding.
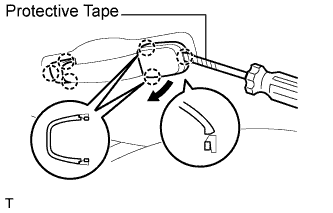
| 11. REMOVE ROOF DRIP SIDE FINISH MOULDING CENTER RH |
|
Put protective tape around the moulding.
Using a moulding remover, detach the 16 clips and remove the moulding.
| 12. REMOVE FRONT DOOR SCUFF PLATE LH |
 |
Using a moulding remover, detach the 5 claws and remove the scuff plate.
| 13. REMOVE FRONT DOOR SCUFF PLATE RH |
| 14. REMOVE FRONT DOOR OPENING TRIM COVER LH |
Using a moulding remover, detach the 3 claws and remove the trim cover.
| 15. REMOVE FRONT DOOR OPENING TRIM COVER RH |
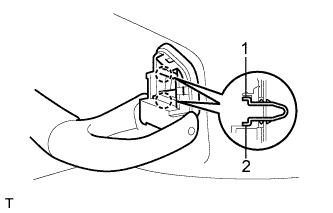
| 16. REMOVE FRONT PILLAR GARNISH LH |
 |
Detach the clip labeled A from the vehicle body. Pull the pillar garnish so that the tip of clip B locks in the pillar garnish's hole.
Using needle-nose pliers, rotate clip B 90° and remove the pillar garnish.
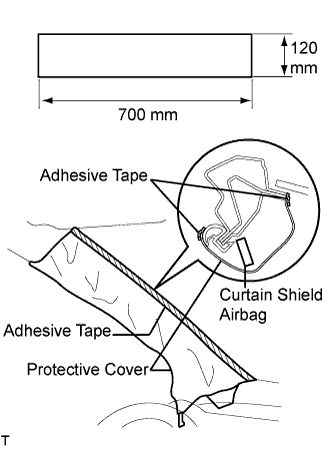 |
Protect the curtain shield airbag.
Thoroughly cover the airbag with a cloth or nylon sheet that is 700 mm (27.56 in.) x 120 mm (4.72 in.) and fix the ends of the cover with adhesive tape, as shown in the illustration.
| 17. REMOVE FRONT PILLAR GARNISH RH |
| 18. REMOVE VISOR BRACKET COVER |
 |
Using a moulding remover, detach the 4 claws and remove the cover.
| 19. REMOVE VISOR ASSEMBLY LH |
Remove the 2 screws and visor.
| 20. REMOVE VISOR ASSEMBLY RH |
Remove the 2 screws and visor.
| 21. REMOVE VISOR HOLDER |
 |
Remove the visor holder by turning it counterclockwise.
| 22. REMOVE FRONT ROOF TOP GARNISH |
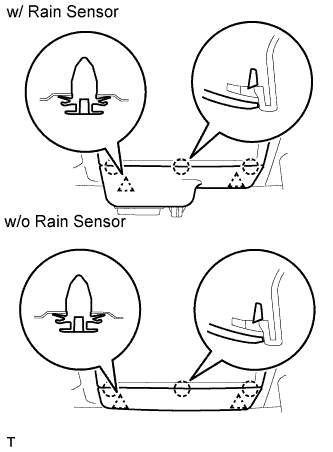 |
w/ Rain sensor:
Remove the top garnish.
Using a screwdriver, detach the 3 claws and 2 clips, and remove the top garnish.
w/o Rain sensor:
Remove the top garnish.
Using a screwdriver, detach the 3 claws and 2 clips, and remove the top garnish.
| 23. REMOVE INNER REAR MIRROR COVER |
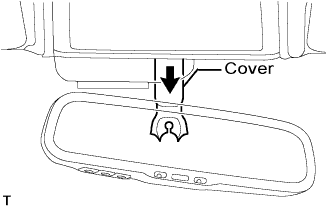 |
Pull the cover in the direction indicated by the arrow in the illustration. Then remove the cover.
| 24. REMOVE PERSONAL LIGHT ASSEMBLY |
 |
Using a screwdriver, remove the 2 covers and 2 screws.
Using a moulding remover, detach the 2 clips and 3 claws.
Disconnect the connector and remove the personal light.
| 25. REMOVE STEERING SPOT LIGHT ASSEMBLY |
Using a moulding remover, detach the 2 claws and remove the spot light.
Disconnect the connector.
| 26. REMOVE VANITY LIGHT ASSEMBLY |
Using a screwdriver, detach the claws.
Spread apart the detached claws and remove the bulb holder from the vanity light.
Only when replacing the roof headlining:
 |
Detach the claw and remove the vanity light.
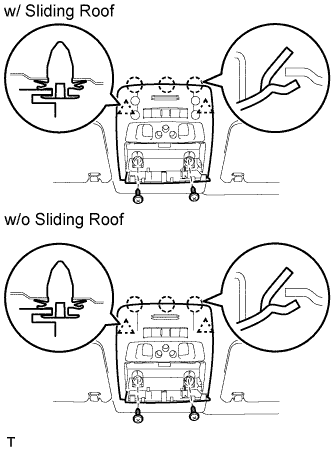
| 27. REMOVE ASSIST GRIP ASSEMBLY |
 |
w/o Sliding roof:
Remove the assist grip.
Using a screwdriver, detach the 6 claws and remove the 2 assist grip covers.
 |
Detach the 2 claws in the order shown in the illustration.
 |
w/ Sliding roof:
Remove the assist grip.
Using a screwdriver, detach the 6 claws and remove the 2 assist grip covers.
 |
Detach the 2 claws in the order shown in the illustration.
| 28. REMOVE ROOF HEADLINING ASSEMBLY |
| 29. REMOVE INNER REAR VIEW MIRROR ASSEMBLY |
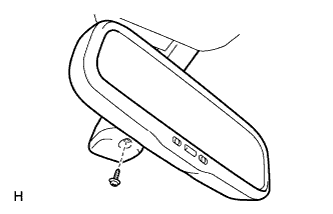 |
Remove the screw.
 |
Disconnect the connector and remove the mirror.
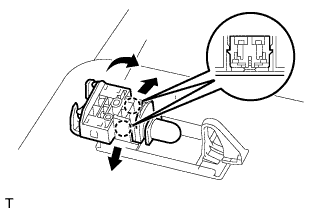
| 30. REMOVE RAIN SENSOR (w/ RAIN SENSOR) |
 |
Disconnect the connector and unlock the stopper by pulling it down.
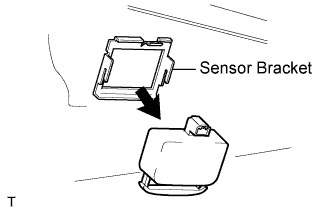 |
Remove the sensor from the sensor bracket.
Remove the rain sensor tape.
| 31. REMOVE WINDSHIELD GLASS |
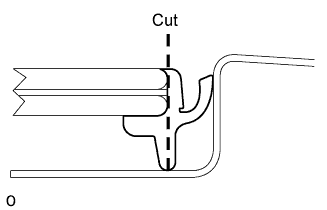 |
Using a knife, cut off the moulding as shown in the illustration.
Remove the remaining moulding.
 |
Apply protective tape to the outer surface of the vehicle body to prevent scratches.
From the interior, insert a piano wire between the vehicle body and glass as shown in the illustration.
Tie objects that can serve as handles (for example, wooden blocks) to both wire ends.
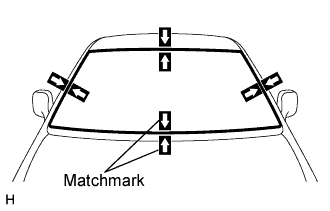 |
Place matchmarks over the glass and vehicle body on the locations indicated in the illustration.
Cut through the adhesive by pulling the piano wire around the glass.
Detach the stoppers.
Using suction cups, remove the glass.
| 32. REMOVE WINDSHIELD GLASS SPACER |
Using a scraper, remove the damaged spacer.
| 33. REMOVE WINDSHIELD GLASS RETAINER |
Using a scraper, remove the damaged retainer.
| 34. REMOVE WINDSHIELD GLASS ADHESIVE DAM |
Using a scraper, remove the damaged dam.
| 35. CLEAN WINDSHIELD GLASS |
 |
Using a scraper, remove the adhesive sticking to the glass.
Clean the outer edges of the glass with white gasoline.
| 36. REMOVE NO. 1 WINDSHIELD GLASS STOPPER |
Remove the stopper from the vehicle body.
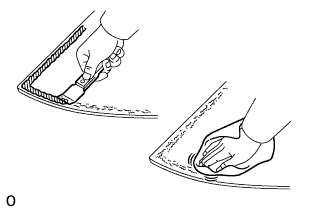
| 37. CLEAN VEHICLE BODY |
Clean and shape the contact surface of the vehicle body.
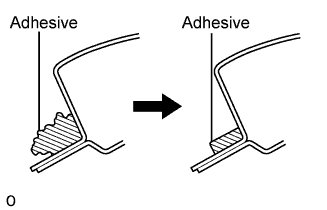 |
On the contact surface of the vehicle body, use a knife to cut away excess adhesive as shown in the illustration.
Clean the contact surface of the vehicle body with cleaner.
