REPAIR INSTRUCTION > INITIALIZATION |
| System Name |
| Power Window Control System |
| Sliding Roof System |
| Clearance Sonar System |
| Variable Gear Ratio Steering System |
| RESET (INITIALIZE) POWER WINDOW REGULATOR MOTOR |
Turn the engine switch on (IG).
Open the power window halfway by pressing the power window switch.
Fully pull the switch up until the power window is fully closed and hold the switch for at least 1 second.
Check that the AUTO UP/DOWN function operates normally.
Disconnect the cable from the negative (-) battery terminal for 10 seconds or more.
Reconnect the cable.
Perform the first 4 steps above.
| RESET SLIDING ROOF DRIVE GEAR SUB-ASSEMBLY |
Turn the engine switch on (IG).
If the sliding roof is opened, close it fully.
Push the open switch of the slide switch or the up switch of the tilt switch on the personal light, making the sliding roof operation as follows:
Tilt up → Approximately 1 second → tilt down → slide open → slide close
Sliding roof stops at the fully closed position.
Finish the initialization.
Check that the operation works normally with AUTO operation.
| RESET CLEARANCE SONAR SYSTEM |
| Method 1 | Use intelligent tester to perform initial setting of mid-point | When clearance warning ECU is replaced When steering wheel mid-point or wheel alignment is adjusted When battery terminal is disconnected and reconnected When malfunction causes momentary drop in the power supply voltage (due to cranking, depleted battery, etc.) When steering sensor is removed and installed When steering sensor is replaced |
| Method 2 | Use customize mode to perform initial setting of mid-point | When clearance warning ECU is replaced When steering wheel mid-point or wheel alignment is adjusted |
| Method 3 | Perform steering angle mid-point learning operation by rotating steering wheel to left and right full lock position | When battery terminal is disconnected and reconnected When malfunction causes momentary drop in the power supply voltage (due to cranking, depleted battery, etc.) When steering sensor is removed and installed When steering sensor is replaced |
| Method 4 | Perform steering angle mid-point learning operation by traveling in approximate straight line for extended distance | When battery terminal is disconnected and reconnected When malfunction causes momentary drop in the power supply voltage (due to cranking, depleted battery, etc.) When steering sensor is removed and installed When steering sensor is replaced |
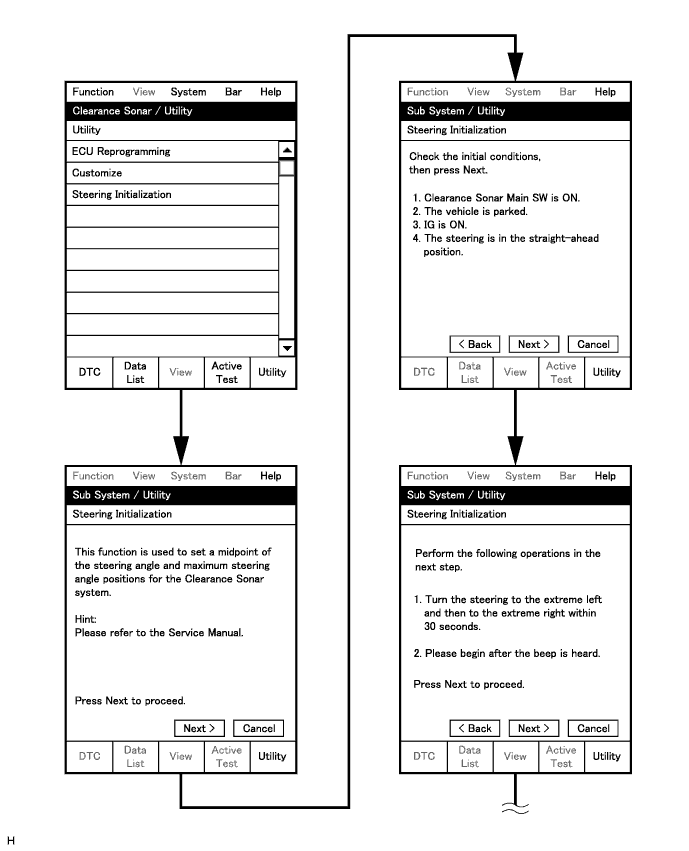
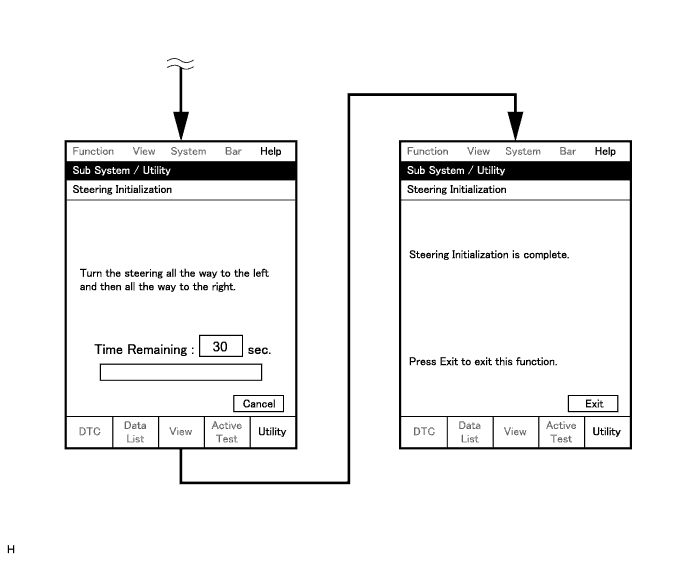
Method 1 (Intelligent tester)
Turn the engine switch off.
Connect the intelligent tester to the DLC3.
Turn the engine switch on (IG) and push the intelligent tester main switch ON.
Select the following menus: "Body / Clearance Sonar".
Perform the Steering Initialization procedure from the Clearance Sonar / Utility menu.
Method 2 (Manual operation method)
Using customize mode, set the mid-point and maximum steering angle.
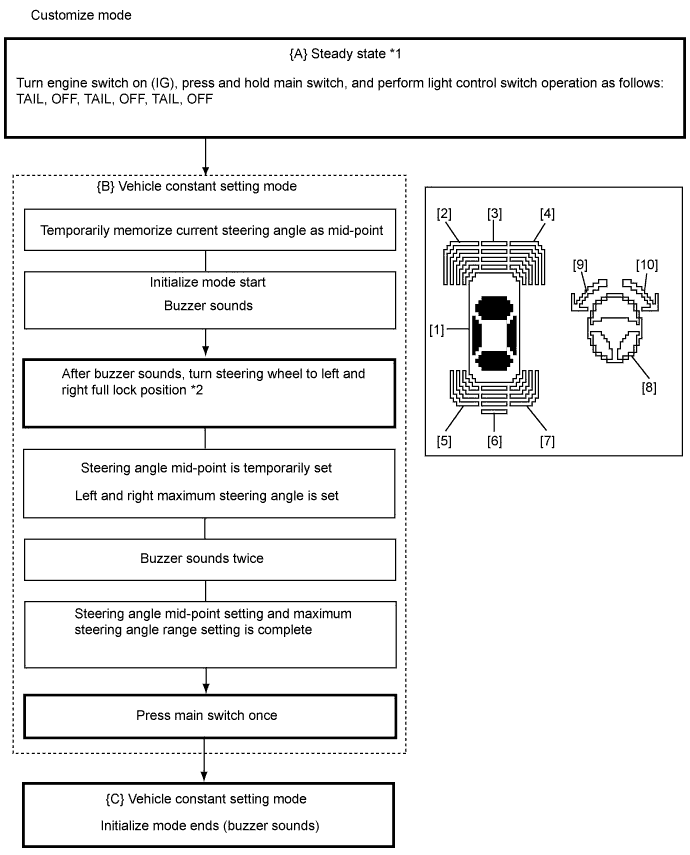
| [1] | [2] | [3] | [4] | [5] | [6] | [7] | [8] | [9] | [10] | Note | |
| {A} | ● | x | x | x | x | - | x | ▲ | ▲ | ▲ | [8], [9], [10] will illuminate if steering wheel mid-point is not set |
| {B} | ● ↓ ○ | x ↓ ○ | x | x ↓ ○ | x | - | x | ● ↓ ○ | ● ↓ ○ | ● ↓ ○ | [1], [8] to [10] will illuminate for 2 seconds: then [1], [2], [4], [8] to [10] will flash |
| {C} | ○ | ○ | x | ○ | x | x | x | x | x | x | [1], [2], [4] will flash |
Method 3 (Manual operation method)
Turn the engine switch on (IG).
Turn the clearance sonar main switch ON.
Turn the steering wheel to the full left and right lock position.
Confirm that the learning operation has been completed by checking the multi-information display.
Method 4 (Manual operation method)
At an area with few turns and curves, and minimal traffic, drive at 20 km/h (12 mph) or more for 5 minutes or more.
| RESET CLEARANCE SONAR SYSTEM |
| Method 1 | Use intelligent tester to perform initial setting of mid-point | When clearance warning ECU is replaced When steering wheel mid-point or wheel alignment is adjusted When battery terminal is disconnected and reconnected When malfunction causes momentary drop in the power supply voltage (due to cranking, depleted battery, etc.) When steering sensor is removed and installed When steering sensor is replaced |
| Method 2 | Use customize mode to perform initial setting of mid-point | When clearance warning ECU is replaced When steering wheel mid-point or wheel alignment is adjusted |
| Method 3 | Perform steering angle mid-point learning operation by rotating steering wheel to left and right full lock position | When battery terminal is disconnected and reconnected When malfunction causes momentary drop in the power supply voltage (due to cranking, depleted battery, etc.) When steering sensor is removed and installed When steering sensor is replaced |
| Method 4 | Perform steering angle mid-point learning operation by traveling in approximate straight line for extended distance | When battery terminal is disconnected and reconnected When malfunction causes momentary drop in the power supply voltage (due to cranking, depleted battery, etc.) When steering sensor is removed and installed When steering sensor is replaced |
Method 1 (Intelligent tester)
Turn the engine switch off.
Connect the intelligent tester to the DLC3.
Turn the engine switch on (IG) and push the intelligent tester main switch on.
Select the following "Body / Clearance Sonar".
Perform the Steering Initialization procedure from the Clearance Sonar / Utility menu.
Method 2 (Manual operation method)
Using customize mode, set the mid-point and maximum steering angle.
| [1] | [2] | [3] | [4] | [5] | [6] | [7] | [8] | [9] | [10] | Note | |
| {A} | ● | x | x | x | x | - | x | ▲ | ▲ | ▲ | [8], [9], [10] will illuminate if steering wheel neutral point is not set |
| {B} | ● ↓ ○ | x ↓ ○ | x | x ↓ ○ | x | - | x | ● ↓ ○ | ● ↓ ○ | ● ↓ ○ | [1], [8] to [10] will illuminate for 2 seconds: then [1], [2], [4], [8] to [10] will flash |
| {C} | ○ | ○ | x | ○ | x | x | x | x | x | x | [1], [2], [4] will flash |
Method 3 (Manual operation method)
Turn the engine switch on (IG).
Turn the clearance sonar main switch ON.
Turn the steering wheel to the full left and right lock position.
Confirm that the learning operation has been completed by checking the multi-information display.
Method 4 (Manual operation method)
At an area with few turns and curves, and minimal traffic, drive at 20 km/h or more for 5 minutes or more.
| STEERING ANGLE SENSOR INITIALIZATION (to obtain a tire angle (during straight-ahead driving) signal) |
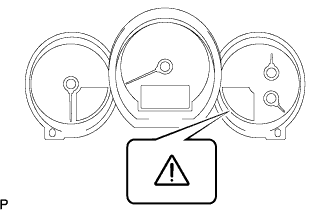 |
Turn the engine switch on (IG), and check that the master warning light and brake warning light illuminate for a few seconds.
Drive the vehicle on a straight road at 35 km/h (22 mph) or more for 5 seconds or longer.
Confirm the steering angle sensor initialization is completed (when using the intelligent tester).
Enter the VGRS menu using the intelligent tester. Select "STRAIGH ANG FLG" from "DATA LIST". Check if the steering angle sensor has obtained a tire angle (during straight-ahead driving) signal.
Confirm the steering angle sensor initialization is completed (when not using the intelligent tester).
Drive the vehicle on a road at 60 km/h (37 mph) or more for 30 seconds or longer.
Stop the vehicle (engine running).
Slowly turn the steering wheel from lock to lock.
If it rotates approximately 2.7 turns, the steering angle sensor initialization is completed. Ifit rotates approximately 3.2 turns, the steering angle sensor initialization is not completed.
