RADIATOR > INSTALLATION |
| 1. INSTALL RADIATOR ASSEMBLY |
Install the 2 radiator support cushions and 2 radiator lower supports to the radiator.
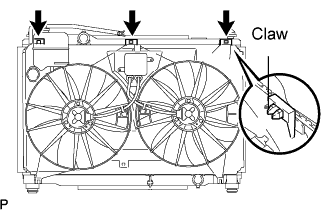 |
Install the fan to the radiator, and attach the 3 claws.
 |
Align the radiator with the condenser. Then install the radiator.
| 2. CONNECT RADIATOR HOSE INLET |
Connect the hose to the water inlet with thermostat and radiator tank upper.
| 3. CONNECT RADIATOR HOSE OUTLET |
Connect the hose to the water inlet and radiator tank lower.
| 4. INSTALL UPPER RADIATOR SUPPORT SUB-ASSEMBLY |
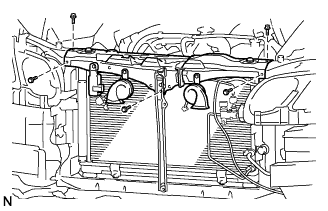 |
Install the radiator support with the 5 bolts.
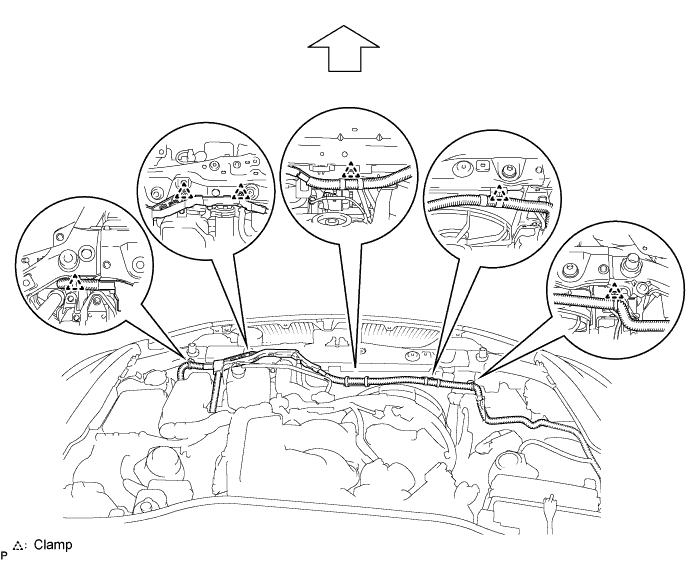
Attach the 6 clamps and install the wire harness.
| 5. INSTALL HOOD LOCK ASSEMBLY |
 |
Apply MP grease to the sliding areas of the lock.
 |
Install the hood lock.
Install the 2 bolts and nut.
Install a new cap.
Connect the hood lock control cable.
| 6. INSTALL HOOD LOCK CONTROL CABLE COVER |
 |
Attach the claw and install the cable cover.
Install the 3 screws.
| 7. INSTALL RADIATOR SUPPORT OPENING COVER |
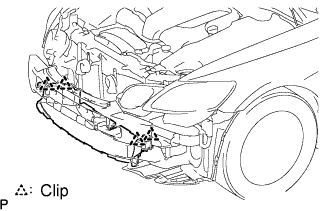 |
Install the cover with the 4 clips.
| 8. ADD ENGINE COOLANT |
Tighten all the plugs and fill the radiator with TOYOTA Super Long Life Coolant (SLLC).
Add engine coolant.
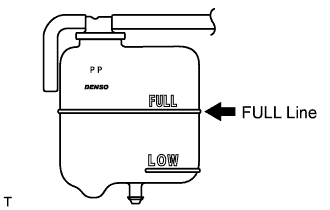
Slowly pour coolant into the radiator reservoir until it reaches the FULL line.
Press the inlet and outlet radiator hoses several times by hand, and then check the level of the coolant.
If the coolant level is low, add coolant.
Install the radiator cap and reservoir cap.
Bleed air from the cooling system.
Warm up the engine until the thermostat opens. While the thermostat is open, circulate the coolant for several minutes.
Maintain the engine speed at 2,000 to 2,500 rpm.
Press the inlet and outlet radiator hoses several times by hand to bleed air.
Stop the engine, and wait until the engine coolant cools down to ambient temperature.
 |
Check the coolant level in the radiator reservoir.
If the coolant level is low, add SLLC to the radiator reservoir FULL line.
| 9. CHECK FOR ENGINE COOLANT LEAKS |
Check for engine coolant leaks (Click here).
| 10. INSTALL FRONT BUMPER COVER |
Connect the ultrasonic sensor connector.
 |
Attach the 3 claws on the LH side.
Attach the 3 claws on the RH side.
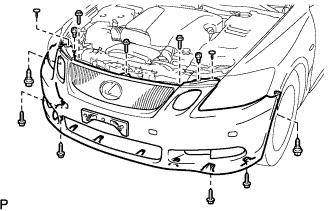 |
Install the bumper cover with the 2 clips, 6 screws and 5 bolts.
| 11. INSTALL AIR CLEANER CAP WITH AIR CLEANER HOSE |
 |
Install the air cleaner cap with air cleaner hose assembly with the 4 clamps and hose clamp.
 |
Install the VSV (for EVAP )to the air cleaner hose.
 |
Connect the MAF meter connector and clamp to the air cleaner.
| 12. INSTALL NO. 1 AIR CLEANER INLET |
Install the inlet with the bolt.
| 13. INSTALL V-BANK COVER SUB-ASSEMBLY |
Install the cover with the 2 nuts.
| 14. INSTALL ENGINE ROOM SIDE COVER RH |
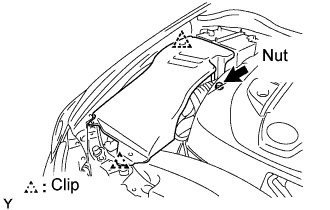 |
Install the side cover with the 2 clips and nut.
| 15. INSTALL ENGINE ROOM SIDE COVER LH |
 |
Install the side cover with the 3 clips.
| 16. INSTALL COOL AIR INTAKE DUCT SEAL |
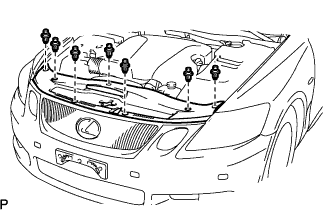 |
Install the duct seal with the 7 clips.
| 17. INSTALL ENGINE UNDER COVER |
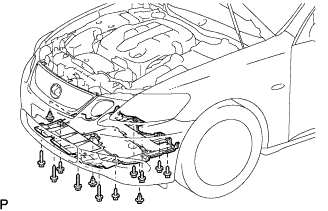 |
Install the under cover with the 3 clips and 10 screws.
| 18. CONNECT CABLE TO NEGATIVE BATTERY TERMINAL |
| 19. PERFORM INITIALIZATION |
Perform initialization (Click here).
