FRONT SEAT ASSEMBLY > REASSEMBLY |
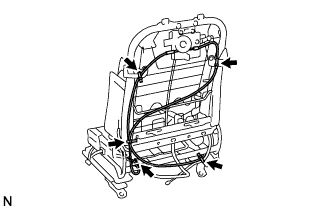
| 1. INSTALL FRONT SEAT WIRE |
| 2. INSTALL SEAT HEATER CONTROL SUB-ASSEMBLY (w/ Seat Heater System) |
Connect the connector and attach the clamp.
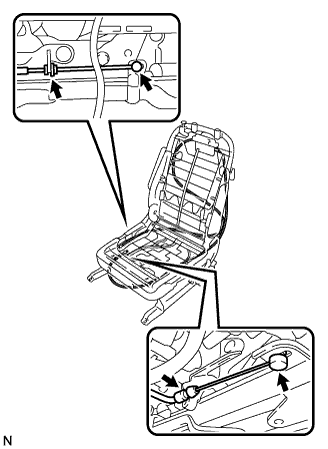
| 3. INSTALL SEAT POSITION AIRBAG SENSOR (for Driver Side) |
 |
Install the seat position airbag sensor, but do not fully tighten it yet.
Install a 1 mm (0.04 in.) feeler gauge between the slide rail and sensor.
Hold down the top of the sensor and tighten the sensor using a T30 "torx" socket.
Remove the feeler gauge.
Install the seat slide position sensor protector.
Connect the wire harness connector.
| 4. INSTALL FRONT SEAT HEADREST ADJUSTER SUB-ASSEMBLY (for Driver Side) |
 |
Install the headrest adjuster to the seat frame with the 2 bolts.
Install the headrest lock release button.
 |
Connect the cable to the front seat frame.
Remove all the slack from the cable by adjusting the nut.
 |
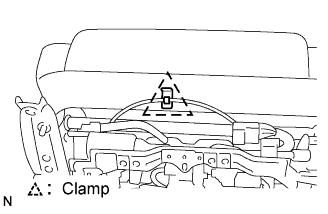
Clamp the cable to the front seat frame with the cable tie as shown in the illustration.
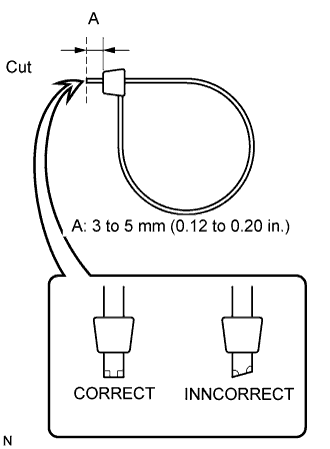 |
Cut off the cable tie, as shown in the illustration.
| 5. INSTALL SEAT CLIMATE CONTROL BLOWER (w/ Climate Control Seat System) |
 |
Install the blower and 3 bushes to the bracket with the 3 bolts.
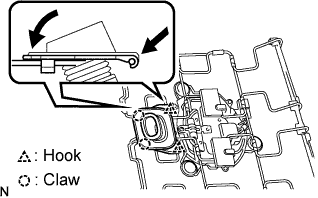
Install the blower with bracket and attach the claw. Then install the screw.
Connect the connector.
| 6. INSTALL SEAT CUSHION CLIMATE CONTROL DUCT (w/ Climate Control Seat System) |
 |
Attach the 2 hooks and 2 claws, and install the duct.
| 7. INSTALL SEATBACK CLIMATE CONTROL BLOWER (w/ Climate Control Seat System) |
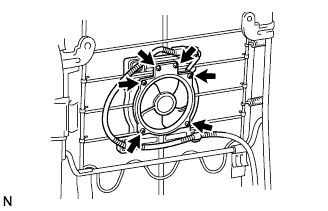 |
Using a T30 ''torx'' socket, install the blower cover and blower to the seat frame with the 6 ''torx'' bolts.
Connect the connector and attach the 3 clamps.
| 8. INSTALL LUMBAR SUPPORT ADJUSTER ASSEMBLY |
Install the lumbar support adjuster with the 2 screws.
Connect the connector.
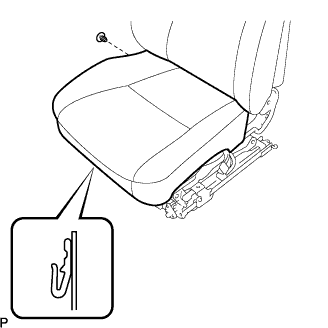
| 9. INSTALL FRONT SEAT CUSHION SHIELD LOWER INNER AND OUTER |
 |
Install the cushion shield with the screw.
| 10. INSTALL RECLINING ADJUSTER INSIDE COVER LH UPPER |
Install the inside cover with the screw.
| 11. INSTALL RECLINING ADJUSTER INSIDE COVER RH UPPER |
Install the inside cover with the screw.
| 12. INSTALL RECLINING ADJUSTER INSIDE COVER LH LOWER |
Install the inside cover with the 2 screws.
| 13. INSTALL RECLINING ADJUSTER INSIDE COVER RH LOWER |
Install the inside cover with the 2 screws.
| 14. INSTALL SEPARATE TYPE FRONT SEATBACK COVER |
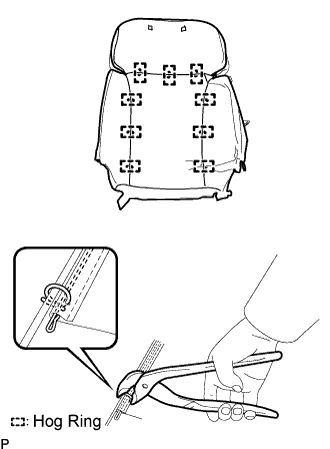 |
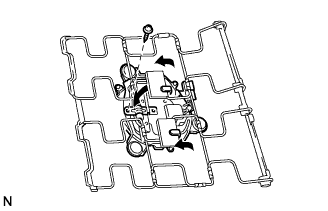
Using hog ring pliers, install the seatback cover to the seatback pad with new hog rings.
Install the seatback cover (with pad) to the seat frame.
Install the 2 headrest supports.
Fully cover the airbag with the 2 seatback cover brackets and tighten the nut.
 |
Using hog ring pliers, install the seatback cover (with pad) to the seat frame with new hog rings, and attach the hooks.
Install the front seatback cover inner and outer with the 4 bolts.
| 15. INSTALL FRONT SEATBACK BOARD SUB-ASSEMBLY |
Attach the 2 claws and install the seatback board with the 2 screws.
| 16. INSTALL INTERIOR NO. 2 ILLUMINATION LIGHT ASSEMBLY |
Install the light to attach the 2 claws.
| 17. INSTALL SEPARATE TYPE FRONT SEAT CUSHION COVER |
 |
Using hog ring pliers, install the seat cushion cover to the seat cushion pad with new hog rings.
 |
Install the seat cushion cover (with pad) to the seat frame and attach the hooks.
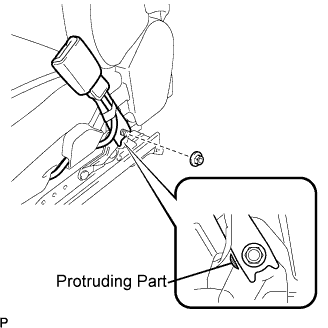
 |
Attach the clamp of the headrest adjuster's cable (driver side).
| 18. INSTALL FRONT POWER SEAT SWITCH LH (w/o Seat Position Memory System) |
Connect the connector.
Install the switch with the 3 screws.
| 19. INSTALL POSITION CONTROL ECU AND SWITCH ASSEMBLY (w/ Seat Position Memory System) |
| 20. INSTALL SEAT TRACK SPACER LOWER INNER |
Install the spacer to the front cushion shield with the 2 screws.
| 21. INSTALL FRONT SEAT CUSHION SHIELD INNER |
Attach the clip and 2 claws to install the cushion shield inner.
Install the screw.
| 22. INSTALL SEAT TRACK SPACER LOWER OUTER |
Install the spacer to the front cushion shield with the 2 screws.
| 23. INSTALL FRONT POWER SEAT LUMBAR SWITCH |
Install the switch to the front cushion shield with the 2 screws.
| 24. CONNECT NO. 1 FRONT SEAT CUSHION SHIELD INNER |
Attach the claw and connect the No. 1 cushion shield inner to the front cushion shield.
Install the 2 screws.
| 25. INSTALL NO. 1 FRONT SEAT CUSHION SHIELD WITH CUSHION SHIELD INNER |
Connect the connector to the lumbar front power seat switch.
Attach the 2 claws and install the cushion shield with cushion shield inner.
Install the 5 screws.
Connect the 2 rubber bands of the front seatback board to the seat frame.
Connect the connector to the No. 1 interior illumination light.
| 26. INSTALL RECLINING POWER SEAT SWITCH KNOB |
| 27. INSTALL SLIDE AND VERTICAL POWER SEAT SWITCH KNOB |
| 28. INSTALL FRONT SEAT INNER BELT ASSEMBLY |
 |
Install the seat belt with the nut.
Install the seat belt's wire harness clamp.
Connect the connector.
