CLEARANCE WARNING BUZZER > REMOVAL |
| 1. DISCONNECT CABLE FROM NEGATIVE BATTERY TERMINAL |
| 2. REMOVE FRONT CONSOLE UPPER PANEL GARNISH |
 |
Using a clip remover, detach the claws and remove the garnish.
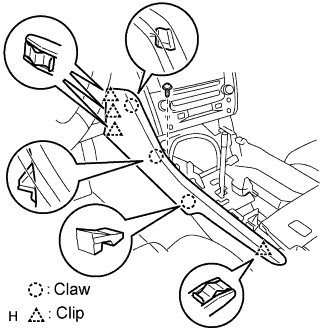
| 3. REMOVE CONSOLE UPPER PANEL ASSEMBLY |
 |
Twist the shift lever knob in the direction indicated by the arrow and remove it.
 |
Using a screwdriver, detach the 9 clips.
Remove the ash receptacle and then disconnect the connector.
| 4. REMOVE INSTRUMENT PANEL FINISH PANEL END RH |
 |
Remove the screw.
Using a screwdriver, detach the 3 clips and 3 claws.
Remove the finish panel end.
| 5. REMOVE INSTRUMENT PANEL FINISH PANEL END LH |
 |
Remove the screw.
Using a screwdriver, detach the 4 clips and 3 claws.
Remove the finish panel end.
| 6. REMOVE MULTI-DISPLAY WITH RADIO RECEIVER ASSEMBLY |
 |
Remove the 4 bolts.
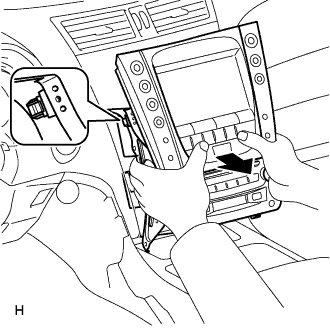 |
Pull the multi-display with radio receiver to detach the 2 clips on the backside of the multi-display.
Disconnect the connectors and remove the multi-display with radio receiver.
| 7. REMOVE NO. 1 CLEARANCE WARNING BUZZER |
 |
Disconnect the buzzer connector.
Detach the clamp and remove the buzzer.
