ROOF HEADLINING > INSTALLATION |
| 1. INSTALL ROOF NO.1 WIRE |
Only when replacing the roof headlining.
Install the roof wire.
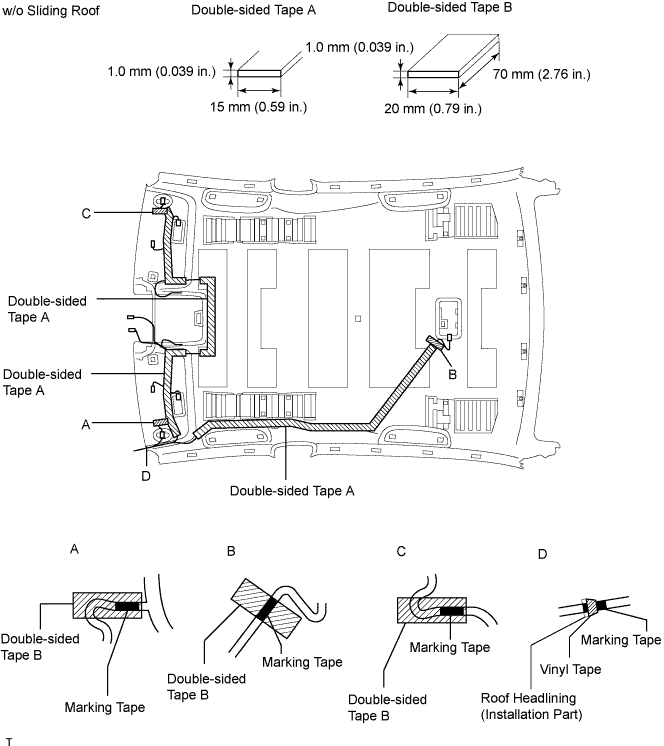
Remove the peeling paper from one side of double-sided tape A.
Attach double-sided tape A to the marks on the roof headlining, as shown in the illustrations below.
Remove peeling paper from the other side of double-sided tape A.
Align the wire harness to double-sided tape A. Also, align the marking tape areas of the wire harness to the marks on the roof headlining (see A, B and C in the illustrations below). Temporarily attach the wire harness to the roof headlining.
Remove peeling paper from one side of double-sided tape B. Secure the wire harness to the roof headlining by attaching double-sided tape B to the wire harness and marks on the roof headlining, as shown in A, B and C in the illustrations below.
Align the marking tape area of the wire harness to the roof headlining installation part, as shown in D in the illustrations below. Wrap tape around the wire harness and installation part.
Attach the claw of the vanity light to install it.

| 2. INSTALL VANITY LIGHT ASSEMBLY |
| 3. INSTALL ROOF HEADLINING ASSEMBLY |
 |
Apply double-sided tape to the pads.
Align the pads with the markings on the roof headlining, and then install the pads.
 |
Only when replacing the sliding roof housing:
Remove the 11 fasteners from the removed sliding roof housing, and attach them to the roof headlining.
Place the roof headlining in the vehicle through the rear door.
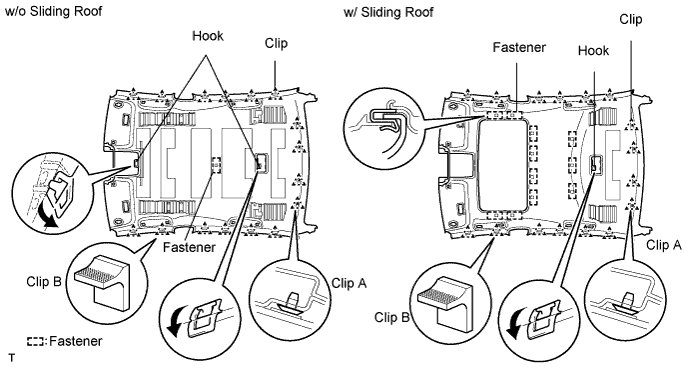
w/o Sliding roof:
Attach the 2 hooks and 4 clips to the vehicle body.
w/ Sliding roof:
Attach the hook, claw and 4 clips to the vehicle body.
Only when replacing the roof headlining:
Remove the 11 fasteners from the removed roof headlining, and attach them to the new roof headlining.
Attach the clips on the rear side of the vehicle.
w/ Sliding roof:
Install the roof headlining to the sliding roof housing.
Attach the clamp of the roof wire to the front pillar garnish LH. Then connect the connector.
w/ Sliding roof:
| 4. INSTALL VISOR HOLDER |
| 5. INSTALL VISOR ASSEMBLY LH |
Install the visor with the 2 screws.
| 6. INSTALL VISOR ASSEMBLY RH |
Install the visor with the 2 screws.
| 7. INSTALL VISOR BRACKET COVER |
Attach the 4 claws to install the cover.
| 8. INSTALL STEERING SPOT LIGHT ASSEMBLY |
Connect the connector.
Attach the 2 claws to install the spot light.
| 9. INSTALL ASSIST GRIP ASSEMBLY |
| 10. INSTALL REAR ROOM LIGHT ASSEMBLY |
Connect the connector.
Attach the 4 claws to install the room light to the vehicle body.
| 11. INSTALL REAR VIEW MIRROR ASSEMBLY INNER |
| 12. INSTALL PERSONAL LIGHT ASSEMBLY |
Connect the connector.
Attach the 3 claws and 2 clips, and install the personal light.
Install the 2 screws and 2 covers to the personal light.
| 13. INSTALL FRONT ROOF TOP GARNISH |
Attach the 3 claws and 2 clips, and install the top garnish.
| 14. INSTALL REAR VIEW MIRROR COVER INNER |
| 15. INSTALL ROOF SIDE GARNISH INNER LH |
Attach the 2 claws and 4 clips, and install the garnish.
| 16. INSTALL ROOF SIDE GARNISH INNER RH |
| 17. INSTALL REAR SEAT SIDE GARNISH LH |
 |
Attach the 5 claws and install the garnish.
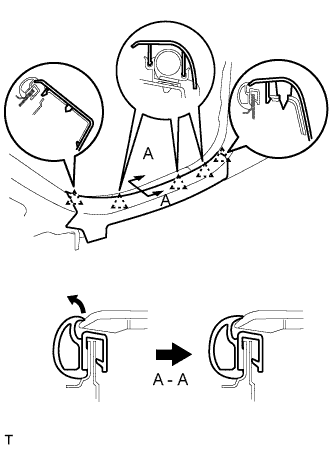
Pull out the folded lip of the weatherstrip.
| 18. INSTALL REAR SEAT SIDE GARNISH RH |
| 19. INSTALL CENTER PILLAR GARNISH LH |
Attach the 2 claws to install the garnish.
Install the 2 screws.
Pull out the folded lip of the weatherstrip.
| 20. INSTALL CENTER PILLAR GARNISH RH |
| 21. INSTALL CENTER PILLAR GARNISH LOWER LH |
Attach the 2 claws and 5 clips to install the garnish.
Pull out the folded lip of the weatherstrip.
| 22. INSTALL CENTER PILLAR GARNISH LOWER RH |
| 23. INSTALL REAR DOOR SCUFF PLATE LH |
 |
Attach the 5 claws to install the scuff plate.
Pull out the folded lip of the weatherstrip.
| 24. INSTALL REAR DOOR SCUFF PLATE RH |
| 25. INSTALL FRONT PILLAR GARNISH LH |
 |
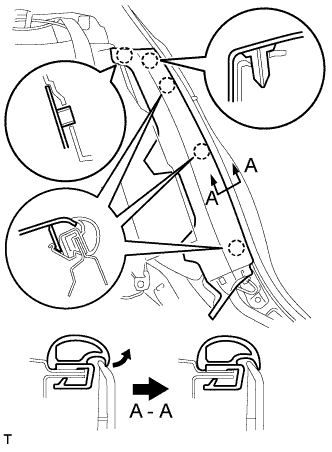
Attach a new clip A to the vehicle body.
Set the pillar garnish to the area labeled B. Using needle-nose pliers, install clip A to the pillar garnish and rotate it 90°.
Install the pillar garnish by attaching the claws and clip.
Pull out the folded lip of the weatherstrip.
| 26. INSTALL FRONT PILLAR GARNISH RH |
| 27. INSTALL FRONT DOOR OPENING TRIM COVER LH |
Attach the 3 claws to install the trim cover.
Pull out the folded lip of the weatherstrip.
| 28. INSTALL FRONT DOOR OPENING TRIM COVER RH |
| 29. INSTALL FRONT DOOR SCUFF PLATE LH |
 |
Attach the 5 claws to install the scuff plate.
Pull out the folded lip of the weatherstrip.
| 30. INSTALL FRONT DOOR SCUFF PLATE RH |
| 31. INSTALL CONSOLE BOX |
Install the console box (Click here).
| 32. INSTALL REAR SEATBACK ASSEMBLY |
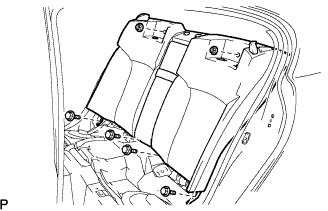 |
Place the seatback in the cabin.
Install the seatback with the 4 bolts and 2 nuts.
Install the 2 rear seat covers.
Pass the 3 seat belts through and close the cap of the 3 rear seat shoulder belt guides.
Install the floor anchor part with the bolt.
| 33. INSTALL REAR SEAT HEADREST ASSEMBLY CENTER |
Install the headrest (Click here).
| 34. INSTALL REAR SEAT HEADREST ASSEMBLY LH |
Install the headrest (Click here).
| 35. INSTALL REAR SEAT HEADREST ASSEMBLY RH |
Install the headrest (Click here).
| 36. INSTALL REAR SEAT CUSHION ASSEMBLY |
 |
Attach the seat cushion's 2 rear hooks to the seatback.
Attach the seat cushion's 2 front hooks to the vehicle body.
Confirm that the seat cushion is firmly installed.
| 37. INSTALL FRONT SEAT ASSEMBLY |
 |
Place the seat in the cabin.
Connect the connectors under the seat.
Connect the cable to the negative (-) battery terminal.
Operate the power seat switch knob and move the seat to the foremost position.
Tighten the 2 bolts on the rear side of the seat.
Operate the power seat switch knob and move the seat to the rearmost position.
Tighten the 2 bolts on the rear side of the seat.
| 38. INSTALL FRONT SEAT OUTER BELT ASSEMBLY |
 |
Move the seat using the power seat switch knob so that the seat belt anchor bolt is revealed.
Install the front seat outer belt anchor with the bolt.
Install the seat belt anchor cover cap.
| 39. INSPECT FRONT POWER SEAT ASSEMBLY |
Inspect the front power seat (Click here).
Inspect the front power seat (w/ seat position memory system) (Click here).
| 40. CONNECT CABLE TO NEGATIVE BATTERY TERMINAL |
| 41. INSPECT FUNCTION OF SEAT BELT |
Inspect the function of seat belt (Click here).
| 42. INSPECT SEAT HEATER |
Inspect the seat heater (Click here).
| 43. PERFORM INITIALIZATION |
Perform initialization (Click here).
