SLIDING ROOF HOUSING > INSTALLATION |
| 1. INSTALL SLIDING ROOF HOUSING ASSEMBLY |
Temporarily install the housing with the 6 bolts (vehicle body side) and 12 nuts.
Tighten the 12 nuts.
Tighten the 4 bolts on the housing side of the stay.
Tighten the 6 bolts.
Connect the 4 drain hoses.
| 2. INSTALL SLIDING ROOF GLASS ASSEMBLY |
Using a T25 "torx" driver, temporarily install the glass with the 4 screws.
Adjust the roof glass position.
Check the clearance between the roof glass and roof panel.
Using a T25 "torx" driver, loosen the 4 screws and adjust the roof glass position.
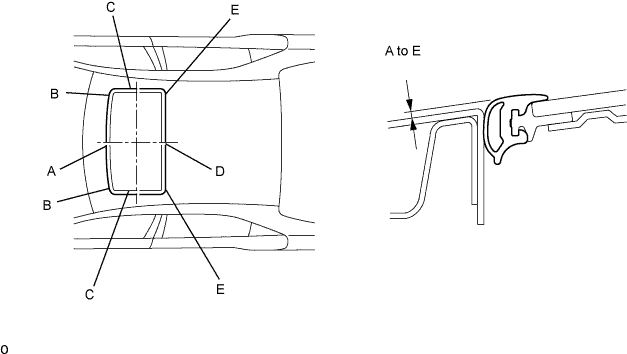
| A | -2.0 to 1.0 mm (-0.078 to 0.039 in.) |
| B | -1.0 to 1.5 mm (-0.039 to 0.059 in.) |
| C | 0 +- 1.5 mm (0 +- 0.059 in.) |
| D | -1.0 to 2.0 mm (-0.039 to 0.078 in.) |
| E | -1.0 to 1.5 mm (-0.039 to 0.059 in.) |
Check the clearance between the roof panel and roof glass.
Tighten the 4 screws.
| 3. INSPECT FITTING OF SLIDING ROOF GLASS ASSEMBLY |
| 4. INSTALL ROOF HEADLINING ASSEMBLY |
Install the roof headlining (Click here).
| 5. CONNECT CABLE TO NEGATIVE BATTERY TERMINAL |
| 6. PERFORM INITIALIZATION |
Perform initialization (Click here).
