FRONT DOOR > REMOVAL |
| 1. DISCONNECT CABLE FROM NEGATIVE BATTERY TERMINAL |
| 2. REMOVE DOOR INSIDE HANDLE BEZEL |
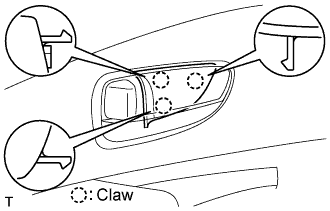 |
Using a screwdriver, detach the 3 claws and remove the bezel plug.
| 3. REMOVE FRONT DOOR TRIM PANEL ASSEMBLY |
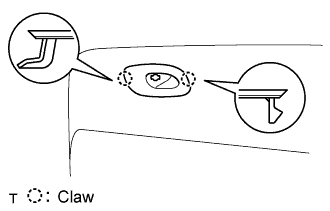 |
Detach the 2 claws and remove the trim lower cover.
Disconnect the connector.
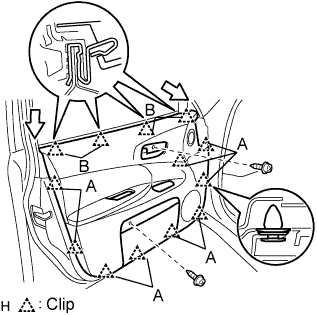 |
Remove the 2 screws.
Detach the 9 clips labeled A, and remove the trim together with the weather strip.
Detach the 4 clips labeled B to separate the weatherstrip and trim.
 |
Disconnect the 2 cables from the inside handle.
| 4. REMOVE FRONT DOOR INSIDE HANDLE SUB-ASSEMBLY |
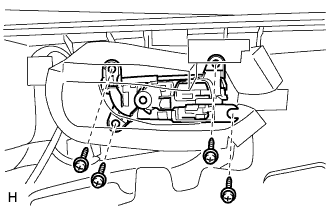 |
Remove the 4 screws and inside handle.
| 5. REMOVE INTERIOR NO. 1 ILLUMINATION LIGHT ASSEMBLY |
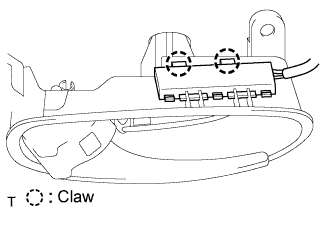 |
Detach the 2 claws, disconnect the connector and then remove the light.
| 6. REMOVE FRONT DOOR COURTESY LIGHT ASSEMBLY |
 |
Detach the 4 claws and remove the lens from the courtesy light.
 |
Detach the 2 claws and remove the courtesy light from the door trim panel.
Disconnect the connector.
| 7. REMOVE SEAT MEMORY SWITCH |
 |
Disconnect the connector.
Remove the 2 screws and switch from the door trim panel.
| 8. REMOVE FRONT DOOR NO. 3 WEATHERSTRIP |
 |
Remove the 4 clips and weatherstrip.
| 9. REMOVE FRONT DOOR TRIM COVER |
 |
Remove the screw.
Using a clip remover, detach the 6 clips and remove the trim cover.
| 10. REMOVE MULTIPLEX NETWORK SWITCH ASSEMBLY |
 |
Disconnect the connector.
Remove the 3 screws and network switch.
| 11. REMOVE DOOR FRAME GARNISH |
 |
Remove the screw.
Using a screwdriver, remove the 2 clips and garnish.
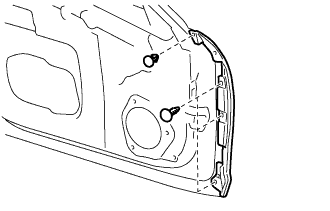
| 12. REMOVE OUTER REAR VIEW MIRROR ASSEMBLY |
 |
Disconnect the connector.
Detach the clip.
Remove the 3 bolts and mirror.
| 13. REMOVE FRONT DOOR GLASS WEATHERSTRIP INNER |
 |
Remove the weatherstrip inner by pulling it upward in the direction indicated by the arrows in the illustration.
| 14. REMOVE MULTIPLEX NETWORK DOOR ECU FRONT |
 |
Remove the 2 screws and ECU.
Disconnect the 3 connectors.
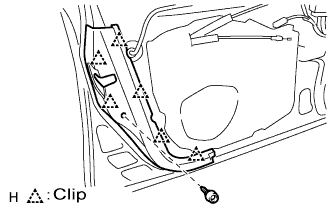
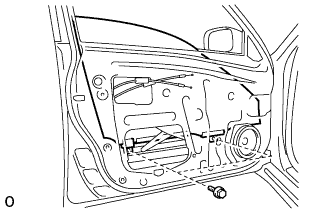
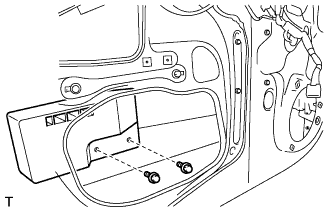
| 15. REMOVE FRONT DOOR SERVICE HOLE COVER |
 |
Remove the 2 bolts and door armrest bracket.
Remove the service hole cover.
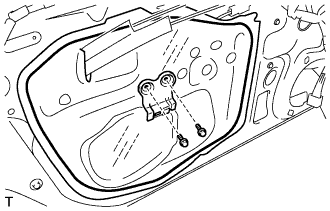
| 16. REMOVE FRONT DOOR GLASS SUB-ASSEMBLY |
 |
Driver's side:
Temporarily install the multiplex network master switch.
Passenger's side:
Temporarily install the multiplex network switch.
Move the door glass until the bolts appear in the service holes.
Remove the 2 bolts.
 |
Remove the door glass in the direction indicated by the arrows in the illustration.
Driver's side:
Remove the multiplex network master switch.
Passenger's side:
Remove the multiplex network switch.
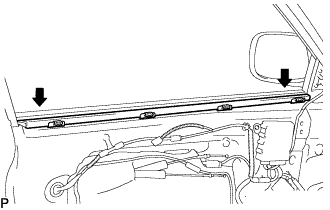
| 17. REMOVE FRONT DOOR BELT MOULDING ASSEMBLY |
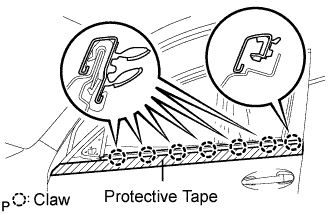 |
Put protective tape under the belt moulding.
Using a moulding remover, detach the 7 claws and remove the belt moulding.
| 18. REMOVE FRONT DOOR WINDOW FRAME MOULDING REAR |
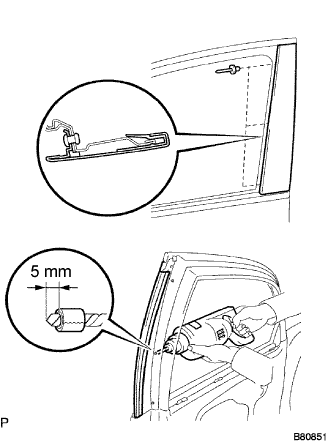 |
Using a drill bit with a diameter of less than 4 mm (0.16 in.), drill out the 3 rivet flanges.
Continue drilling and push out the remaining rivet fragments using the drill.
Using a vacuum cleaner, remove the rivet fragments and shavings from the drilled areas.
Remove the front door window frame moulding rear from the door frame.
| 19. REMOVE FRONT DOOR WINDOW FRAME MOULDING UPPER |
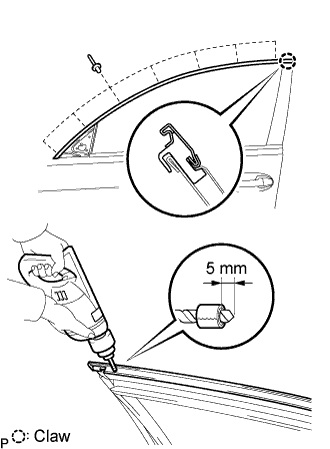 |
Using a drill bit with a diameter of less than 4 mm (0.16 in.), drill out the 7 rivet flanges.
Continue drilling and push out the remaining rivet fragments using the drill.
Using a vacuum cleaner, remove the rivet fragments and shavings from the drilled areas.
Remove the front door window frame moulding from the door frame.
| 20. REMOVE FRONT DOOR WINDOW REGULATOR SUB-ASSEMBLY |
 |
Disconnect the connector.
Remove the 6 bolts and window regulator.
| 21. REMOVE FRONT POWER WINDOW REGULATOR MOTOR ASSEMBLY |
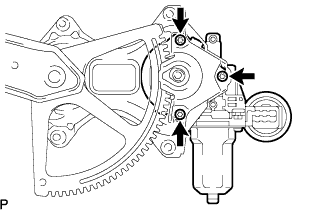 |
Using a T25 "torx" driver, remove the 3 screws and motor.
| 22. REMOVE FRONT DOOR FRONT LOWER FRAME SUB-ASSEMBLY |
 |
Remove the 2 bolts and frame.
| 23. REMOVE FRONT DOOR OUTSIDE HANDLE COVER |
 |
Remove the hole plug.
Using a T30 "torx" socket, loosen the screw and remove the cover with the door lock key cylinder installed.
Remove the cylinder from the cover.
| 24. REMOVE FRONT DOOR HANDLE ASSEMBLY OUTSIDE |
 |
Disconnect the connector.
Remove the handle by sliding and pulling it in the direction indicated by the arrow mark in the illustration.
Remove the outside handle pad front and rear.
| 25. REMOVE FRONT DOOR FRONT OUTSIDE HANDLE PAD |
 |
Detach the 2 claws and remove the pad.
| 26. REMOVE FRONT DOOR REAR OUTSIDE HANDLE PAD |
 |
Detach the 2 claws and remove the pad.
| 27. REMOVE FRONT DOOR WITH MOTOR LOCK ASSEMBLY |
 |
Disconnect the door lock connector.
Using a T30 "torx" socket, remove the 3 screws and door lock.
| 28. REMOVE FRONT DOOR OUTSIDE HANDLE FRAME SUB-ASSEMBLY |
 |
Disconnect the connector.
 |
Using a T30 "torx" socket, loosen the screw.
Slide the outside handle frame to remove it.
Remove the lock open rod from the outside handle frame.
| 29. REMOVE FRONT DOOR NO. 1 STIFFENER CUSHION |
 |
Remove the 2 bolts and cushion.
| 30. REMOVE FRONT DOOR CHECK ASSEMBLY |
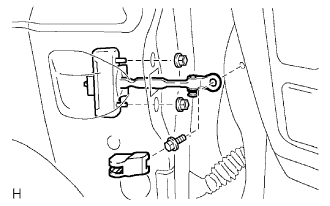 |
Remove the cover.
Remove the bolt, 2 nuts and door check.
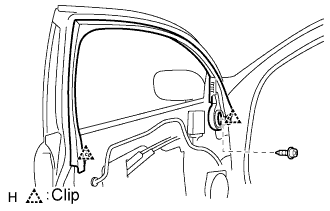
| 31. REMOVE FRONT DOOR WEATHERSTRIP |
Using a clip remover, detach the clips and remove the weatherstrip.
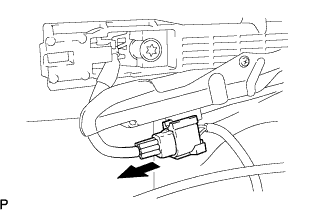
| 32. REMOVE FRONT DOOR WIRE |
 |
Disconnect the wire clips.
Remove the 2 bolts and door wire.
