REAR DOOR > REMOVAL |
| 1. DISCONNECT CABLE FROM NEGATIVE BATTERY TERMINAL |
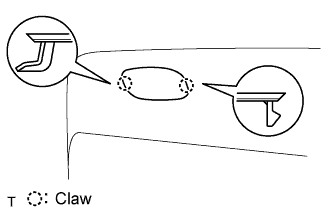
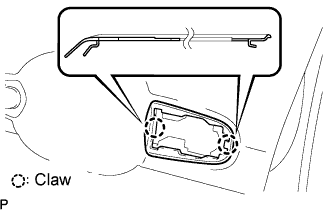
| 2. REMOVE REAR DOOR INSIDE HANDLE BEZEL PLUG |
 |
Using a screwdriver, detach the 3 claws and remove the bezel plug.
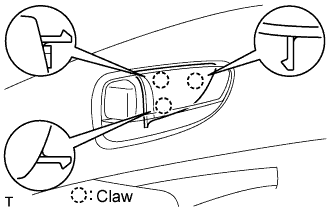
| 3. REMOVE REAR DOOR COURTESY LIGHT ASSEMBLY |
 |
Detach the 4 claws and remove the lens from the courtesy light.
 |
Detach the 2 claws and remove the courtesy light from the door trim panel.
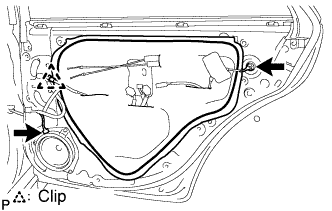
| 4. REMOVE REAR DOOR TRIM PANEL ASSEMBLY |
 |
Detach the 2 claws and trim lower cover.
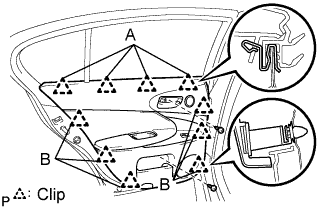 |
Remove the 2 screws.
Detach the 6 clips labeled B, and remove the trim together with the weatherstrip.
Detach the 4 clips labeled A to separate the weatherstrip.
 |
Disconnect the 2 cables from the inside handle.
Disconnect the connectors and remove the trim board.
| 5. REMOVE REAR DOOR INSIDE HANDLE SUB-ASSEMBLY |
 |
Remove the 4 screws and inside handle.
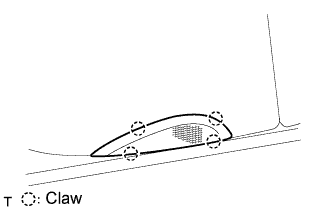
| 6. REMOVE INTERIOR NO. 1 ILLUMINATION LIGHT ASSEMBLY |
 |
Detach the 2 claws, disconnect the connector and then remove the light.
| 7. REMOVE MULTIPLEX NETWORK SWITCH ASSEMBLY |
 |
Disconnect the connector.
Remove the 2 screws and switch.
| 8. REMOVE REAR DOOR TRIM COVER |
 |
Remove the screw.
Using a clip remover, detach the 6 clips and remove the trim cover.
| 9. REMOVE REAR DOOR FRAME GARNISH |
Using a screwdriver, remove the 2 clips and garnish.
| 10. REMOVE REAR DOOR GLASS WEATHERSTRIP INNER |
 |
Remove the weatherstrip inner by pulling it upward.
| 11. REMOVE MULTIPLEX NETWORK DOOR ECU REAR |
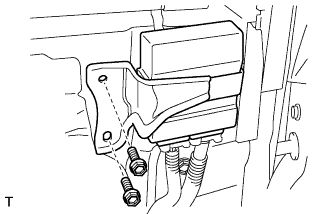 |
Remove the 2 screws and ECU.
Disconnect the connector.
| 12. REMOVE REAR DOOR SERVICE HOLE COVER |
 |
Remove the clip.
Remove the service hole cover.
| 13. REMOVE REAR DOOR WINDOW DIVISION BAR SUB-ASSEMBLY |
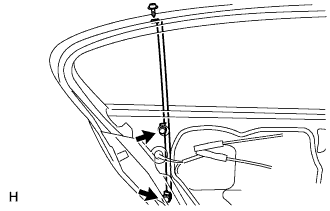 |
Remove the 2 bolts, screw and division bar.
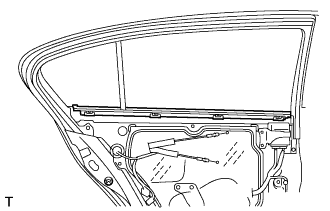
| 14. REMOVE REAR DOOR QUARTER WINDOW GLASS |
 |
Remove the quarter glass together with the quarter window glass weatherstrip in the direction indicated by the arrow in the illustration.
Remove the quarter window glass weatherstrip.
| 15. REMOVE REAR DOOR GLASS RUN |
| 16. REMOVE REAR DOOR GLASS SUB-ASSEMBLY |
Carefully pull the glass upward and out of the panel.
| 17. REMOVE REAR DOOR BELT MOULDING ASSEMBLY |
Put protective tape under the belt moulding.
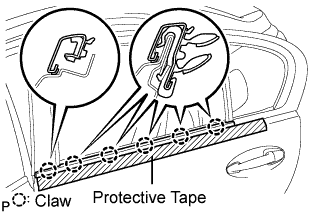 |
Using a moulding remover, detach the 6 claws and remove the belt moulding.
| 18. REMOVE REAR DOOR WINDOW FRAME MOULDING FRONT |
 |
Using a drill bit with a diameter of less than 4 mm (0.16 in.), drill out the 3 rivet flanges.
Continue drilling and push out the remaining rivet fragments using the drill.
Using a vacuum cleaner, remove the rivet fragments and shavings from the drilled areas.
Remove the rear door window frame moulding front from the door frame.
| 19. REMOVE REAR DOOR WINDOW FRAME MOULDING SUB-ASSEMBLY |
|
Using a drill bit with a diameter of less than 4 mm (0.16 in.), drill out the 3 rivet flanges.
Continue drilling and push out the remaining rivet fragments using the drill.
Using a vacuum cleaner, remove the rivet fragments and shavings from the drilled areas.
Remove the rear door window frame moulding front from the door frame.
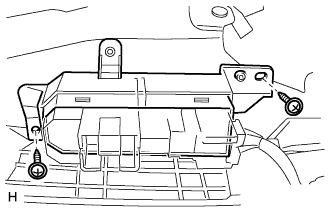
| 20. REMOVE REAR DOOR WINDOW REGULATOR SUB-ASSEMBLY |
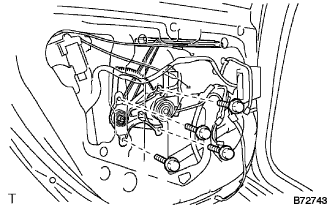 |
Disconnect the connector.
Remove the 4 bolts and regulator.
| 21. REMOVE REAR DOOR WINDOW REGULATOR MOTOR SUB-ASSEMBLY |
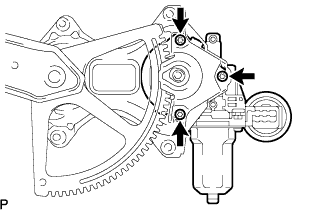 |
Using a T25 ''torx'' driver, remove the 3 screws and motor.
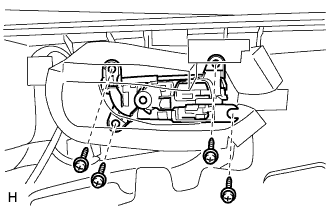
| 22. REMOVE REAR DOOR WITH MOTOR LOCK ASSEMBLY |
 |
Disconnect the connector.
Using a T30 ''torx'' socket, remove the 3 screws and door lock.
| 23. REMOVE REAR DOOR OUTSIDE HANDLE PAD FRONT |
 |
Detach the 2 claws and remove the pad.
| 24. REMOVE REAR DOOR OUTSIDE HANDLE PAD REAR |
 |
Detach the 2 claws and remove the pad.
| 25. REMOVE REAR DOOR OUTSIDE HANDLE COVER |
 |
Using a T30 ''torx'' socket, loosen the screw and remove the outside handle cover.
| 26. REMOVE REAR DOOR OUTSIDE HANDLE ASSEMBLY |
 |
Remove the handle by sliding and pulling it in the direction indicated by the arrow in the illustration.
| 27. REMOVE REAR DOOR OUTSIDE HANDLE FRAME SUB-ASSEMBLY |
 |
Using a T30 ''torx'' socket, loosen the screw.
Slide the outside handle frame in the direction indicated by the arrow in the illustration, and remove it.
Remove the lock open rod from the outside handle frame.
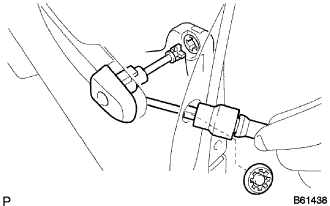
| 28. REMOVE REAR DOOR CHECK ASSEMBLY |
 |
Remove the cover.
Remove the bolt, 2 nuts and door check.
| 29. REMOVE REAR DOOR WIRE |
 |
Disconnect the wire clips.
Remove the 2 bolts and door wire.
| 30. REMOVE REAR DOOR WEATHERSTRIP |
Using a clip remover, detach the clips and remove the weatherstrip.
| 31. REMOVE REAR DOOR NO. 3 WEATHERSTRIP |
Remove the clip and weatherstrip.
