REASSEMBLY
Removal / installation
- NOTICE:
- When installing, coat the parts indicated by arrows with lithium soap base glycol grease (Click here).
| 1. INSTALL STEERING RACK END SUB-ASSEMBLY |

Install 2 new claw washers.
- HINT:
- Align the claws of the claw washer with the steering rack grooves.
Using 2 SST, install the steering rack end sub-assembly (RH side).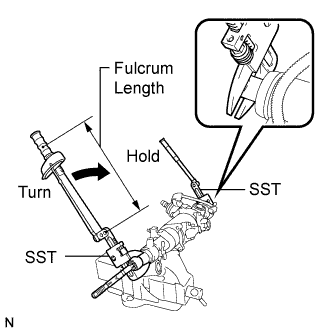

- SST
- 09922-10010
- Torque:
- 76 N*m{ 775 kgf*cm , 56 ft.*lbf }
- NOTICE:
- Use SST 09922-10010 following the direction shown in the illustration.
- Use a torque wrench with a fulcrum length of 345 mm (13.58 in.).
- Use SST 09922-10010 following the direction shown in the illustration.
- HINT:
- Using SST, hold the steering rack and install the steering rack end sub-assembly.
Using 2 SST, install the steering rack end sub-assembly (LH side).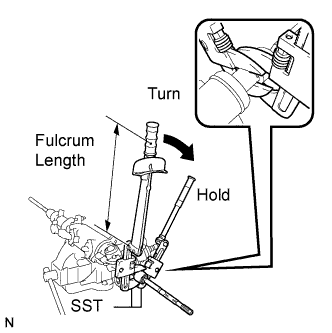
- SST
- 09922-10010
- Torque:
- 76 N*m{ 775 kgf*cm , 56 ft.*lbf }
- NOTICE:
- Use SST 09922-10010 following the direction shown in the illustration.
- Use a torque wrench with a fulcrum length of 345 mm (13.58 in.).
- Use SST 09922-10010 following the direction shown in the illustration.
- HINT:
- Using SST, hold the steering rack and install the steering rack end sub-assembly.
Using a brass bar and a hammer, stake the 2 claw washers.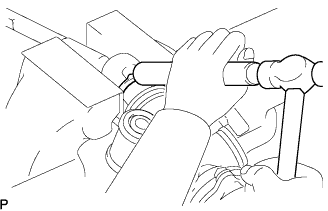
- NOTICE:
- Avoid any impact to the steering rack.
| 2. INSTALL NO. 1 STEERING RACK BOOT |
Apply lithium soap base glycol grease to the inside of the small opening of the No.1 steering rack boot (LH side).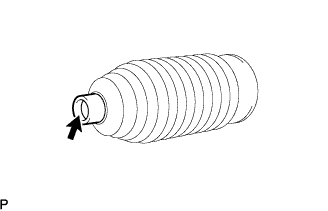
Temporarily install a new No. 1 steering rack boot clamp to the large opening of the No. 1 steering rack boot (LH side) at the position shown by arrow (A).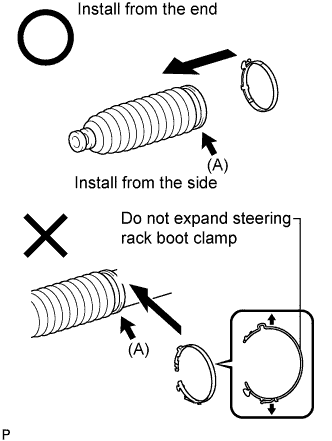
- NOTICE:
- Use a new No. 1 steering rack boot clamp.
- Do not expand the No. 1 steering rack boot clamp more than necessary for installation.
- Do not deform the No. 1 steering rack boot clamp.
- Tightening force of the No. 1 steering rack boot clamp becomes uneven if it is installed after being expanded as shown in the illustration. As a result, rust is caused by water entering from the clearance between the No. 1 steering rack boot and rack housing, causing a malfunction.
- Use only the supply parts which are applicable to the vehicle to secure the No. 1 steering rack boot.
- Use a new No. 1 steering rack boot clamp.
- HINT:
- After disengaging the claw of a new No. 1 steering rack boot clamp, temporarily install it from the end without expanding the clamp diameter more than necessary.
Install the No. 1 rack boot (LH side) to the groove on the rack housing.
- NOTICE:
- Be careful not to damage or twist the No. 1 steering rack boot.
- Do not damage the No. 1 steering rack boot (LH side).
- Ensure that the No. 1 steering rack boot clamp is installed before installing the No. 1 steering rack boot (LH side) to the rack housing.
- Be careful not to damage or twist the No. 1 steering rack boot.
Install the RH side by using the same procedure as for the LH side.
| 3. INSTALL NO. 1 STEERING RACK BOOT CLAMP |
Using pliers and a screwdriver, install the No. 1 steering rack boot clamp (LH side).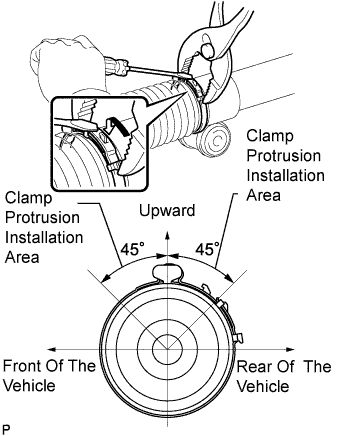
- NOTICE:
- Be careful not to damage the steering rack boot.
- Do not twist the steering rack boot.
- Be careful not to damage the steering rack boot.
- HINT:
- Make sure that the protrusion of the steering rack boot clamp is positioned within the area shown in the illustration.
Install the RH side by using the same procedure as for the LH side.
| 4. INSTALL STEERING RACK BOOT CLIP |
Using pliers, install the 2 steering rack boot clips.
Using SST, turn the pinion and check that the rack boots expand and contract smoothly.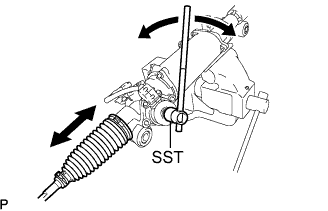
- SST
- 09616-00011
| 5. INSTALL TIE ROD END LH |
Install the lock nut and the tie rod end LH to the rack end until the matchmarks are aligned.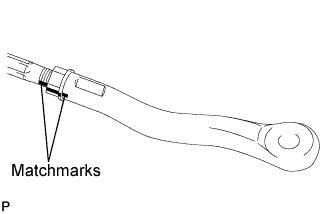
- HINT:
- After adjusting toe-in, torque the lock nut.
| 6. INSTALL TIE ROD END RH |
- HINT:
- Perform the same procedure as for the LH side.