CUSTOMIZE PARAMETERS
Troubleshooting
- HINT:
- The following items can be customized.
- NOTICE:
- When the customer requests a change in a function, first make sure that the function can be customized.
- Be sure to make a note of the current settings before customizing.
- When troubleshooting a function, first make sure that the function is set to the default setting.
- When the customer requests a change in a function, first make sure that the function can be customized.
| POWER TILT AND POWER TELESCOPIC STEERING COLUMN SYSTEM |
- HINT:
- The following can be customized.
- NOTICE:
- Be sure to record the current value before customizing.
- When troubleshooting, be careful, as customizing could turn off the function. (Example: If the wireless operation does not function, check that it has not been turned off by customizing.)
- Be sure to record the current value before customizing.
| DISPLAY |
DEFAULT |
CONTENTS |
SETTING |
| AUTO TILT AWAY |
ON |
ON / OFF of the auto away / return function |
ON / OFF |
| THEFT DETERRENT SYSTEM (w/ Intrusion Sensor) |
- HINT:
- The following items can be customized.
- NOTICE:
- After confirming whether the items requested by the customer are applicable or not for customization, perform customizing operations.
- Be sure to record the current settings before customization.
- When troubleshooting, make sure that the item in question is not set to "OFF" as a result of customization (Example: For the system, "the wireless function does not operate", first check that the wireless function is not set to "OFF", then perform troubleshooting).
- After confirming whether the items requested by the customer are applicable or not for customization, perform customizing operations.
| DISPLAY (ITEM) |
DEFAULT |
CONTENTS |
SETTING |
| Warn by Horn*1
(Warning by horn) |
ON |
Function that makes vehicle horn and theft deterrent horn be able to be used as a warning device |
ON/OFF |
| Warn by Self Power Siren*2
|
ON |
Function to turn ON/OFF of the self power siren |
ON/OFF |
- HINT:
- *1: Australia, New Zealand
- *2: Europe
- *1: Australia, New Zealand
| THEFT DETERRENT SYSTEM (w/o Intrusion Sensor) |
- HINT:
- The following items can be customized.
- NOTICE:
- After confirming whether the items requested by the customer are applicable or not for customization, perform customizing operations.
- Be sure to record the current settings before customization.
- When troubleshooting, make sure that the item in question is not set to "OFF" as a result of customization (Example: For the system, "the wireless function does not operate", first check that the wireless function is not set to "OFF", then perform troubleshooting).
- After confirming whether the items requested by the customer are applicable or not for customization, perform customizing operations.
| DISPLAY (ITEM) |
DEFAULT |
CONTENTS |
SETTING |
| Warn by Horn (Warning by horn) |
ON |
Function that makes vehicle horn and theft deterrent horn be able to be used as a warning device |
ON/OFF |
| LIGHTING SYSTEM |
- HINT:
- The followings are the possible items to be customized.
- NOTICE:
- After confirming whether the items of the customer's request is applicable or not for the customized items, perform the customize operation.
- Be sure to record the current value before customizing.
- In case of performing the troubleshooting, pay attention as there is a possibility that the function is OFF by customizing. (Example: In case of the symptom in which "The wireless operation does not function", check that the wireless operation is not OFF by customizing, then perform the troubleshooting.)
- After confirming whether the items of the customer's request is applicable or not for the customized items, perform the customize operation.
| Display |
Default |
Contents |
Setting |
| Shift Light Control |
AVAIL |
Lights up the shift illumination when the engine switch is turned on (ACC or IG). |
NOT AVL / AVAIL |
| Lighting Time |
15 s |
Changes the lighting time of the seat illumination. |
7.5 s / 15 s / 30 s |
| Illumination System |
ON |
Lights up the footwell lights when one of the following occurs: the engine switch is turned on (IG), or any door is unlocked or opened. |
ON / OFF |
| Light Control |
ON |
Dims (ON setting) or turns off (OFF setting) the footwell lights under the following conditions: A/T models: engine switch on (IG), shift lever not in P, and all doors closed. M/T models: engine switch on (IG), parking lever released, and all doors closed, or engine switch on (IG), vehicle speed above 5 km/h (3 mph), and all doors closed. |
ON / OFF |
| I/L ON W/Unlock |
AVAIL |
Lights up the seat illumination when the doors are unlocked with the transmitter. |
NOT AVL / AVAIL |
| I/L when ACC OFF |
AVAIL |
Lights up the seat illumination when the engine switch is turned off. |
NOT AVL / AVAIL |
| Exterior Foot Light Control |
AVAIL |
Lights up the door mirror foot lights when either of the following occurs: the doors are unlocked with the transmitter, or the key enters any actuation area around the doors. |
NOT AVL / AVAIL |
| Exterior Foot Light Lighting Time |
15 s |
Changes the lighting time of the door mirror foot lights. |
15 s / 7.5 s / 30 s |
| Display |
Default |
Contents |
Setting |
| Sensitivity |
NORMAL |
Adjusts the sensitivity of the automatic light control system. *1 |
LIGHT2 / LIGHT1 / NORMAL / DARK1 / DARK2 |
| Response time |
0.15 s |
Changes the delay timing of illuminating the taillights when entering the tunnel with the light control switch in the AUTO position. |
1.0 s / 0.15 s |
| Disp Ex ON Sen |
NORMAL |
Changes the ambient brightness level to dim the lights such as the indicator lights of the combination meter, A/C indicator light, and clock. *1 |
LIGHT2 / LIGHT1 / NORMAL / DARK1 / DARK2 |
| Disp Ex OFF Sen |
NORMAL |
Changes the ambient brightness level to brighten the dimmed lights such as the indicator lights of the combination meter, A/C indicator light, and clock. *1 |
LIGHT2 / LIGHT1 / NORMAL / DARK1 / DARK2 |
- HINT:
- Sensitivity adjustment can hardly be confirmed. Check by driving the customer's vehicle.
| Ambient Brightness Level |
  |
||||
| Setting |
DARK2 |
DARK1 |
NORMAL |
LIGHT1 |
LIGHT2 |
| WIPER AND WASHER SYSTEM |
- HINT:
- The following items can be customized.
- NOTICE:
- When the customer requests a change in a function, first make sure that the function can be customized.
- Be sure to make a note of the current settings before customizing.
- When troubleshooting a function, first make sure that the function is set to the default setting.
Body No. 3 (Main Body ECU LH): Display (Item)
Default
Contents
Setting
AUTO WIPER (Auto wiper)
AVAIL
Function to operate the wiper automatically when it is raining
NOT AVAIL / AVAIL
REWPER CONTROL (Rewiper control)
SPD MOD
Function to change the time between end of wiper motor operation and start of wiper operation to prevent streaking from washer fluid
OFF / 3 s / SPD MOD
SPEED MODE (Speed mode)
AVAIL
Function to change to the intermittent operation when the vehicle comes to a stop from driving condition with the wiper switch in the LO position
NOT AVAIL / AVAIL
- When the customer requests a change in a function, first make sure that the function can be customized.
| POWER DOOR LOCK CONTROL SYSTEM |
- HINT:
- The following items can be customized.
- NOTICE:
- Before attempting to customize vehicle settings, confirm whether it is possible to mark the change that the customer has requested.
- Be sure to record the current settings before customizing.
- When troubleshooting, make sure that the item in question has not been disabled using the customize function.
- Before attempting to customize vehicle settings, confirm whether it is possible to mark the change that the customer has requested.
| Display (Item) |
Default |
Contents |
Setting |
| Auto Lock Time |
30s |
Function that selects AUTO LOCK time 30 sec. or 60 sec. |
30s/60s |
| Auto Lock |
OFF (cannot be change) |
Function that locks doors when vehicle speed reaches 20 km/h (13 mph) |
OFF |
| Unlock Key Twice (Unlock w/ 2 times D key operation) |
for Europe: OFF for Australia: ON |
|
ON/OFF (*1) |
| All Unlock / Open-Close (All unlock w/ D door open-close) |
OFF (cannot be change) |
Function that unlocks all other doors when opening driver side door within 10 seconds after turning the engine switch off from on (IG) |
OFF |
| Unlock / Park (Unlock w/ engine switch on (IG), shift P, speed 0 km/h (0 mph)) |
OFF (cannot be change) |
Function that unlocks doors when the shift lever is moved to the P position from any other position while the engine switch is on (IG) |
OFF |
| Auto Lock / Shift (Auto lock/shift not P) |
OFF (cannot be change) |
Function that locks doors when the shift lever is moved from the P position to any other position |
OFF |
| *1: Customizing function is set only for Australia. | |||
| WIRELESS DOOR LOCK CONTROL SYSTEM |
- HINT:
- The following items can be customized.
- NOTICE:
- After confirming whether the items requested by the customer are applicable or not for customization, perform customizing operations.
- Be sure to record the current settings before customization.
- When troubleshooting, make sure that the item in question is not set to "OFF" as a result of customization (Example: For the system, "the wireless function does not operate", first check that the wireless function is not set to "OFF", then perform troubleshooting).
- After confirming whether the items requested by the customer are applicable or not for customization, perform customizing operations.
| Item (Display) |
Default |
Contents |
Setting |
| Wireless Control (Wireless door lock control function) |
ON |
This function turns the wireless door lock function on or off. |
ON / OFF |
| Hazard Answer Back (Hazard answer-back for wireless door lock operation) |
ON |
When LOCK is pressed, all hazard warning lights flash once. When UNLOCK is pressed, all hazard warning lights flash twice. |
ON / OFF |
| Open Door Warning |
ON |
If a door is not completely closed and LOCK is pressed, this function sounds a buzzer for 10 seconds. |
ON / OFF |
| Auto Lock Time |
30 s |
This function controls the amount of time from unlocking doors to automatic re-locking. |
30 s / 60 s |
| Trunk Lid Operation (Wireless luggage compartment door open function setting) |
0.8 s PR |
This function changes operation method of transmitter to open luggage compartment door. 1 TIME: Push 1 time (within 3 sec.) 2 TIMES: Push 2 times 0.8 s PR: Push longer than 0.8 seconds OFF: Does not operate |
1 TIME / 2 TIMES / 0.8 s PR / OFF |
| Unlock 2 Operation (Wireless unlock operated twice) |
ON (Australia, New Zealand) OFF (Europe) |
This function unlocks the driver side door when UNLOCK is pressed once, and unlocks all doors when pressed twice. If set to OFF, pressing UNLOCK once unlocks all doors. |
ON / OFF |
| Panic Function* |
ON |
This function operates the theft deterrent system when PANIC is pressed and held for 0.8 seconds. |
ON / OFF |
| Wireless Buzzer Resp* (Buzzer answer-back of Wireless) |
ON |
This function makes the wireless door lock buzzer sound for answer-back when LOCK/UNLOCK is pressed. |
ON / OFF |
- HINT:
- *: Australia, New Zealand
| CUSTOMIZING FUNCTION WITH INTELLIGENT TESTER |
- HINT:
- The items in the table below can be customized.
- NOTICE:
- When the customer requests a change in a function, first make sure that the function can be customized.
- Be sure to make a note of the current setting before customizing.
- When troubleshooting a function, first make sure that the function is set to the default setting.
- When the customer requests a change in a function, first make sure that the function can be customized.
- HINT:
- The following function's default setting is ON. Part of these functions can be customized.
| Display (Item) |
Default |
Contents |
Setting |
| Park Wait Time (Waiting time to permit opening door after locking) |
3.0s |
Function that sets waiting time to permit opening door after door is locked with entry lock function |
1.0s / 2.0s / 3.0s / 5.5s |
| Trunk Open Mode (Luggage compartment door open mode when vehicle is locked) |
ON |
Function to permit opening luggage compartment door |
ON / OFF |
| Key Lo-Batt Wrn (Warn when electrical key battery becomes weak) |
ON |
Function that warns driver that electrical key's battery power is low (Buzzer in the combination meter, multi-information display) |
ON / OFF |
| Door Unlock Mode (Entry door unlock mode) |
D-DOOR |
Function that makes entry unlock operation available |
All / D-DOOR |
| Ignition Area |
ALL |
Function that switches the entry ignition detection area |
FRONT / ALL |
| Warning3 |
ON |
Function that switches the warning for carrying the electrical key out of the vehicle when the engine switch is on (IG) |
ON / OFF |
| Entry Unlock Mode Switching Function |
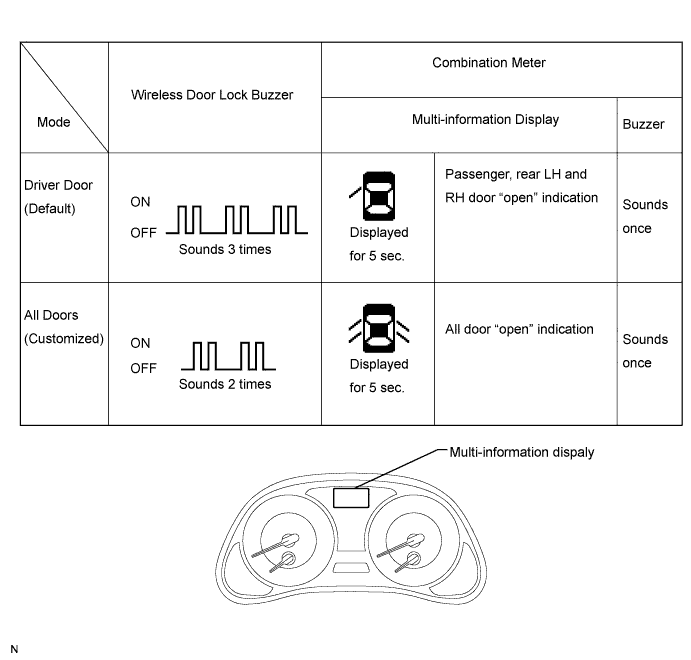
To change the vehicle to entry unlock mode switching function, make sure the vehicle power is off and simultaneously press and hold the electrical key's LOCK switch and another electrical key switch for 5 seconds.
- Driver door unlock default setting
When the switches are pressed and held for 5 seconds, the entry door unlock mode changes in the following order: driver door mode, one door mode, doors on one side mode, all door mode.
- NOTICE:
- After pressing and holding the switches for 5 seconds, wait 5 seconds before performing the same procedure again.
- Driver door unlock mode:
When the driver door's touch sensor is touched, only the driver door unlocks. When another touch sensor is touched, all doors unlock.
- All door unlock mode:
When the touch sensor is touched, all doors unlock.
- Driver door unlock default setting
The certification ECU receives this signal from the entry door control receiver and changes the smart access system with push-button start to the entry unlock mode.
The certification ECU sounds the buzzers of the wireless door lock buzzer and combination meter to inform the user that the mode has been switched.
- HINT:
- The function only changes the entry unlock mode of the entry and start system. It does not switch the unlocking of the wireless door lock control.
| Electrical Key Cancel |
- Entry Ignition
- Entry Unlock / Lock
- Entry Luggage Compartment Open
- Electrical key Lock-in Prevention
- Warning
- Memory Call
The operation procedures are as follows:
Precondition:
Engine switch off, driver side door closed and unlocked.Unlock the driver side door once with the UNLOCK switch of the electrical key.
Open the driver door within 5 seconds.
Unlock the driver side door twice with the UNLOCK switch of the electrical key within 5 seconds.
Repeat open → close twice for the driver door within 30 seconds, and open again.
(Driver door: Open → Close → Open → Close → Open)Unlock the driver side door twice with the UNLOCK switch of the electrical key within 5 seconds.
Repeat open → close once for the driver door within 30 seconds, and open again.
(Driver door: Open → Close → Open)Close the driver door within 5 seconds.
When electrical key cancel is activated, the wireless door lock buzzer sounds once.
To return to the original condition, perform the procedures again. When the original condition is returned, the wireless door lock buzzer sounds twice.
| Combination Meter Assembly |
*2: for LHD
- NOTICE:
- Be sure to record the current value before customizing.
- Be sure to record the current value before customizing.
- HINT:
- The following items can be customized using intelligent tester.
| Display (Item) |
Default |
Contents |
Setting |
| Key Remained Volume |
Large |
Function to change the volume of the key remind warning buzzer |
Large, Medium, Small |
| Key Remained Sound |
Normal |
Function to change the cycle of the key remind warning buzzer |
Fast, Normal, Slow |
| Units by Region |
ML/G (*1) KM/L (*2) |
Function to change the unit of the trip information display |
ML/G, ML/G, KM/L |
- HINT:
- The following items can be customized without using intelligent tester.
| Item |
Default |
Contents |
Setting |
| Seat belt warning buzzer (See procedure "A") |
b-on |
Function to change volume of key remind warning buzzer |
b-on, b-oFF |
| Speed indicator (See procedure "B") |
75 (mph) (*1) 120 (km/h) (*2) |
Function to change the value that decides the speed indicator when to illuminate |
30 to 100 (mph) (*1), 50 to 160 (km/h) (*2) |
| Tach indicator (See procedure "B") |
5,000 (rpm) |
Function to change the value that decides the tach indicator when to illuminate |
2,000 to 6,500 (rpm) |
| Seat Belt Buzzer ON/OFF setting (Procedure "A") |
- NOTICE:
- These buzzers should be on for safe driving. Perform these procedures only if it is necessary to set the buzzer off (disabled).
- These buzzers should be on for safe driving. Perform these procedures only if it is necessary to set the buzzer off (disabled).
- When either the battery cable or the combination meter connector is disconnected, these buzzers are set on (enabled).
- Odometer returns to 0 after starting this procedure, although it is not displayed.
- When either the battery cable or the combination meter connector is disconnected, these buzzers are set on (enabled).
- HINT:
- "b-oFF" indicates that the seat belt buzzer is OFF. "b-on" indicates that the buzzer is ON. The buzzer ON/OFF setting will be finished (the odometer will display "ODO") if the ODO/TRIP switch is not operated for 10 seconds or more. In this case, perform step 11 to check that the buzzer ON/OFF setting is complete. If it is not complete, start from step 1 again.
Driver and front passenger side seat belt buzzers
Engine switch on (IG).
Press the ODO/TRIP switch until the odometer displays "ODO".
Engine switch off.
Engine switch on (IG).
Press the ODO/TRIP switch immediately (within 6 seconds) and hold it down for 10 seconds or more.
Continue holding down the ODO/TRIP switch and fasten the driver side seat belt.
Check that the odometer displays either "b-on" or "b-oFF".
Press the ODO/TRIP switch to change the display to "b-oFF".
Engine switch off.
Engine switch on (IG).
Check that no buzzer sounds.
Front passenger side seat belt buzzer
Engine switch on (IG).
Press the ODO/TRIP switch until the odometer displays "ODO".
Engine switch off.
Engine switch on (IG).
Sit in the front passenger seat. Press the ODO/TRIP switch immediately (within 6 seconds) and hold it down for 10 seconds or more.
Sit in the front passenger seat. Continue holding down the ODO/TRIP switch and fasten the front passenger side seat belt.
Check that the odometer displays either "b-on" or "b-oFF".
Press the ODO/TRIP switch to change the display to "b-oFF".
Engine switch off.
Engine switch on (IG).
Check that no buzzer sounds.
| SPEED AND TACH INDICATOR (Procedure "B") |
Select the SPEED INDICATOR or TACH INDICATOR using the satellite switch (RH, ON/OFF, or LH switch).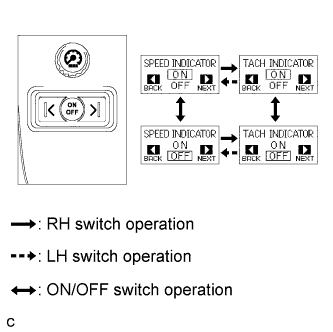
Turn the SPEED INDICATOR or TACH INDICATOR function off by using the ON/OFF switch.
Turn the SPEED INDICATOR or TACH INDICATOR function on again by using the ON/OFF switch.
Leave the display on for 1 second to allow it to change to the SET display.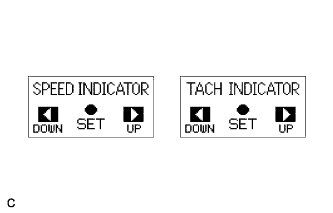
When SET flashes, the speedometer needle moves to indicate the previously set vehicle speed and then stops.
Push the LH or RH switch within 6 seconds of the speedometer needle moving in order to allow setting of the speedometer indicator set point.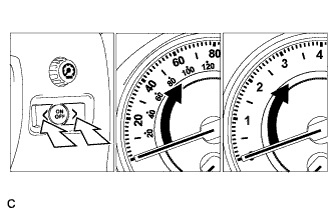
- The speedometer needle moves by 1 degree each time the LH or RH switch is pushed.
- Pushing and holding the switch changes values at a faster rate.
- The speedometer needle moves by 1 degree each time the LH or RH switch is pushed.
When the ON/OFF switch is pushed, the speedometer or tachometer needle stays at the setting value for 1 second, the buzzer sounds once, and the SPEED indicator illuminates only momentarily one time in yellow.
| CUSTOMIZE PARAMETERS (INTELLIGENT TESTER) |
The following items can be customized:
- NOTICE:
- When the customer requests a change in a function, first make sure that the function can be customized.
- Be sure to make a note of the current settings before customizing.
- When troubleshooting a function, first make sure that the function is set to the default setting.
- When the customer requests a change in a function, first make sure that the function can be customized.
| DISPLAY (ITEM) |
DEFAULT |
CONTENTS |
SETTING |
| Rear buzzer onset range |
Wide |
Function to set rear buzzer activation range /Narrow or Wide |
Narrow: 600 mm (23.62 in.) Wide: 1,500 mm (59.06 in.) |
| Keep sense status buzzer |
ON |
Function to make buzzer sound when distance between vehicle and obstacle does not change for more than 3 seconds |
ON / OFF |
| Front & rear buzzer volume |
M2 |
Function to change volume of buzzer /L, M1, M2, M3 or H |
L: Low volume M1: Medium low volume M2: Medium volume M3: Medium high volume H: high volume |
| DISPLAY (ITEM) |
DEFAULT |
CONTENTS |
SETTING |
| Non P/R range sensor |
F |
Function to set available sensors when shift position is not in P or R / F, Rcrn2 or F |
F, Rcrn2: Corner sensors are available F: Front sensors are available |
| REAR SUNSHADE SYSTEM |
- HINT:
- The following items can be customized.
- NOTICE:
- When the customer requests a change in a function, first make sure that the function can be customized.
- Be sure to make a note of the current settings before customizing.
- When troubleshooting a function, first make sure that the function is set to the default setting.
Rear sunshade system System
Default
Contents
Selection
Rear Sunshade Reverse Control
AVAIL
NOT AVL/AVAIL of the rear sunshade reverse function.
NOT AVL / AVAIL
Reverse Output Time
0.7 sec.
Function to change the time until operating the function linked shift R
0 / 0.7 / 0.9 / 1.2
- When the customer requests a change in a function, first make sure that the function can be customized.
| SLIDING ROOF SYSTEM |
- CUSTOMIZING FUNCTION WITH INTELLIGENT TESTER (REFERENCE)
- HINT:
- The following items can be customized.
- NOTICE:
- When the customer requests a change in a function, first make sure that the function can be customized.
- Be sure to make a note of the current settings before customizing.
- When troubleshooting a function, first make sure that the function is set to the default setting.
- When the customer requests a change in a function, first make sure that the function can be customized.
| Display (Item) |
Default |
Contents |
Setting |
| OPEN/DOOR KEY (Door key related OPEN) |
ON |
Function to manually open sliding roof linked with power window if holding driver side door key for 2.5 seconds or more to unlock position when engine switch is off |
ON/OFF |
| CLOSE/DOOR KEY (Door key related CLOSE) |
ON |
Function to manually close sliding roof linked with power window if holding driver side door key for 2.5 seconds or more to lock position when engine switch is off |
ON/OFF |
| OPEN/WIRELESS (Wireless key related OPEN) |
ON |
Function to manually open sliding roof linked with power window if pressing transmitter UNLOCK switch for 3.4 seconds or more when engine switch is off |
ON/OFF |
| CLOSE/WIRELESS (Wireless key related CLOSE) |
ON |
Function to close the sliding roof manually liking with the power window if pressing on the transmitter lock button for 3.4 seconds or more when the ignition switch is OFF. |
ON/OFF |
| DOOR KEY OPER (Door key related operation) |
SLIDE |
Function to select tilt up or slide open of manual sliding roof operation linked with power window Activate by holding driver side door key for 2.5 seconds or more to unlock position when engine switch is off |
TILT/SLIDE |
| WIRELESS OPER (Wireless key related operation) |
SLIDE |
Function to select tilt up or slide open of manual sliding roof operation linked with power window Activate by pressing on transmitter UNLOCK switch for 3.4 seconds or more when engine switch is off |
TILT/SLIDE |