ТОПЛИВНЫЙ БАК > СНЯТИЕ

для подготовки Нажмите здесь


1. PRECAUTION

ПРЕДОСТЕРЕЖЕНИЕ:
  1. Do not smoke or be near an open flame when working on the fuel system.
  2. Keep gasoline away from rubber or leather parts.
  3. Do not allow fuel to spray when removing the pipe between the high pressure side fuel pump and the fuel injector. The fuel in the pipe is highly pressurized.


2. DISCHARGE FUEL SYSTEM PRESSURE
  1. Discharge fuel system pressure (see page Нажмите здесь).


3. REMOVE COWL TOP VENTILATOR LOUVER RH


E139771
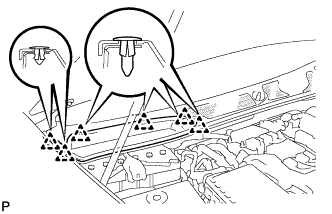
  1. Remove the 6 clips and cowl top ventilator louver RH.


4. DISCONNECT CABLE FROM NEGATIVE BATTERY TERMINAL

ПРЕДОСТЕРЕЖЕНИЕ:
Wait at least 90 seconds after disconnecting the cable from the negative (-) battery terminal to prevent airbag and seat belt pretensioner activation.


5. REMOVE REAR SEAT ASSEMBLY (for Power Seat)
  1. Remove the rear seat assembly (see page Нажмите здесь).


6. REMOVE REAR SEAT ASSEMBLY (for Ottoman)
  1. Remove the rear seat assembly (see page Нажмите здесь).


7. REMOVE REAR SEAT CUSHION ASSEMBLY (for Fixed Type)
  1. Remove the rear seat cushion assembly (see page Нажмите здесь).


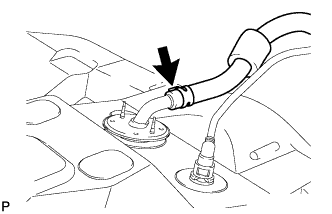
8. REMOVE REAR FLOOR NO. 2 SERVICE HOLE COVER


    A149222
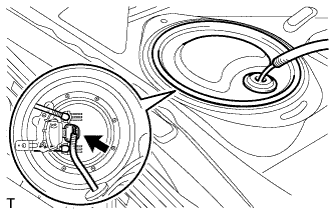
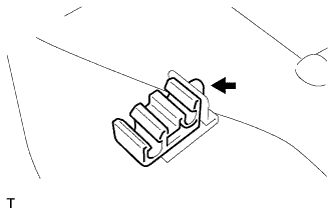
  1. Remove the service hole cover and disconnect the connector from the fuel suction with pump and gauge tube assembly.


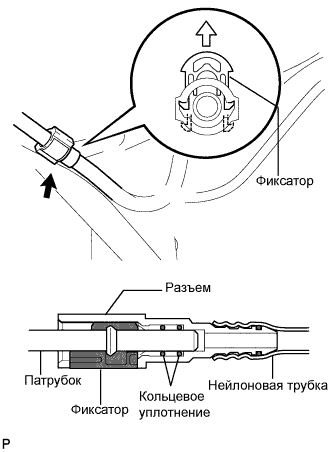
9. REMOVE FUEL TANK MAIN AND RETURN TUBE


A149223E01
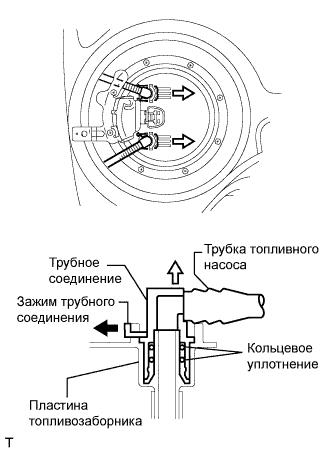
  1. Disconnect the fuel main tube and fuel return tube.

    1. Remove the 2 tube joint clips and 2 fuel tubes.

      ПРИМЕЧАНИЕ:
      1. Remove any dirt and foreign matter on the fuel tube joint before performing this work.
      1. Do not allow any scratches or foreign matter on the parts when disconnecting them, as the fuel tube joint contains the O-rings that seal the plug.
      1. Perform this work by hand. Do not use any tools.
      1. Do not forcibly bend, twist or turn the nylon tube.
      1. Protect the disconnected part by covering it with a plastic bag and tape after disconnecting the fuel tubes.


10. REMOVE REAR FLOOR SERVICE HOLE COVER


    A149226
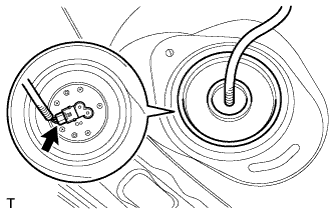
  1. Remove the service hole cover and disconnect the fuel sender gauge connector.


11. REMOVE EXHAUST PIPE ASSEMBLY
  1. Remove the exhaust pipe (see page Нажмите здесь).


12. REMOVE PROPELLER WITH CENTER BEARING SHAFT ASSEMBLY
  1. Remove the propeller with center bearing shaft (see page Нажмите здесь).


13. REMOVE FUEL TANK ASSEMBLY


    A150256E01
  1. Disconnect the fuel main tube.

    ПРИМЕЧАНИЕ:
    1. Check for any dirt and foreign matter contamination in the pipe and around the connector. Clean if necessary. Foreign matter may damage the O-ring or cause leaks in the seal between the pipe and connector.
    1. Do not use any tools to separate the pipe and connector.
    1. Do not allow any scratches or foreign matter on the parts when disconnecting them, as the fuel tube joint contains the O-rings that seal the plug.
    1. Check for any dirt and foreign matter on the pipe seal surface. Clean if necessary.
    1. Do not forcibly bend, twist or turn the nylon tube.
    1. Protect the disconnected part by covering it with a plastic bag and tape after disconnecting the main tube.
    2. If the pipe and connector are stuck together, pinch the tube between your fingers and turn it carefully to free it. Then disconnect the main tube.


    A150256E01
  1. Disconnect the fuel return tube.

    ПРИМЕЧАНИЕ:
    1. Check for any dirt and foreign matter contamination in the pipe and around the connector. Clean if necessary. Foreign matter may damage the O-ring or cause leaks in the seal between the pipe and connector.
    1. Do not use any tools to separate the pipe and connector.
    1. Do not allow any scratches or foreign matter on the parts when disconnecting them, as the fuel tube joint contains the O-rings that seal the plug.
    1. Check for any dirt and foreign matter on the pipe seal surface. Clean if necessary.
    1. Do not forcibly bend, twist or turn the nylon tube.
    1. Protect the disconnected part by covering it with a plastic bag and tape after disconnecting the fuel return tube.
    2. If the pipe and connector are stuck together, pinch the vent tube between your fingers and turn it carefully to free it. Then disconnect the fuel return tube.


    A149234
  1. Loosen the clamp and disconnect the filler pipe hose.


    A149231
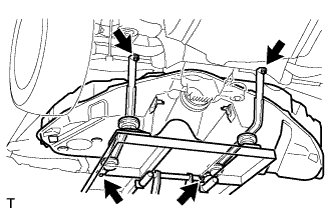
  1. Place a mission jack under the fuel tank.

  1. Remove the 4 bolts and 2 fuel tank bands.

  1. Lower the mission jack so that the fuel tank breather tube can be disconnected.

    ПРИМЕЧАНИЕ:
    Make sure that no load is applied to the fuel filler pipe.

    УКАЗАНИЕ:
    Lower the mission jack slowly.


    A155703
  1. Disconnect the fuel tank breather tube sub-assembly NO. 1.


    A155704E01
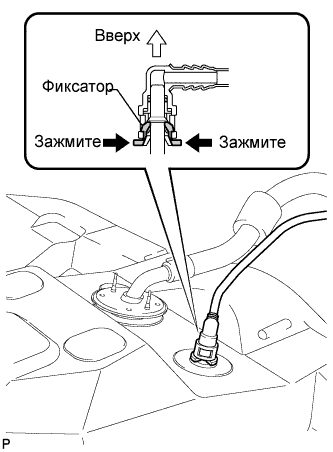
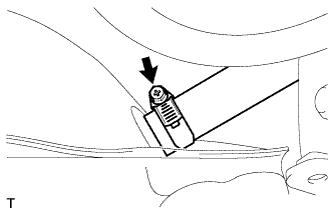
  1. Disconnect the fuel tank to canister tube sub-assembly.

    1. Pinch the retainer and then raise it.

      ПРИМЕЧАНИЕ:
      1. Check for any dirt and foreign matter contamination in the pipe and around the connector. Clean if necessary. Foreign matter may damage the O-ring or cause leaks in the seal between the pipe and connector.
      2. Do not use any tools to separate the pipe and connector.
      3. Do not allow any scratches or foreign matter on the parts when disconnecting them, as the vent hose contains the O-rings that seal the plug.
      4. Check for any dirt and foreign matter on the pipe seal surface. Clean if necessary.
      5. Do not forcibly bend, twist or turn the nylon tube.
      6. Protect the disconnected part by covering it with a plastic bag and tape after disconnecting the vent hose.
      7. If the pipe and connector are stuck together, pinch the tube between your fingers and turn it carefully to free it. Then disconnect the vent hose.

  1. Lower the mission jack to remove the fuel tank from the vehicle.

    ПРИМЕЧАНИЕ:
    1. Do not allow the fuel tank to contact the vehicle, especially the differential.
    2. Make sure that the fuel tank is free from the fuel tank to canister tube sub-assembly.

    УКАЗАНИЕ:
    Lower the mission jack slowly.


14. REMOVE FUEL SUCTION WITH PUMP AND GAUGE TUBE ASSEMBLY


    A149224
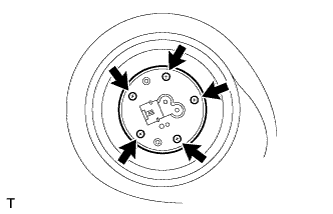
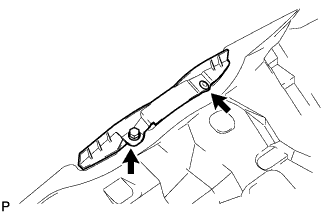
  1. Remove the 8 bolts and fuel vent tube set plate.


    A149225
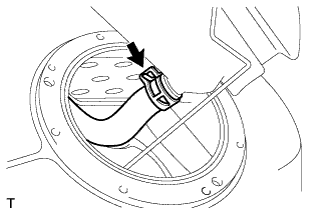
  1. Disconnect the fuel hose.

  1. Remove the fuel suction with pump and gauge tube from the fuel tank.

    ПРИМЕЧАНИЕ:
    1. Make sure that the sender gauge arm does not bend.
    1. Do not damage the fuel suction tube with pump and gauge.

  1. Remove the gasket.


15. REMOVE FUEL SENDER GAUGE ASSEMBLY


    A149227
  1. Remove the 5 screws and fuel sender gauge.

  1. Remove the gasket.


16. REMOVE FUEL TANK MAIN TUBE SUB-ASSEMBLY


A155701
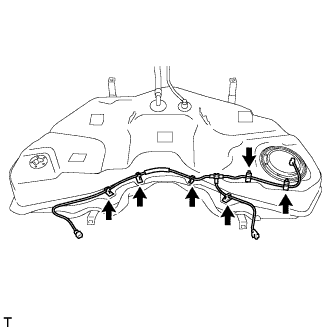
  1. Remove the 6 clamps and fuel tank main tube from the fuel tank.


    A149235
  1. Remove the fuel hose clamp.


17. REMOVE FUEL TANK PROTECTOR NO.2


A156973
  1. Remove the bolt and clip and fuel tank protector from the fuel tank.

  1. Remove the clamp from the fuel tank.


18. REMOVE FUEL TANK CUSHION


    A155702
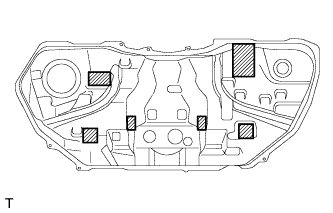
  1. Remove the 6 tank cushions.


    A149233
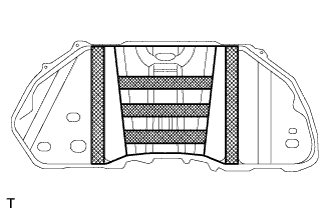
  1. Remove the tank protector and 5 tank cushions.