| Last Modified: 4-30-2014 | 6.6 A | Doc ID: RM000000SJZ005X |
| Model Year: 2006 | Model: LX470 | Prod Date Range: [05/2005 - ] |
| Title: 2UZ-FE LUBRICATION: OIL PUMP: REMOVAL; 2006 MY LX470 [05/2005 - ] | ||
REMOVAL
1. REMOVE ENGINE AND TRANSMISSION ASSEMBLY
(a)
Remove the engine and transmission
![2006 MY LX470 [05/2005 - ]; 2UZ-FE ENGINE MECHANICAL: ENGINE ASSEMBLY: REMOVAL](../../../../stylegraphics/info.gif "2006 MY LX470 [05/2005 - ]; 2UZ-FE ENGINE MECHANICAL: ENGINE ASSEMBLY: REMOVAL") .
.
2. REMOVE TIMING BELT
(a)
Remove the timing belt
.
3.
REMOVE CRANKSHAFT TIMING PULLEY
4. REMOVE OIL DIPSTICK GUIDE
|
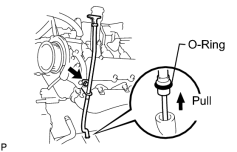
(a) Remove the bolt and dipstick guide. |
|
(b) Pull out the dipstick guide together with the dipstick from the No. 1 oil pan.
(c) Pull the O-ring from the dipstick guide.
5. REMOVE OIL FILTER BRACKET SUB-ASSEMBLY
(a) Disconnect the oil pressure switch connector.
(b) Disconnect the oil cooler hose from the oil cooler.
(c) Remove the 2 bolts, nut, compressor stay, oil cooler and filter bracket assembly.
(d) Remove the gasket from the filter bracket.
6.
REMOVE CRANKSHAFT POSITION SENSOR
7. REMOVE NO. 2 OIL PAN SUB-ASSEMBLY
|
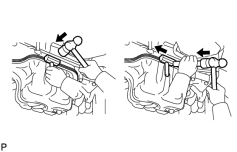
(a) Remove the 20 bolts and 2 nuts. |
|
(b) Insert the blade of SST between the No. 1 and No. 2 oil pans, cut off applied sealer and remove the No. 2 oil pan.
SST: 09032-00100
NOTICE:
Be careful not to damage the contact surfaces of the oil pans.
8. REMOVE OIL PAN BAFFLE PLATE NO.1
|
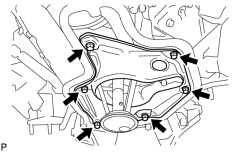
(a) Remove the 4 bolts, 2 nuts and baffle plate. |
|
9. REMOVE NO. 1 OIL PAN SUB-ASSEMBLY
|
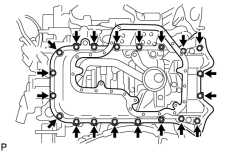
(a) Remove the 18 bolts, 2 nuts and oil pan. |
|
|
(b) Using a screwdriver, remove the oil pan by prying the areas between the cylinder block and oil pan shown in the illustration. NOTICE: Be careful not to damage the contact surfaces of the cylinder block and oil pan. |
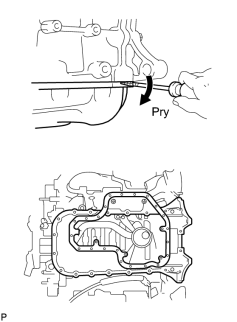
|
10. REMOVE OIL STRAINER SUB-ASSEMBLY
|
(a) Remove the 2 bolts, 2 nuts, oil strainer and gasket. |
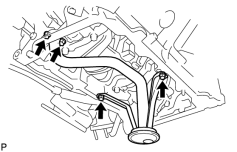
|
11. REMOVE OIL PUMP ASSEMBLY
|
(a) Remove the 8 bolts. HINT: Use a 6 mm hexagon wrench for the hexagon head bolt. |
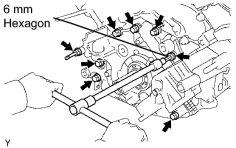
|
|
(b) Using a screwdriver, remove the oil pump by prying the areas between the oil pump and cylinder block shown in the illustration. NOTICE: Be careful not to damage the contact surface of the cylinder block and oil pump. |
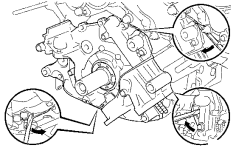
|
(c) Remove the O-ring from the cylinder block.

|

|