| Last Modified: 4-30-2014 | 6.6 A | Doc ID: RM000000V2H005X |
| Model Year: 2006 | Model: LX470 | Prod Date Range: [05/2005 - ] |
| Title: 2UZ-FE COOLING: RADIATOR: INSTALLATION; 2006 MY LX470 [05/2005 - ] | ||
INSTALLATION
1. INSTALL RADIATOR ASSEMBLY
(a) Install the 2 side supports with the 8 bolts.
Torque:
12.7 N·m {130 kgf·cm, 9ft·lbf}
(b) Install the 2 brackets with the 4 nuts.
Torque:
20 N·m {204 kgf·cm, 15ft·lbf}
(c) Install the radiator to the body.
|
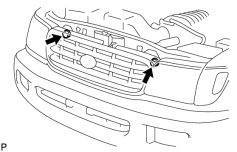
(d) Install the 2 nuts. Torque: 20 N·m {204 kgf·cm, 15ft·lbf} |
|
(e) Install the radiator with the 2 bolts.
Torque:
12 N·m {122 kgf·cm, 9ft·lbf}
2. INSTALL FAN SHROUD
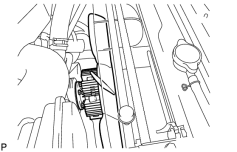
(a) Place the fan with fluid coupling, fan pulley and fan shroud in position.
|
(b) Temporarily install the 4 fan pulley mounting nuts. |
|
|
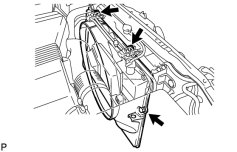
(c) Install the fan shroud with the 3 bolts. Torque: 5.0 N·m {51 kgf·cm, 44in·lbf} |
|
(d) Connect the 2 oil cooler tubes to the clamp on the fan shroud.
(e)
Install the drive belt
![2006 MY LX470 [05/2005 - ]; 2UZ-FE ENGINE MECHANICAL: DRIVE BELT: INSTALLATION+](../../../../stylegraphics/info.gif "2006 MY LX470 [05/2005 - ]; 2UZ-FE ENGINE MECHANICAL: DRIVE BELT: INSTALLATION+") .
.
(f) Tighten the 4 fan pulley mounting nuts.
(g) Install the 2 wire harness brackets to the radiator wire with the 2 bolts.
Torque:
5.0 N·m {51 kgf·cm, 44in·lbf}
(h) Install the 2 clamps on the A/C discharge tube to the 2 wire harness brackets with the 2 nuts.
Torque:
5.0 N·m {51 kgf·cm, 44in·lbf}
3. INSTALL RADIATOR RESERVOIR ASSEMBLY
(a) Install the grommet to the reservoir.
(b) Attach the lower side of the reservoir to the fan shroud.
(c) Install the reservoir with the 2 bolts.
Torque:
8.0 N·m {82 kgf·cm, 71in·lbf}
(d) Connect the reserve tank hose to the radiator.
(e) Install the clamp on the wire to the radiator.
4. CONNECT NO. 1 OIL COOLER OUTLET TUBE
(a) Connect the outlet tube.
5. CONNECT NO. 1 OIL COOLER INLET TUBE
(a) Connect the inlet tube.
6. CONNECT NO. 2 RADIATOR HOSE
(a) Connect the radiator hose.
7. CONNECT NO. 1 RADIATOR HOSE
(a) Connect the radiator hose.
8.
ADD ENGINE COOLANT
9. CHECK FOR ENGINE COOLANT LEAKS
(a)
Check for engine coolant leaks
.
10.
INSTALL NO. 1 ENGINE UNDER COVER
11. CONNECT CABLE TO NEGATIVE BATTERY TERMINAL
12. PERFORM INITIALIZATION
(a)
Perform initialization
.
NOTICE:
Certain systems need to be initialized after disconnecting and reconnecting the cable from the negative (-) battery terminal.

|

|