| Last Modified: 4-30-2014 | 6.6 A | Doc ID: RM00000195S002X |
| Model Year: 2006 | Model: LX470 | Prod Date Range: [05/2005 - ] |
| Title: WINDSHIELD / WINDOWGLASS: BACK DOOR GLASS: INSTALLATION; 2006 MY LX470 [05/2005 - ] | ||
INSTALLATION
1. INSTALL CLIP AND SPACER
(a) Remove the damaged clips and spacers.
(b) Cut off the old adhesive around the clips and spacers installation area.
NOTICE:
Be careful not to damage the back door glass.
(c) Clean the installation area.
|
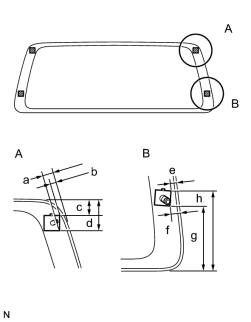
(d) Attach new clips and spacers to the glass, as shown in the illustration. Standard measurement:
|
|
|
2. INSTALL BACK WINDOW OUTSIDE MOULDING (a) Install a new back window moulding as shown in the illustration. NOTICE: Do not touch the glass face after cleaning it. |
|
3. INSTALL BACK DOOR GLASS
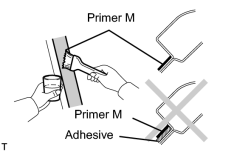
(a) Using a brush, apply Primer M to the exposed part of the vehicle body.
NOTICE:
- Allow the primer to dry for 3 minutes or more.
- Do not apply primer to the adhesive.
- Throw away any leftover primer.
- Do not apply too much primer.
|
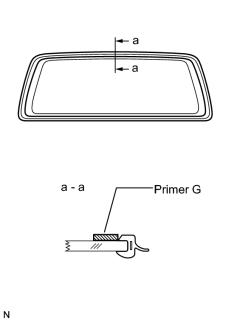
(b) Using a brush or sponge, apply Primer G to the contact surface of the glass. HINT: If the primer is applied to an area that is not specified, apply white gasoline to a clean cloth and wipe off the excess primer. NOTICE:
|
|
|
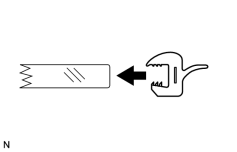
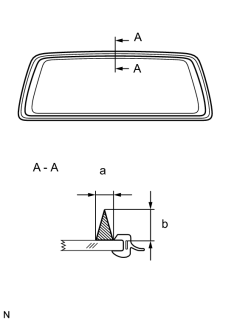
(c) Apply adhesive to the glass. Adhesive: Toyota Genuine Windshield, Glass Adhesive or Equivalent (1) Cut off the tip of the cartridge nozzle as shown in the illustration. HINT: After cutting off the tip, use all adhesive within the time written in the table below. Usage time frame:
(2) Load the sealer gun with the cartridge. (3) Apply adhesive to the glass as shown in the illustration. Standard measurement:
|
|
(d) Install the glass to the vehicle body.
(1) Using suction cups, position the glass so that the matchmarks are aligned. Press it in gently along the rim.
(2) Lightly press the front surface of the glass to ensure that it is securely fit to the vehicle body.
NOTICE:
- Check that the spacers are attached to the vehicle body correctly.
- Check that the vehicle body and glass have a small gap between them.
(3) Hold the glass in place securely with protective tape or equivalent until the adhesive hardens.
NOTICE:
Do not drive the vehicle for the amount of time written in the table below.
Minimum time:
|
Temperature |
Minimum time prior to driving vehicle |
|---|---|
|
35°C (95°F) |
1 hour 30 minutes |
|
20°C (68°F) |
5 hours |
|
5°C (41°F) |
24 hours |
4. INSTALL REAR WIPER ARM
5. INSTALL BACK DOOR GARNISH
6. INSTALL BACK DOOR GARNISH CENTER
7. INSTALL BACK DOOR INSIDE HANDLE BEZEL
8. INSTALL ASSIST GRIP
9. INSTALL ASSIST GRIP PLUG
10. CHECK FOR LEAKS AND REPAIR
(a) Conduct a leak test after the adhesive has completely hardened.
(b) Seal any leaks with auto glass sealer.
11. CONNECT CABLE TO NEGATIVE BATTERY TERMINAL
12. PERFORM INITIALIZATION
(a)
Perform initialization
![2006 MY LX470 [05/2005 - ]; INTRODUCTION: REPAIR INSTRUCTION: INITIALIZATION](../../../../stylegraphics/info.gif "2006 MY LX470 [05/2005 - ]; INTRODUCTION: REPAIR INSTRUCTION: INITIALIZATION") .
.
NOTICE:
Certain systems need to be initialized after disconnecting and reconnecting the cable from the negative (-) battery terminal.

|

|