| Last Modified: 4-30-2014 | 6.6 G | Doc ID: RM000001BAX002X |
| Model Year: 2006 | Model: LX470 | Prod Date Range: [05/2005 - ] |
| Title: WINDSHIELD / WINDOWGLASS: POWER WINDOW REGULATOR MOTOR: INSPECTION; 2006 MY LX470 [05/2005 - ] | ||
INSPECTION
1. INSPECT FRONT POWER WINDOW REGULATOR MOTOR ASSEMBLY LH AND REAR POWER WINDOW REGULATOR MOTOR ASSEMBLY RH (POWER WINDOW MOTOR)
|
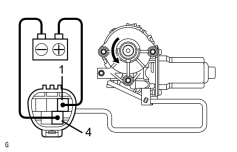
(a) Connect the battery positive (+) lead to terminal 1 and the battery negative (-) lead to terminal 4, and check that the motor turns counterclockwise. |
|
|
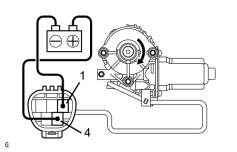
(b) Reverse the polarity, and check that the motor turns clockwise.
|
|
2. INSPECT FRONT POWER WINDOW REGULATOR MOTOR ASSEMBLY RH AND REAR POWER WINDOW REGULATOR MOTOR ASSEMBLY LH (POWER WINDOW MOTOR)
|
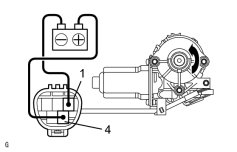
(a) Connect the battery positive (+) lead to terminal 4 and the battery negative (-) lead to terminal 1, and check that the motor turns clockwise. |
|
|
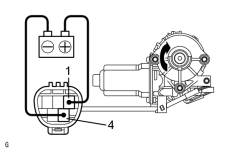
(b) Reverse the polarity, and check that the motor turns counterclockwise.
|
|
3. INSPECT POWER WINDOW REGULATOR MOTOR ASSEMBLY (PTC THERMISTOR)
(a) Disconnect the connector from the power window regulator motor assembly.
|
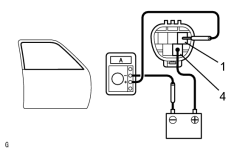
(b) Connect the positive (+) lead from the ammeter to terminal 1 on the wire harness side connector and the negative (-) lead to the negative terminal of the battery. |
|
(c) Connect the positive (+) lead from the battery to terminal 4 on the wire harness side connector, and raise the window to the fully closed position.
(d) Continue to apply voltage and check that the current changes within 4 to 90 seconds.
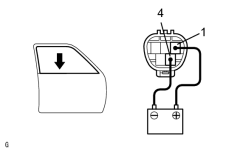
(e) Disconnect the leads from the terminals.
|
(f) Approximately 60 seconds later, connect the positive (+) lead from the battery to terminal 1 and the negative (-) lead to terminal 4, and check that the window begins to descend.
|
|
4. INSPECT POWER WINDOW REGULATOR MOTOR ASSEMBLY (JAM PROTECTION LIMIT SWITCH)
|
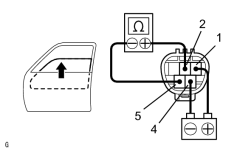
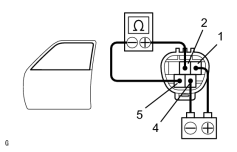
(a) Connect the positive (+) lead from the ohmmeter to terminal 2 and the negative (-) lead to terminal 5. |
|
(b) Connect the positive (+) lead from the battery to terminal 1 and the negative (-) lead to terminal 4.
(c) Check that continuity exists when the window goes up.
|
(d) Check that the no continuity exists when the window is in the fully closed position.
NOTICE: If the wire harness is connected wrongly, the sensor might be damaged so caution is necessary. |
|
5. INSPECT POWER WINDOW REGULATOR MOTOR ASSEMBLY FRONT LH (JAM PROTECTION PULSE SWITCH)
|
(a) Connect the positive (+) lead from the TOYOTA electrical tester to terminal 3 and the negative (-) lead to terminal 5. |
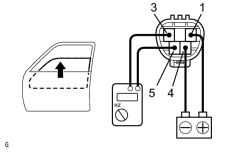
|
(b) Connect the positive (+) lead from the battery to terminal 1 and the negative (-) lead to terminal 4.
(c) Check that a pulse is generated while the motor is running.
|
(d) Reverse the polarity and check that a pulse is generated.
NOTICE: If the wire harness is connected wrongly, the sensor might be damaged so caution is necessary. |
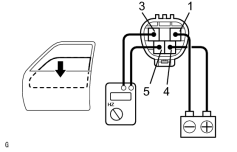
|

|

|