| Last Modified: 4-30-2014 | 6.6 A | Doc ID: RM000001BG6000X |
| Model Year: 2006 | Model: LX470 | Prod Date Range: [05/2005 - ] |
| Title: SLIDING ROOF: SLIDING ROOF HOUSING: REMOVAL; 2006 MY LX470 [05/2005 - ] | ||
REMOVAL
1. DISCONNECT CABLE FROM NEGATIVE BATTERY TERMINAL
CAUTION:
Wait at least 90 seconds after disconnecting the cable from the negative (-) battery terminal to prevent airbag and seat belt pretensioner activation.
HINT:
At the time of installation, perform initialization
![2006 MY LX470 [05/2005 - ]; INTRODUCTION: REPAIR INSTRUCTION: INITIALIZATION](../../../../stylegraphics/info.gif "2006 MY LX470 [05/2005 - ]; INTRODUCTION: REPAIR INSTRUCTION: INITIALIZATION") .
.
NOTICE:
Certain systems need to be initialized after disconnecting and reconnecting the cable from the negative (-) battery terminal.
2. REMOVE ROOF HEADLINING ASSEMBLY
(a)
Remove the roof headlining
.
NOTICE:
After removing the roof headlining, connect the cable to the negative (-) battery terminal and reconnect the map light connector.
3. REMOVE NO. 1 COOLER AIR DUCT
|
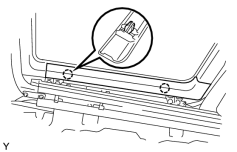
4. REMOVE SLIDING ROOF SIDE GARNISH (a) Using a screwdriver, detach the 2 claws and remove the garnishes. HINT: Tape the screwdriver tip before use. |
|
5. REMOVE SLIDING ROOF GLASS SUB-ASSEMBLY
(a) Remove the 4 nuts.
(b) Pull the glass upward to remove it.
6. REMOVE SLIDING ROOF DRIVE GEAR SUB-ASSEMBLY
NOTICE:
Remove the drive gear with the sliding roof fully closed.
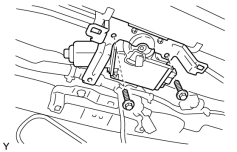
(a) Disconnect the connector.
(b) Remove the 2 bolts and drive gear.
|
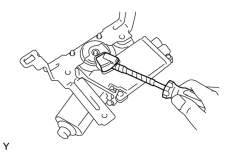
(c) Using a screwdriver, remove the cam plate cover. HINT: Tape the screwdriver tip before use. |
|
|
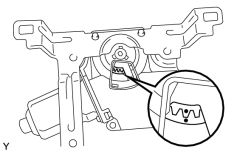
(d) Turn the drive gear to align the point marks as shown in the illustration. NOTICE: At the time of installation, refer to the following item. If the sliding roof position and drive gear fully closed position are not the same, the sliding roof will not operate normally. |
|
(e) Install the cam plate cover.
|
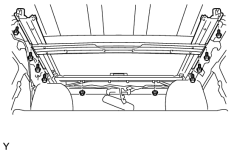
7. REMOVE SLIDING ROOF HOUSING SUB-ASSEMBLY (a) Remove the 4 drain hoses from the housing. (b) Remove the room light wire harness. (c) Remove the 8 bolts, 2 nuts and sliding roof housing. |
|

|

|