| Last Modified: 4-30-2014 | 6.6 A | Doc ID: RM000001CM4001X |
| Model Year: 2006 | Model: LX470 | Prod Date Range: [05/2005 - ] |
| Title: INTERIOR: ROOF HEADLINING: REMOVAL; 2006 MY LX470 [05/2005 - ] | ||
REMOVAL
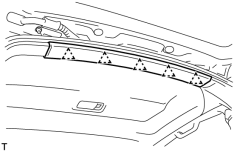
1. REMOVE ROOF HEADLINING TRIM REAR
|
(a) Using a screwdriver, remove the roof headlining rear trim. HINT: Tape the screwdriver tip before use. |
|
2. REMOVE REAR NO. 2 SEAT ASSEMBLY
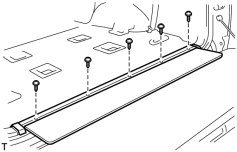
3. REMOVE REAR MAT SET PLATE
|
(a) Remove the 5 screws. |
|
(b) Using a screwdriver, remove the rear mat set plate.
HINT:
Tape the screwdriver tip before use.
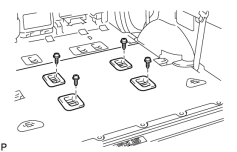
4. REMOVE REAR NO. 3 SEAT PROTECTOR
|
(a) Remove the 4 screws and 4 protectors. |
|
5. REMOVE NO. 3 SEAT FRONT BRACKET COVER
(a) Remove the 2 screws and 2 bracket covers.
6. REMOVE NO. 3 SEAT BRACKET SUPPORT COVER
(a) Remove the 2 covers.
7. REMOVE TETHER ANCHOR BRACKET SUB-ASSEMBLY
(a) Remove the 3 tether anchor bracket covers.
(b) Remove the 3 brackets.
Torque:
27 N·m {275 kgf·cm, 20ft·lbf}
8. REMOVE REAR FLOOR CARPET
9. REMOVE REAR DOOR SCUFF PLATE LH
10. REMOVE REAR DOOR SCUFF PLATE RH
11. REMOVE REAR DOOR OPENING TRIM LH
12. REMOVE REAR DOOR OPENING TRIM RH
|
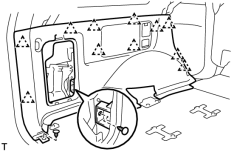
13. REMOVE QUARTER TRIM PANEL LH (a) Remove the rear No. 1 seat outer belt floor anchor. Torque: 42 N·m {430 kgf·cm, 31ft·lbf} (b) Remove the rear No. 2 seat outer belt floor anchor. Torque: 42 N·m {430 kgf·cm, 31ft·lbf} (c) Remove the quarter trim jack cover. (d) Using a clip remover, remove the 2 clips. (e) Detach the clips and remove the quarter trim panel, and then disconnect the connector. |
|
|
14. REMOVE QUARTER TRIM PANEL RH (a) Remove the rear No. 1 seat outer belt shoulder floor anchor. Torque: 42 N·m {430 kgf·cm, 31ft·lbf} (b) Remove the rear No. 2 seat outer belt shoulder floor anchor. Torque: 42 N·m {430 kgf·cm, 31ft·lbf} (c) Using a clip remover, remove the clip. (d) Detach the clips and remove the quarter trim panel. |
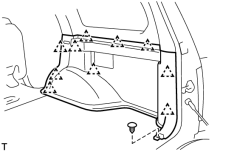
|
15. REMOVE UPPER ROOF SIDE INNER GARNISH LH
(a) Remove the rear No. 1 seat outer belt shoulder anchor.
Torque:
42 N·m {430 kgf·cm, 31ft·lbf}
(b) Remove the rear No. 2 seat outer belt shoulder anchor.
Torque:
42 N·m {430 kgf·cm, 31ft·lbf}
|
(c) Using a screwdriver, remove the 2 assist grip plugs, and then remove the 2 screws and the assist grip. HINT: Tape the screwdriver tip before use. |
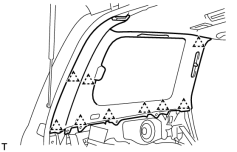
|
(d) Using a clip remover, remove the clip.
(e) Using a screwdriver, remove the upper roof side inner garnish.
HINT:
Tape the screwdriver tip before use.
16. REMOVE UPPER ROOF SIDE INNER GARNISH RH
HINT:
Use the same procedures described for the LH side.
17. REMOVE FRONT DOOR SCUFF PLATE LH
18. REMOVE FRONT DOOR SCUFF PLATE RH
19. REMOVE COWL SIDE TRIM BOARD LH
20. REMOVE COWL SIDE TRIM BOARD RH
21. REMOVE FRONT DOOR OPENING TRIM LH
22. REMOVE FRONT DOOR OPENING TRIM RH
23. REMOVE FRONT PILLAR GARNISH LH
(a) Using a screwdriver, remove the 2 assist grip plugs, then remove the 2 screws and assist grip.
HINT:
Tape the screwdriver tip before use.
|
(b) Using a screwdriver, remove the front pillar garnish. HINT: Tape the screwdriver tip before use. |
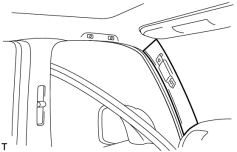
|
24. REMOVE FRONT PILLAR GARNISH RH
HINT:
Use the same procedures described for the LH side.
25. REMOVE CENTER PILLAR GARNISH LOWER LH
|
(a) Using a screwdriver, remove the center pillar garnish cover. HINT: Tape the screwdriver tip before use. |
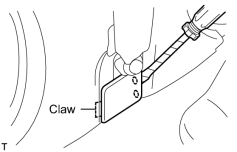
|
|
(b) Using a screwdriver, remove the center pillar lower garnish as shown in the illustration. HINT: Tape the screwdriver tip before use. |
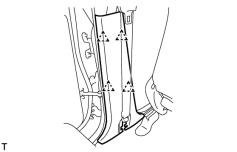
|
26. REMOVE CENTER PILLAR GARNISH LOWER RH
HINT:
Use the same procedures described for the LH side.
27. REMOVE CENTER PILLAR GARNISH LH
|
(a) Using a screwdriver, remove the seat belt anchor cover cap. HINT: Tape the screwdriver tip before use. |
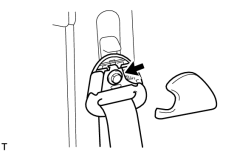
|
(b) Remove the bolt and the front seat outer belt shoulder anchor.
Torque:
42 N·m {430 kgf·cm, 31ft·lbf}
|
(c) Using a clip remover, remove the clip. |
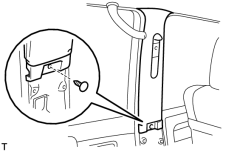
|
(d) Using a screwdriver, remove the center pillar garnish.
HINT:
Tape the screwdriver tip before use.
28. REMOVE CENTER PILLAR GARNISH RH
HINT:
Use the same procedures described for the LH side.
29. REMOVE SUN VISOR LH
(a) Using a screwdriver, remove the cap.
HINT:
Tape the screwdriver tip before use.
(b) Remove the 2 screws, and then disconnect the connector.
(c) Remove the sun visor.
30. REMOVE SUN VISOR RH
HINT:
Use the same procedures described for the LH side.
31. REMOVE DOUBLE VISOR LH
(a) Remove the 2 screws and the double visor.
32. REMOVE DOUBLE VISOR RH
(a) Remove the 2 screws and the double visor.
33. REMOVE VISOR HOLDER
(a) Remove the 2 screws and 2 holders.
34. REMOVE REAR ROOM LIGHT ASSEMBLY
|
(a) Using a screwdriver, remove the lens as shown in the illustration. HINT: Tape the screwdriver tip before use. |
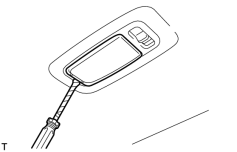
|
(b) Remove the 4 screws and the light, and then disconnect the connector.
35. REMOVE ROOM LIGHT AND REAR PERSONAL LIGHT
|
(a) Using a screwdriver, remove the lens as shown in the illustration. HINT: Tape the screwdriver tip before use. |
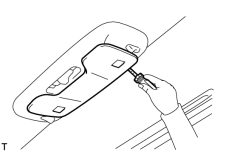
|
(b) Remove the 4 screws and the light, and then disconnect the connector.
36. REMOVE OVERHEAD CONSOLE BOX (w/o LEXUS Link System)
|
(a) Remove the bolt. |
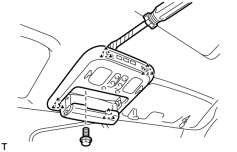
|
(b) Using a screwdriver, remove the overhead console box, and then disconnect the connector.
HINT:
Tape the screwdriver tip before use.
37. REMOVE OVERHEAD CONSOLE BOX (w/ LEXUS Link System)
|
(a) Using a screwdriver, open the lid of the LEXUS link system switch. HINT: Tape the screwdriver tip before use. |
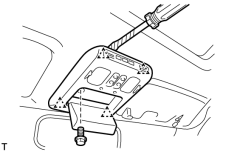
|
(b) Remove the bolt.
(c) Using a screwdriver, remove the overhead console box, and then disconnect the connector.
HINT:
Tape the screwdriver tip before use.
38. REMOVE REAR CONDITIONING CONTROL SWITCH
|
(a) Using a screwdriver, detach the claws and remove the control switch, and then disconnect the connector. HINT: Tape the screwdriver tip before use. |
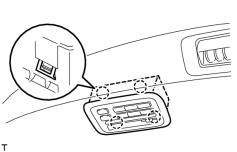
|
39. REMOVE ROOM TEMPERATURE SENSOR
(a) Using a screwdriver, remove the room temperature sensor, and then disconnect the connector.
HINT:
Tape the screwdriver tip before use.
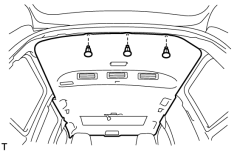
40. REMOVE ROOF HEADLINING
(a) Using a screwdriver, remove the 8 assist grip plugs, then remove the 8 screws and 4 assist grips.
HINT:
Tape the screwdriver tip before use.
|
(b) Using a clip remover, remove the 3 clips and the roof headlining. |
|
41. REMOVE ADJUSTABLE ANCHOR
(a) Remove the 4 bolts and 2 adjustable anchors.
Torque:
42 N·m {430 kgf·cm, 31ft·lbf}
42. REMOVE CENTER ASSIST GRIP
(a) Remove the 2 assist grips.
43. REMOVE AIR OUTLET GRILLE
(a) Remove the 8 screws and 2 air outlet grilles.
44. REMOVE REAR TEMPERATURE GAUGE
(a) Remove the 12 screws and 3 temperature gauges.

|

|