| Last Modified: 4-30-2014 | 6.6 G | Doc ID: RM000001DW8001X |
| Model Year: 2006 | Model: LX470 | Prod Date Range: [05/2005 - ] |
| Title: SUSPENSION CONTROL: ACTIVE HEIGHT CONTROL SUSPENSION: ON-VEHICLE INSPECTION; 2006 MY LX470 [05/2005 - ] | ||
ON-VEHICLE INSPECTION
|
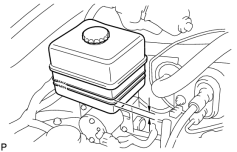
1. INSPECT FLUID LEVEL (a) Start the engine on a level place. Adjust the vehicle height to "N" position with the vehicle unloaded. NOTICE: After adjusting the vehicle height to control the fluid pressure in the height control accumulator, do not turn the engine OFF. (b) Check that the fluid level in the reservoir tank of the AHC pump and motor is within the standard range. |
|
2. OPERATE HEIGHT SELECT SWITCH AND CHECK CHANGE OF VEHICLE HEIGHT
(a)
Check the tires for the proper inflation pressure
![2006 MY LX470 [05/2005 - ]; TIRE AND WHEEL: TIRE AND WHEEL SYSTEM: INSPECTION](../../../../stylegraphics/info.gif "2006 MY LX470 [05/2005 - ]; TIRE AND WHEEL: TIRE AND WHEEL SYSTEM: INSPECTION") .
.
(b)
Check the vehicle height
.
(c) Start the engine.
|
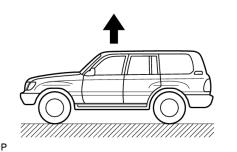
(d) Push the height select switch to change from "N" to the "HI" mode. NOTICE: The AHC pump and motor assembly dose not operate unless all doors closed. |
|
(e) Check the time required for the height changed and the changed amount of the vehicle height.
Standard value:
|
Operation |
Specified Condition |
|---|---|
|
"HI" mode (Up time) |
15 sec. or less |
Amount of change in vehicle height:
|
Item |
Specified Condition |
|---|---|
|
Front |
30 to 45 mm (1.18 to 1.77 in.) |
|
Rear |
40 to 55 mm (1.57 to 2.17 in.) |
NOTICE:
After vehicle height control has been completed, wait for approximately 5 seconds until the height is fixed securely, then check the changed amount of vehicle height.
|
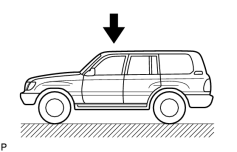
(f) Push the height select switch to change from "N" to the "LO" mode. |
|
(g) Check the time required for the height change and the changed amount of the vehicle height.
Standard value:
|
Operation |
Specified Condition |
|---|---|
|
"LO" mode (Down time) |
10 sec. or less |
Amount of change in vehicle height:
|
Item |
Specified Condition |
|---|---|
|
Front |
40 to 55 mm (1.57 to 2.17 in.) |
|
Rear |
30 to 45 mm (1.18 to 1.77 in.) |
NOTICE:
After vehicle height control has been completed, wait for approximately 5 seconds until the height is fixed securely, then check the changed amount of vehicle height.
3. INSPECT SUSPENSION CONTROL SWITCH (HEIGHT SELECT SWITCH)
|
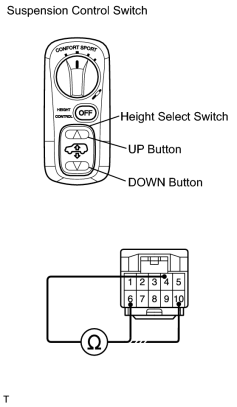
(a) Remove the suspension control switch. |
|
(b) Disconnect the suspension control switch (for height select switch) connector.
(c) Measure the resistance between terminals 6, 10 and 4 of suspension control switch (for height select switch) connector when UP and DOWN button of the height select switch is pushed.
Standard resistance:
|
Tester Connection |
Condition |
Specified Condition |
|---|---|---|
|
6 - 4 |
UP button pushed |
Below 1 Ω |
|
6 - 4 |
DOWN button pushed |
10 kΩ or higher |
|
10 - 4 |
DOWN button pushed |
Below 1 Ω |
|
10 - 4 |
UP button pushed |
10 kΩ or higher |
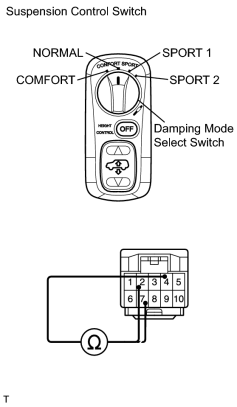
4. INSPECT SUSPENSION CONTROL SWITCH (DAMPING MODE CONTROL SWITCH)
|
(a) Remove the suspension control switch. |
|
(b) Disconnect the suspension control switch (for damping mode select switch) connector.
(c) Measure the resistance between terminals 2, 7 and 4 of the suspension control switch (for damping mode select switch) connector when changing the damping mode select switch to each mode.
Standard resistance:
|
Tester Connection |
Condition |
Specified Condition |
|---|---|---|
|
2 - 4 |
COMFORT |
Below 1 Ω |
|
2 - 4 |
NORMAL |
Below 1 Ω |
|
2 - 4 |
SPORT 1 |
10 kΩ or higher |
|
2 - 4 |
SPORT 2 |
10 kΩ or higher |
|
7 - 4 |
COMFORT |
10 kΩ or higher |
|
7 - 4 |
NORMAL |
Below 1 Ω |
|
7 - 4 |
SPORT 1 |
Below 1 Ω |
|
7 - 4 |
SPORT 2 |
10 kΩ or higher |
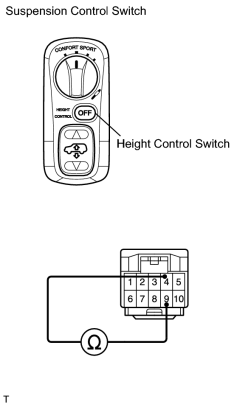
5. INSPECT SUSPENSION CONTROL SWITCH (HEIGHT CONTROL SWITCH)
|
(a) Remove the suspension control switch. |
|
(b) Disconnect the suspension control switch (for height control switch) connector.
(c) Measure the resistance between terminals 9 and 4 of the suspension control switch (for height control switch) connector when the height control switch is pushed and released.
Standard resistance:
|
Tester Connection |
Condition |
Specified Condition |
|---|---|---|
|
9 - 4 |
Pushed |
Below 1 Ω |
|
9 - 4 |
Released |
10 kΩ or higher |
6. INSPECT VEHICLE SPEED SENSING FUNCTION
(a) When vehicle height is in the "LO" position:
(1) Start the engine and push the height select switch to select the "LO" mode.
(2) Drive the vehicle at approximately 10 km/h (7 mph) or more and check with an indicator that the vehicle height changes from "LO" to "N".
(b) When vehicle height is in the "HI" position:
(1) Start the engine and push the height select switch to select the "HI" mode.
(2) Drive the vehicle at 30 km/h (19 mph) or more and check with an indicator that the vehicle height changes from "HI" to "N".
(c) When the height control switch is operated:
(1) Push the height control switch to turn off the height control.
(2) Drive the vehicle and check with the indicator that the height control is activated automatically.
Standard value:
|
Vehicle Height |
Vehicle Speed |
|---|---|
|
HI |
More than 30 km/h (19 mph) |
|
N |
More than 80 km/h (50 mph) |
|
LO |
More than 30 km/h (19 mph) |
7. INSPECT PRESSURE VALUE OF FRONT SHOCK ABSORBER (IN CASE OF USING INTELLIGENT TESTER)
NOTICE:
Perform the operation with vehicle unloaded (with the fuel tank filled up).
|
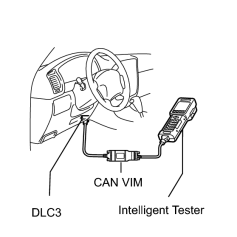
(a) Connect the intelligent tester (with CAN VIM) to the DLC3 on the vehicle. |
|
(b) Start the engine and push the height select switch to adjust the vehicle height to the "N".
(c) Push the height select switch to adjust the vehicle height from N" to "LO", then back to "N".
NOTICE:
Adjust it without passengers.
(d) Stop the engine.
(e) Read the pressure value of the front shock absorber with intelligent tester at this time.
Standard pressure:
6.9 +- 0.5 MPa (70 +- 5 kgf/cm 2 , 996 +- 71 psi)
(f) Start the engine and push the height select switch to adjust the vehicle height to "N".
(g) Check the fluid level.
8. INSPECT PRESSURE VALUE OF FRONT SHOCK ABSORBER (IN CASE OF NOT USING INTELLIGENT TESTER)
NOTICE:
- Perform the operation with the vehicle unloaded (with the fuel tank filled up).
- After and before using LSPV gauge (SST) and adapter, make sure to clean the hose, gauge and adapter.
(a) Start the engine and push the height select switch to adjust the vehicle height to "LO".
(b) With the ignition switch OFF, discharge the suspension fluid AHC from the bleeder plug of the either front right or left wheel damping force control actuator.
CAUTION:
The fluid gushes out because of high pressure, so discharge the fluid in the same way as air bleeding.
|
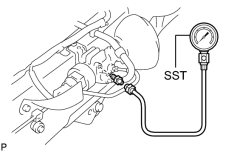
(c) Remove the bleeder plug of either right or left damping force control actuator and install the LSPV gauge (SST). SST: 09709-29018 |
|
(d) Start the engine and push the height select switch to adjust the vehicle height to "N".
(e) Push the height select switch to adjust the vehicle height from "N" to "LO", then back to "N".
(f) Stop the engine.
(g) Read the pressure value of LSPV gauge (SST) at this time.
SST: 09709-29018
Standard pressure:
5.7 +- 0.3 MPa (58 +- 3 kgf/cm 2 , 825 +- 43 psi)
(h) Start the engine and push the height select switch to adjust the vehicle height to "LO".
(i) With the ignition switch OFF, discharge the suspension fluid AHC from the bleeder plug of LSPV gauge (SST).
SST: 09709-29018
CAUTION:
The fluid gushes out because of high pressure, so discharge the fluid in the same way as air bleeding.
(j) Remove the LSPV gauge (SST).
SST: 09709-29018
(k) Install the bleeder plug.
Torque:
8.3 N·m {84 kgf·cm, 73in·lbf}
(l)
Bleed the air
.
HINT:
Bleed the bleeder plug with LSPV gauge (SST) installed to only once.
(m) Check the fluid level.
9. INSPECT PRESSURE VALUE OF REAR SHOCK ABSORBER (IN CASE OF USING INTELLIGENT TESTER)
NOTICE:
Perform the operation with the vehicle unloaded (with the fuel tank filled up).
|
(a) Connect the intelligent tester to the DLC3 on the vehicle. |
|
(b) Disconnect the fluid temperature sensor connector.
(c) Start the engine and push the height select switch to adjust the vehicle height from "N" to "LO", then back to "N".
NOTICE:
Adjust it without passengers.
(d) Stop the engine.
(e) Read the pressure valve of the rear shock absorber with the intelligent tester at this time.
Standard pressure:
5.6 to 6.7 MPa (57 to 68 kgf/cm 2 , 811 to 967 psi)
-
If the pressure is not within the specified range, its cause may be that a load object is either installed or removed.
HINT:
The cylinder pressure read by the intelligent tester is estimated by the pump emitted pressure so the pressure is approximately 1.2 MPa (12 kgf/cm 2 , 171 psi) higher than the pressure read by the LSPV gauge (SST).
(f) Connect the fluid temperature sensor connector.
(g)
Check the DTC
.
-
If the DTC is displayed, clear the DTC
.
(h) Start the engine and push the height select switch to adjust the vehicle height to "LO", then to "N".
- At this time, check that the 4 wheels are raised simultaneously.
10. INSPECT PRESSURE VALUE OF REAR SHOCK ABSORBER (IN CASE OF NOT USING INTELLIGENT TESTER)
NOTICE:
- Perform the operation with the vehicle unloaded (with the fuel tank filled up).
- After and before using LSPV gauge (SST) and adapter, make sure to clean the hose, gauge and adapter.
(a) Start the engine and push the height select switch to adjust the vehicle height to "LO".
(b) With the ignition switch OFF, discharge the suspension fluid AHC from the bleeder plug of the either rear right or left wheel damping force control actuator.
CAUTION:
The fluid gushes out because of high pressure, so discharge the fluid in the same way as air bleeding.
|
(c) Remove the bleeder plug of either right or left damping force control actuator and install the LSPV gauge (SST). |
|
(d) Start the engine and push the height to "N".
(e) Push the height select switch to adjust the vehicle height from "N" to "LO", then back to "N".
(f) Stop the engine.
(g) Read the pressure value with LSPV gauge (SST) at this time.
SST: 09709-29018
Standard pressure:
4.4 to 5.5 MPa (45 to 56 kgf/cm 2 , 640 to 797 psi)
- If the pressure is not within the specified range, its cause may be that a load object is either installed or removed.
(h) Start the engine and push the height select switch to adjust the vehicle height to "LO".
(i) With the ignition switch OFF, discharge the suspension fluid AHC from the bleeder plug of LSPV gauge (SST).
SST: 09709-29018
CAUTION:
The fluid gushes out because of high pressure, so discharge the fluid in the same way as air bleeding.
(j) Remove the LSPV gauge (SST).
SST: 09709-29018
(k) Install the bleeder plug.
Torque:
8.3 N·m {84 kgf·cm, 73in·lbf}
(l)
Bleed the air
.
HINT:
Bleed air from the bleeder plug with LSPV gauge (SST) installed only once.
(m) Check the fluid level.
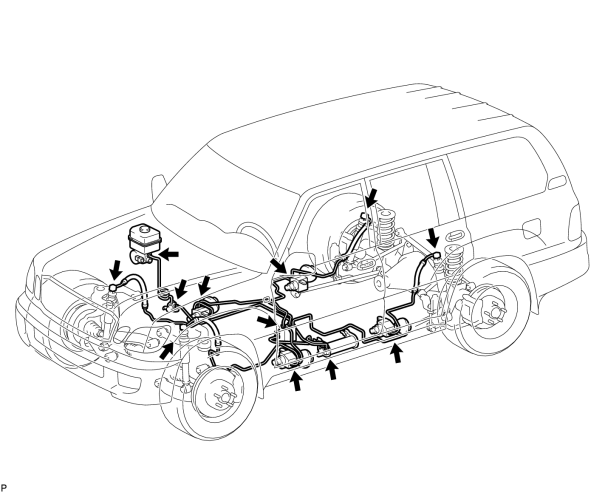
11. INSPECT FLUID LEAKAGE
(a) Inspect the connections of tube and parts for fluid leakage.

|

|