| Last Modified: 7-3-2017 | 6.8:8.0.40 | Doc ID: RM000000SJW00BX |
| Model Year Start: 2007 | Model: LX470 | Prod Date Range: [08/2006 - ] |
| Title: 2UZ-FE LUBRICATION: OIL PUMP: INSTALLATION; 2007 MY LX470 [08/2006 - ] | ||
INSTALLATION
1. INSTALL OIL PUMP ASSEMBLY
(a) Remove any old packing (FIPG) material and be careful not to drop any oil on the contact surfaces of the oil pump and cylinder block.
(1) Using a gasket scraper, remove all the old packing (FIPG) material from the gasket surfaces and sealing groove.
(2) Thoroughly clean all components to remove all the loose material.
(3) Using a non-residue solvent, clean both sealing surfaces.
|
(b) Apply seal packing to the oil pump as shown in the illustration. Seal packing: Toyota Genuine Seal Packing Black, Three Bond 1207B or equivalent Standard seal diameter: 3 to 4 mm (0.12 to 0.16 in.) NOTICE:
|
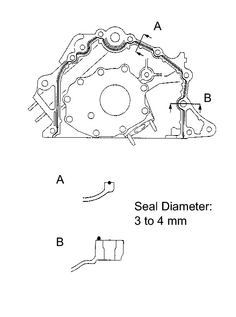
|
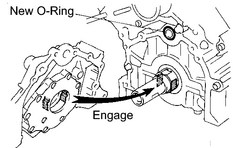
(c) Apply engine oil to a new O-ring.
|
(d) Install the O-ring to the cylinder block. |
|
(e) Align the spline teeth of the oil pump drive gear with the large teeth of the crankshaft, and slide the oil pump onto the crankshaft.
|
(f) Install the oil pump with the 8 bolts. Uniformly tighten the bolts in several passes. Torque: 15.5 N·m {158 kgf·cm, 11ft·lbf} for bolt A, B, C and E 30.5 N·m {311 kgf·cm, 22ft·lbf} for bolt D HINT:
|
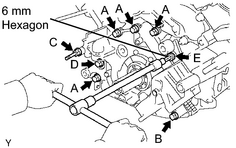
|
2. INSTALL OIL STRAINER SUB-ASSEMBLY
|
(a) Install a new gasket and the oil strainer with the 2 bolts and 2 nuts. Torque: 7.5 N·m {76 kgf·cm, 66in·lbf} HINT: The bolt length is 12 mm (0.47 in.). |
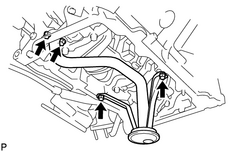
|
3. INSTALL NO. 1 OIL PAN SUB-ASSEMBLY
(a) Remove any old packing (FIPG) material and be careful not to drop any oil on the contact surfaces of the No.1 oil pan, cylinder block, oil pump and rear oil seal retainer.
(1) Using a razor blade and gasket scraper, remove all the old packing (FIPG) material from the gasket surfaces and sealing groove.
(2) Thoroughly clean all components to remove all the loose material.
(3) Using a non-residue solvent, clean both sealing surfaces.
|
(b) Apply the seal packing to the No. 1 oil pan as shown in the illustration. Seal packing: Toyota Genuine Seal Packing Black, Three Bond 1207B or equivalent Seal diameter: 3 to 5 mm (0.12 to 0.20 in.) NOTICE:
|
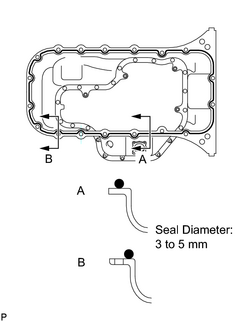
|
|
(c) Temporarily install the No. 1 oil pan with the 18 bolts, stud bolt and 2 nuts. HINT: Each bolt length is as shown in the table. Bolt length:
|
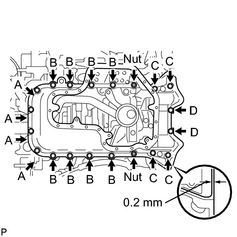
|
(d) Set the No. 1 oil pan as shown in the illustration.
NOTICE:
Make sure the clearance between the rear end of the No. 1 oil pan and cylinder block is 0.2 mm (0.008 in.) or less. If the clearance is more than 0.2 mm (0.008 in.), the No. 1 oil pan will deform when tightening the bolts and nuts.
(e) Uniformly tighten the bolts and nuts in several passes.
Torque:
7.5 N·m {76 kgf·cm, 66in·lbf} for bolt A, D
28 N·m {286 kgf·cm, 21ft·lbf} for bolt B, C
28 N·m {286 kgf·cm, 21ft·lbf} for nut
4. INSTALL OIL PAN BAFFLE PLATE NO.1
|
(a) Install the baffle plate with the 4 bolts and 2 nuts. Torque: 7.5 N·m {76 kgf·cm, 66in·lbf} |
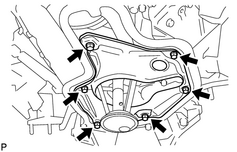
|
5. INSTALL NO. 2 OIL PAN SUB-ASSEMBLY
(a) Remove any old packing (FIPG) material and be careful not to drop any oil on the contact surfaces of the No. 1 and No. 2 oil pans.
(1) Using a razor blade and gasket scraper, remove all the old packing (FIPG) material from the gasket surfaces and sealing groove.
(2) Thoroughly clean all components to remove all the loose material.
(3) Using a non-residue solvent, clean both sealing surfaces.
|
(b) Apply seal packing to the No. 2 oil pan as shown in the illustration. Seal packing: Toyota Genuine Seal Packing Black, Three Bond 1207B or equivalent Seal diameter: 3 to 5 mm (0.12 to 0.20 in) NOTICE:
|
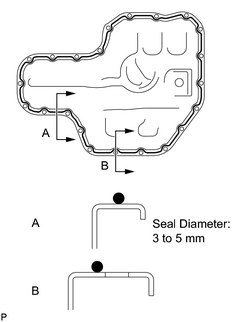
|
(c) Install the No. 2 oil pan with the 20 bolts and 2 nuts. Uniformly tighten the bolts and nuts in several passes.
Torque:
7.5 N·m {76 kgf·cm, 66in·lbf}
HINT:
The bolt length is 14 mm (0.55 in.).
6.
INSTALL CRANKSHAFT POSITION SENSOR
![2007 MY LX470 [08/2006 - ]; 2UZ-FE ENGINE CONTROL SYSTEM: CRANKSHAFT POSITION SENSOR: INSTALLATION+](../../../../stylegraphics/info.gif "2007 MY LX470 [08/2006 - ]; 2UZ-FE ENGINE CONTROL SYSTEM: CRANKSHAFT POSITION SENSOR: INSTALLATION+")
7. INSTALL OIL FILTER BRACKET SUB-ASSEMBLY
(a) Install a new gasket to the oil filter bracket.
(b) Install the compressor stay, oil cooler and oil filter bracket assembly with the 2 bolts and nut.
Torque:
18 N·m {184 kgf·cm, 13ft·lbf}
(c) Connect the oil cooler hose to the oil cooler.
(d) Connect the oil pressure switch connector.
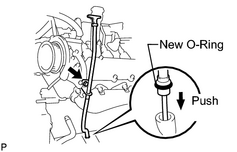
8. INSTALL OIL DIPSTICK GUIDE
|
(a) Install a new O-ring to the dipstick guide. |
|
(b) Apply soapy water to the O-ring.
(c) Push the dipstick guide end into the guide hole of the No. 1 oil pan.
(d) Install the dipstick guide with the bolt.
Torque:
15 N·m {155 kgf·cm, 11ft·lbf}
(e) Install the dipstick.
9.
INSTALL CRANKSHAFT TIMING PULLEY
10. INSTALL TIMING BELT
(a)
Install the timing belt
.
11. INSTALL ENGINE AND TRANSMISSION ASSEMBLY
(a)
Install the engine and transmission
.

|

|