| Last Modified: 7-3-2017 | 6.8:8.0.40 | Doc ID: RM0000018ZD00AX |
| Model Year Start: 2007 | Model: LX470 | Prod Date Range: [08/2006 - ] |
| Title: A750F AUTOMATIC TRANSMISSION: AUTOMATIC TRANSMISSION ASSEMBLY: REMOVAL; 2007 MY LX470 [08/2006 - ] | ||
REMOVAL
1. DISCONNECT CABLE FROM NEGATIVE BATTERY TERMINAL
NOTICE:
Wait at least 90 seconds after disconnecting the cable from the negative (-) battery terminal to prevent airbag and seat belt pretensioner activation.
2. REMOVE AIR CLEANER CAP SUB-ASSEMBLY
3. REMOVE DRIVE BELT, FAN AND FLUID COUPLING ASSEMBLY, FAN SHROUD AND RADIATOR RESERVOIR
(a)
Remove the drive belt, fan and fluid coupling assembly, fan shroud and radiator reservoir
![2007 MY LX470 [08/2006 - ]; 2UZ-FE COOLING: FAN: REMOVAL](../../../../stylegraphics/info.gif "2007 MY LX470 [08/2006 - ]; 2UZ-FE COOLING: FAN: REMOVAL") .
.
|
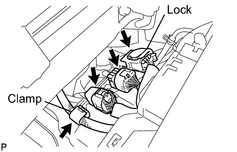
4. DISCONNECT CONNECTOR (a) Release the lock and disconnect the transmission wire connector. (b) Disconnect the 2 transmission wire connectors. (c) Separate the connector clamp. |
|
5. REMOVE TRANSFER SHIFT LEVER BOOT
(a) Remove the transfer shift lever knob.
(b)
Remove the upper console panel
.
|
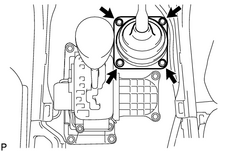
(c) Remove the 4 bolts and transfer shift lever boot. |
|
6. REMOVE ENGINE UNDER COVER
(a) Remove the front No. 1 and No. 2 under covers.
7. REMOVE FRONT EXHAUST PIPE
(a)
Remove the front exhaust pipes
and
.
8.
REMOVE FRONT PROPELLER SHAFT
9.
REMOVE REAR PROPELLER SHAFT
|
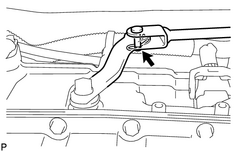
10. DISCONNECT FLOOR SHIFT TRANSMISSION CONTROL ROD (a) Remove the clip and pin and disconnect the shift control rod. |
|
|
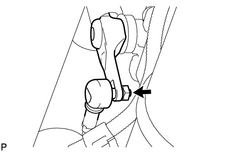
11. DISCONNECT TRANSFER SHIFT LEVER (a) Remove the nut and disconnect the transfer shift lever rod. Torque: 12 N·m {122 kgf·cm, 9ft·lbf} |
|
|
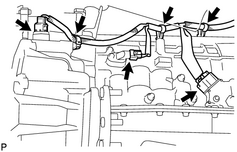
12. DISCONNECT WIRE HARNESS (a) Disconnect the 3 connectors. (b) Remove the 3 clamps from the transmission unit and disconnect the transmission wire. |
|
13. REMOVE AND TORQUE CONVERTER CLUTCH SETTING BOLT
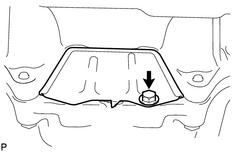
(a) Remove bolt and the hole plug.
|
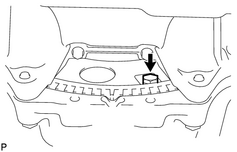
(b) Turn the crankshaft to gain access to each bolt. |
|
(c) Hold the crankshaft pulley nut with a wrench, and remove the 6 bolts.
|
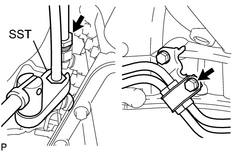
14. DISCONNECT OIL COOLER TUBE (a) Using SST, loosen the 2 union nuts. SST: 09023-12701 (b) Remove the bolt and clamp. (c) Remove the 2 union nuts and disconnect the 2 oil cooler tubes. |
|
|
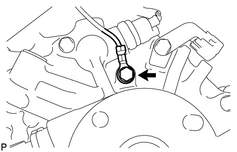
15. DISCONNECT GROUND CABLE (a) Remove the bolt and disconnect the ground cable. |
|
16. REMOVE CROSSMEMBER AND TRANSFER CASE PROTECTOR
(a) Support the transmission with a jack.
|
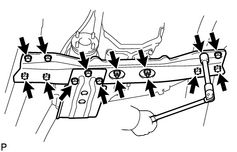
(b) Remove the 3 bolts and transfer case protector. |
|
(c) Remove the 8 bolts, 2 nuts and crossmember.
|
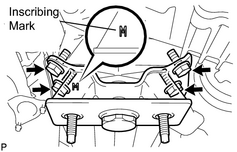
17. REMOVE ENGINE MOUNTING INSULATOR REAR (a) Remove the 4 bolts and mounting insulator. |
|
18. REMOVE AUTOMATIC TRANSMISSION ASSEMBLY
(a) Lower the rear end of the transmission unit.
(b) Remove the transmission wire clamp bolt.
|
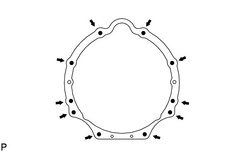
(c) Remove the 10 bolts and the transmission unit. |
|
|
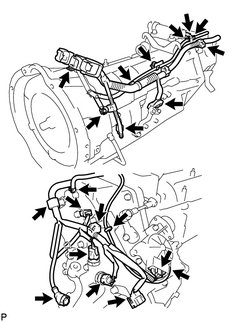
19. REMOVE WIRE HARNESS AND HOSE (a) Remove the 4 bolts. (b) Release the lock and disconnect the connector. (c) Disconnect the 5 connectors. (d) Disconnect the 6 connector clamps. (e) Disconnect the 5 hoses and remove the wire harness and hose. |
|
20. REMOVE TRANSFER ASSEMBLY
(a)
Remove the transfer
.
21. REMOVE TORQUE CONVERTER CLUTCH ASSEMBLY

|

|