| Last Modified: 7-3-2017 | 6.8:8.0.40 | Doc ID: RM000001A8U00AX |
| Model Year Start: 2007 | Model: LX470 | Prod Date Range: [08/2006 - ] |
| Title: SEAT: REAR NO. 1 SEAT ASSEMBLY (for RH Side): DISASSEMBLY; 2007 MY LX470 [08/2006 - ] | ||
DISASSEMBLY
1. REMOVE REAR SEAT HEADREST ASSEMBLY
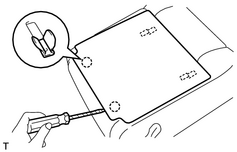
2. REMOVE REAR SEATBACK BOARD
|
(a) Using a screwdriver, remove the seatback board as shown in the illustration. HINT: Tape the screwdriver tip before use. |
|
3. REMOVE RECLINING ADJUSTER RELEASE HANDLE
(a) Using a screwdriver, remove the cover.
HINT:
Tape the screwdriver tip before use.
(b) Remove the screw and reclining adjuster release handle.
4. REMOVE NO. 1 RECLINING COVER
(a) Remove the 4 hog rings and open the seatback cover.
HINT:
At the time of reassembly, refer to the following item.
When installing the hog rings, avoid wrinkling the cover.
(b) Remove the 2 corner pads.
|
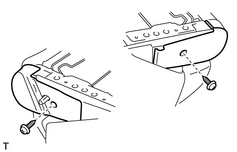
(c) Remove the 2 screws and 2 No. 1 reclining covers as shown in the illustration. |
|
5. REMOVE RECLINING CONNECTING WIRE
|
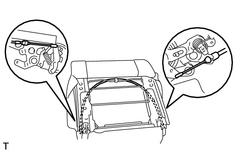
(a) Loosen the nuts, then remove the reclining connecting wire of RH side edge. |
|
(b) Remove the reclining connecting wire of LH side edge.
(c) Remove the clamp and reclining connecting wire.
6. REMOVE REAR NO. 1 SEATBACK ASSEMBLY
|
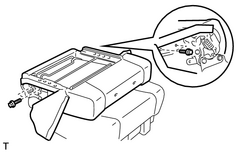
(a) Remove the 4 bolts and seatback assembly. Torque: 41 N·m {420 kgf·cm, 30ft·lbf} |
|
7. REMOVE REAR NO. 1 SEATBACK COVER
(a) Remove the 4 screws and reclining inner cover.
(b) Remove the 2 hog rings.
HINT:
At the time of reassembly, refer to the following item.
When installing the hog rings, avoid wrinkling the cover.
|
(c) Detach the hook, and then remove the headrest supports. |
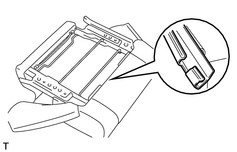
|
(d) Remove the seatback cover (with pad) from the seatback frame.
(e) Remove the 2 No. 1 protectors from the seatback frame.
(f) Remove the hog rings and seatback cover from the seatback pad.
HINT:
At the time of reassembly, refer to the following item.
When installing the hog rings, avoid wrinkling the cover.
8. REMOVE REAR SEAT CUSHION UNDER COVER LH
(a) Remove the screw and seat cushion under cover.
9. REMOVE REAR SEAT CUSHION UNDER COVER RH
(a) Remove the screw and seat cushion under cover.
10. REMOVE REAR NO. 1 SEAT CUSHION COVER
|
(a) Using a screwdriver, detach the hooks as shown in the illustration. HINT: Tape the screwdriver tip before use. |
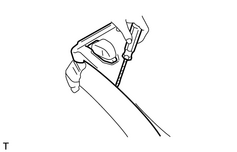
|
(b) Remove the seat cushion cover (with pad) from the seat cushion frame.
(c) Remove the hog rings and seat cushion cover.
HINT:
At the time of reassembly, refer to the following item.
When installing the hog rings, avoid wrinkling the cover.
11. REMOVE CUSHION
(a) Remove the screw and cushion from the seat cushion under cover sub-assembly.
12. REMOVE LOCK COVER
(a) Remove the screw and lock cover.
13. REMOVE RECLINING REMOTE CONTROL LEVER KNOB
(a) Remove the screw and reclining remote control lever knob.
14. REMOVE FOLD SEAT STOPPER BAND
(a) Remove the bolt and fold seat stopper band.
15. REMOVE REAR SEAT CUSHION UNDER COVER SUB-ASSEMBLY
|
(a) Remove the 8 screws and rear seat cushion under cover. |
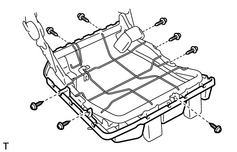
|
16. REMOVE REAR NO. 1 SEAT ADJUSTER INNER
(a) Remove the 2 bolts and rear No. 1 seat outer adjuster.
Torque:
41 N·m {440 kgf·cm, 32ft·lbf}
(b) Remove the hinge cover from the seat adjuster.
17. REMOVE REAR NO. 1 SEAT ADJUSTER OUTER
(a) Remove the 2 bolts and rear No. 1 seat outer adjuster.
Torque:
41 N·m {440 kgf·cm, 32ft·lbf}
(b) Remove the hinge cover from the seat adjuster.
18. REMOVE REAR NO. 1 SEAT INNER BELT
(a) Loosen the bolt, and then remove the rear No. 1 seat inner belt.
Torque:
43 N·m {440 kgf·cm, 32ft·lbf}
19. REMOVE NO. 2 FOLD SEAT LOCK CONTROL CABLE
|
(a) Loosen the clamp and No. 2 fold seat lock control cable as shown in the illustration. |
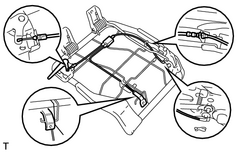
|
|
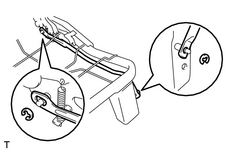
20. REMOVE NO. 1 SEAT LEG STAY (a) Using a screwdriver, remove the 2 E-rings and seat leg stay. HINT: Tape the screwdriver tip before use. |
|
21. REMOVE REAR SEAT CUSHION HINGE
(a) Using a screwdriver, remove the 2 E-rings.
HINT:
Tape the screwdriver tip before use.
(b) Remove the 2 hinge pins, 2 cushion spacers, 2 cushion support springs and 2 rear seat cushion hinges.
22. REMOVE REAR SEAT LOCK

|

|